Technology
Setting Up Multi-Factor Authentication using the Mobile App
Last modified 8/21/2026
This method requires you to install and keep the Microsoft Authenticator app on your phone. Deleting the application from your phone may prevent you from authenticating your account. This app is available for Android and iOS devices using the Google Play Store or the Apple App Store. Follow the instructions below when using this authentication method.
- NOTE: The mobile app is the most secure method for Multi-Factor Authentication (MFA), and is recommended for all.
If you have not yet enabled MFA on your account, please refer to the steps in the Enabling Multi-Factor Authentication article.
- When first logging on to a Microsoft 365 product off-campus on your computer or mobile device, you will be asked for additional security verification using MFA (Figure 1). It is recommended to use your computer when first setting up MFA to make QR code setup easier.
- Install the Microsoft Authenticator application on your phone before proceeding on your computer. Once downloaded from the Google Play Store or the App Store, click Next on the screen on your computer (See Figure 1 for an example).
Figure 1: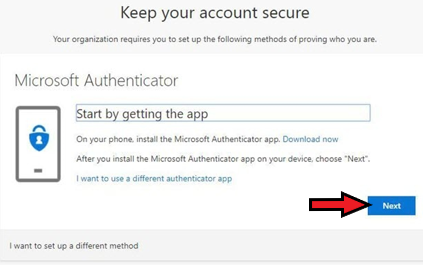
- Once downloaded, open the application on your phone and click the Add Account button. After that, you will see multiple options for adding an account. To add your ISU account, you will need to click Work or School Account. This will trigger a pop-up that asks how you would like to add the account. Select Scan QR Code (See Figure 2 for an example).
Figure 2: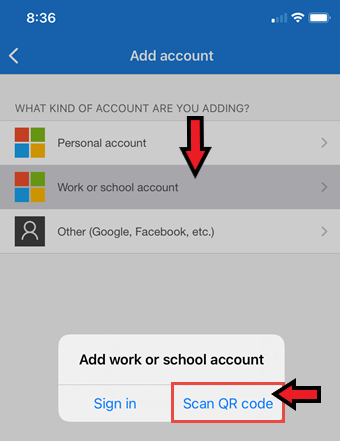
- Once your camera opens up after selecting the Scan QR Code option, select Next on the computer again until the QR code appears on your screen.
- Hover the camera over the QR code on your computer to scan it. (See Figure 3 for an example).
Figure 3: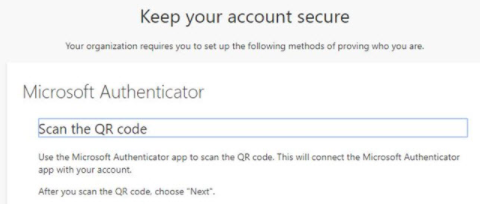
- Scan the QR code displayed on your computer screen to complete the mobile app configuration, then click Next. The account has now been added to your authenticator app. You will now need to test the notification prompt that is sent to your authenticator app. To continue with this, click the Next button in the "Let's Try it Out" screen (Figure 4 for an example). Click Next, then approve the sign-in request notification that's sent to your phone to complete the setup.
Figure 4: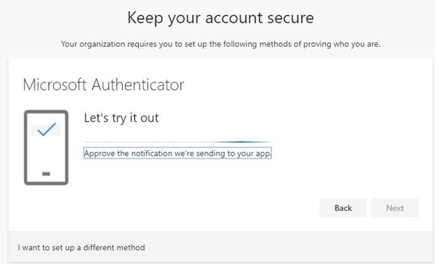
- After clicking Approve, you will receive a notification confirming that your setup was successful. Click Done to proceed with signing in (Figure 5 for an example).
Figure 5: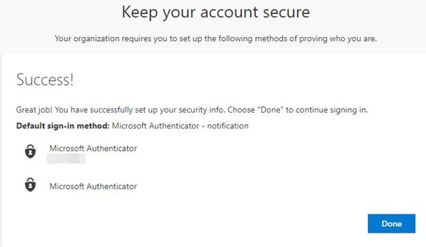
Please see the articles below for details on the other authentication methods
- Setting Up Multi-Factor Authentication Using Your Phone Number - Text Message Verification
- Setting Up Multi-Factor Authentication Using Your Phone Number - Phone Call Verification
- Setting Up Multi-Factor Authentication using a FIDO2 Security Key
- Setting Up Multi-Factor Authentication using Passkey
Multiple MFA verification methods recommended
It is recommended that you set up at least two MFA methods so you have a backup if one fails. Please see Adding Additional Verification Methods for Multi-Factor Authentication for instructions on setting up additional method(s). To change your default method, see Change the Default Method for Authenticating with MFA.
Videos
View the following videos to learn more about MFA:
How to Get Help
For questions about MFA, account access issues, MFA resets, or other technical assistance, contact the Technology Support Center at:
- Phone: (309) 438-4357
- Email: SupportCenter@IllinoisState.edu
- Submit a Request via Web Form: Get IT Help Form
- Live Chat: IT Help Live Chat
For in-person support, visit TechZone on the 1st floor of the Bone Student Center.
- Visit their website to see their opening hours, as they vary throughout the semester: TechZone.
Feedback
To suggest an update to this article, ISU students, faculty, and staff should submit an Update Knowledge/Help Article request and all others should use the Get IT Help form.