Technology
Using the Cisco Secure Client VPN Client
Last modified 4/23/2026
Important!
Effective May 28th, 2021 - Accessing ISU resources from off campus via VPN requires you to confirm your login with your multi-factor authentication method. Similar to email, you will receive and be required to act on the prompt when logging in. More information on multi-factor authentication may be found Multi-Factor Authentication (MFA)
Note
If you are looking for instructions on where to find the VPN software and how to download it, see: Installing Cisco Secure Mobility Client VPN.
When you are off campus, some of Illinois State University's electronic services are unavailable to you unless you establish a VPN connection.
Cisco Secure Client VPN is available to faculty, staff, and students that is used to access some campus resources from off campus locations.
Where do I get the VPN for my device?
Windows:
First you will want to check if you already have Cisco Secure Client VPN installed onto your machine. To do this, you can perform a quick search on your computer. For Windows machines, you can use the Search Field for your computer located in the lower left-hand corner of your desktop. Simply type in Cisco Secure Client. If nothing populates, you do not yet have the VPN installed. If it populates after searching for it, click on the Cisco Secure Client app, and proceed to the section below for Windows - 'Connect Using Cisco Secure Client.'
Mac:
First, you will want to check if you already have Cisco Secure Client VPN installed onto your Mac. To do this, you can perform a quick search using the Finder app on your mac. This is a search field in the upper right-hand corner that looks like a magnifying glass. Type in Cisco Secure Client. If nothing populates, you do not yet have the VPN installed. If it populates after searching for it, click on the Cisco Secure Client App, and proceed to the section below for 'MacOS - Connect Using Cisco Secure Client.'
Chromebook:
See the Chromebook VPN help article to download, install, and use the VPN on a Chromebook located here: Setting Up a VPN on a ChromeBook | Help - Illinois State
Cisco Secure Client VPN is not installed on my machine. Where can I get it?
If you have verified that Cisco Secure Client is not already installed on your machine using the instructions above, you can download the most recent version using the following steps. These steps are for both Mac and Windows machines. For assistance with using Cisco Secure Client on a phone, see: Connecting with Cisco Secure Client for Android Devices or Install and Connect with the VPN Profile for iOS.
How to Download Cisco Secure Client for Mac and Windows Machines
- Navigate to our Downloads Page.
- Scroll down to Cisco Secure Client VPN.
- For Windows machines, click on the Windows hyperlink and follow the steps in the installation process.
- For MacOS, click on the Mac hyperlink and follow the steps in the installation process.
- Once the installation is completed, you may need to navigate to your computer's Downloads folder to locate the Cisco Secure Client app. If you are having trouble locating it, use your computer's Search field (Finder for Macs) and type in 'Cisco Secure Client.'
- Click the Cisco Secure Client app. You should now be able to connect using the steps below under 'Connect Using Cisco Secure Client.'
Connect Using Cisco Secure Client
Alert
If you are a database user needing access to ISU Oracle, or SQL database resources, use the instructions listed in the following article: Connecting to Databases from Off-Campus.
Windows:
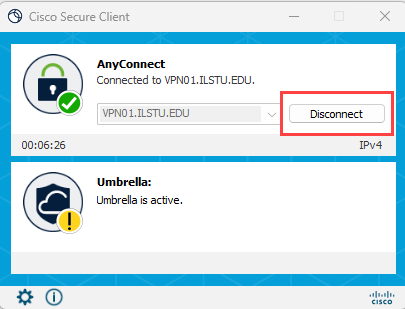
- Open Cisco Secure Client.
- Verify that the path in the Server field underneath Ready to connect is VPN01.ILSTU.EDU (Where 0 is a zero and not the letter O).
- If the path name does not automatically appear, click the arrow to the right of the field and select VPN01.ILSTU.EDU from the drop down menu, or enter the path name manually.
- Click the Connect button (Figure 1).
Figure 1: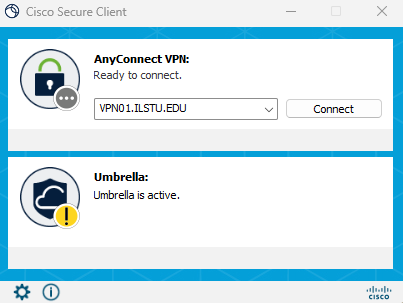
- Select the appropriate group to connect to from the group list.
- To access most ISU resources, select the group -ISU-.
- To access ISU Oracle or SQL database resources directly (via software such as Microsoft Access, Oracle SQL Developer, Microsoft SQL Management Studio, etc.), select DB-User_Access.
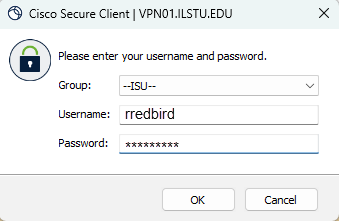
- Enter your ULID and password, then click OK.
- Be sure that you are entering just your ULID in lower case letters
- Do not use your ULID@ilstu.edu
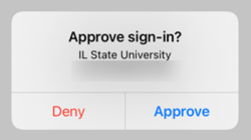
- You will be prompted to validate your login attempt using the MFA notification option you selected. Information on available MFA authentication methods and steps for using them can be found here: Sign in Using Multi-Factor Authentication
- Click the Approve button in the app on your mobile device.
You are now connected with the Cisco Secure Client VPN client.
MacOS:
- Open Cisco Secure Client.
- Verify that the path in the Server field underneath Ready to connect. reads VPN01.ILSTU.EDU (Where 0 is a zero and not the letter O). If the field is empty, type the address in the connection field (See Figure 1 above).
- Click the Connect button.
- Select the appropriate group to connect to from the group list.
- To access most ISU resources, select -ISU-.
- To access ISU Oracle or SQL database resources directly (via software such as Microsoft Access, Oracle SQL Developer, Microsoft SQL Management Studio, etc.), select DB-User_Access.
- Enter your ULID and password, click Connect.
- Be sure that you are entering just your ULID in lower case letters
- Do not use your ULID@ilstu.edu
- You will be prompted to validate your login attempt using the MFA notification option you selected. Information on available MFA authentication methods and steps for using them can be found here: Sign in Using Multi-Factor Authentication
Click the Approve button in the app on your mobile device. - Click Accept.
You are now connected with the Cisco Secure Client VPN client.
Disconnect from the VPN
Windows:
To disconnect from the VPN on a Window's machine:
- In the bottom right of your screen, locate the Cisco Secure Client client icon. If the icon isn't readily displayed, select the caret icon (^) to display hidden icons.
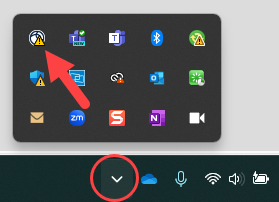
- Select the Cisco Secure Client client icon.

- This will open the Cisco Secure Client window. Click the Disconnect button.
- Close the Cisco Secure Client Secure Mobility Client window by clicking the X on the upper right of this window.
You are now disconnected from VPN.
MacOS:
To disconnect from a VPN connection on Cisco Secure Client on MacOS:
- Click on the Cisco Secure Client icon in your menu bar, located in the upper right of the screen.
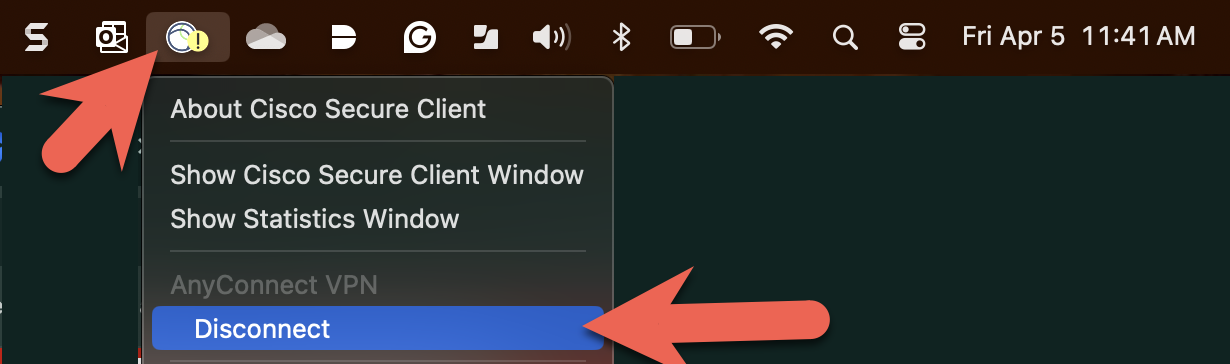
- Click Disconnect.
- Close Cisco Secure Client Secure Mobility Client.
You are now disconnected from VPN.
Alternatively, click on the Cisco Secure Client icon in your dock and click Disconnect.
How to Get Help
Technical assistance is available through the Illinois State University Technology Support Center at:
- Phone: (309) 438-4357
- Email: SupportCenter@IllinoisState.edu
- Submit a Request via Web Form: Help.IllinoisState.edu/get-it-help
- Live Chat: Help.IllinoisState.edu/get-it-help
Feedback
To suggest an update to this article, ISU students, faculty, and staff should submit an Update Knowledge/Help Article request and all others should use the Get IT Help form.