Technology
Adding & Removing Users in Microsoft 365 Groups
Last modified 7/11/2023
The steps below will help you remove and add users to all Microsoft groups you are currently the owner of.
Group Owner Functionality
Please note that these steps will only work if you are the owner of a Microsoft 365 Group. If you are a member of a group, you will not have this functionality.
Web App Only
You may only perform these steps on the Outlook Web app version. https://outlook.office365.com/
How to add users
- Sign into your Outlook account on the Web version.
- Go over to the side toolbar and click on the People tab. (Figure 1)
Figure 1: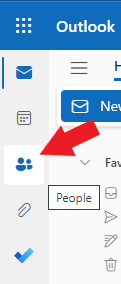
- Expand Groups, and then click on Owner (FIgure 2)
Figure 2: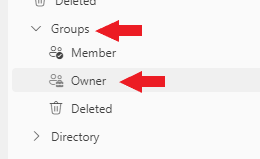
- You will see the list of groups that you are the owner of. Select the group you are wanting to add a user to.
- Click on the Members tab, and then click on Add members. (Figure 3)
Figure 3:
- Underneath Add members start entering in names or email address of users you want to add to the group. (Figure 4)
- Once you have found a user, click on their name and their name will display on a list below.
- Make sure to have them marked as "Members". (Figure 4)
- Once you have added all the members, go ahead and click on Add. (Figure 4)
Figure 4: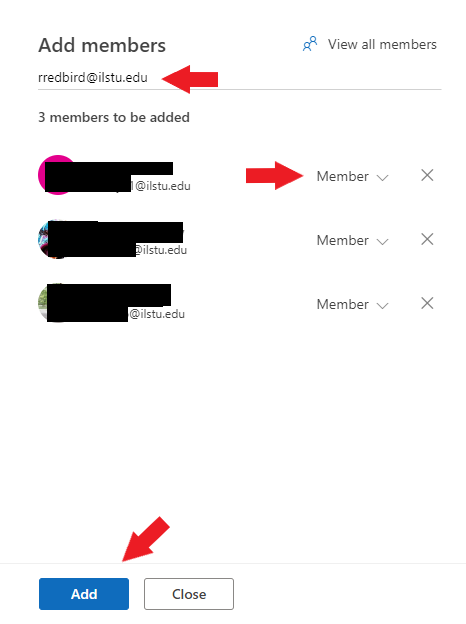
- You will receive a confirmation message stating that " # members successfully added ". You may then click on Close
The members should then receive a notice that they were added to the group. The notice should look like the screenshot below.
How to remove users
Follow steps 1-5 from above but do not click on Add members.
- Go down the member list of who you want to remove and click on the "X" that is on the right
- Click Yes
It may take a few seconds, but the member you removed will disappear from the list.
Getting Help
For Technical Assistance, you can Submit a Help Ticket, or contact the Technology Support Center at (309) 438-4357 or by email at SupportCenter@IllinoisState.edu
Similar Articles
- Microsoft 365
- Launching Apps in Microsoft 365
- Unable to Log in to Microsoft 365
- Adding & Removing Users in Microsoft 365 Groups
- Microsoft OneNote
- Microsoft Power BI
- Microsoft OneNote Class Notebook
- Microsoft Planner
- Microsoft Project
- Microsoft SharePoint
- Microsoft Stream (on SharePoint)
- Microsoft Teams
- Microsoft To Do
- Office Online
- Microsoft OneDrive
- Uninstalling Microsoft Office