Technology
Recording a Zoom Meeting to the Cloud
Last modified 4/21/2026
When you are in a Zoom meeting, you are able to record the meeting locally to your computer as well as to the Zoom Cloud. This article will cover how to record your Zoom meeting to the Cloud.
Note:
Course instructors will have access to Zoom Cloud Recording automatically. However, Staff members that want access to Zoom Cloud Recording will need to request it. Staff can make a request ticket at Get IT Help Form.
Before You Begin:
The following must be understood prior to recording your meetings in any location:
- Consent must be provided by all meeting attendees before recording the session.
- Zoom recordings should avoid gallery view (thumbprint-sized photos) to avoid any violation of FERPA. Meeting hosts should change their view prior to recording. Instructions on how to do so can be found here: Switching Views in a Zoom Meeting.
- View the Illinois State FERPA information for more information on FERPA
- Recordings or screenshots of meetings should not be shared or posted to external services (e.g. social media).
- Cloud storage is shared by all ISU users and is limited. Zoom meeting recordings will only be retained for 30 days and any recordings left in the cloud storage after that timeframe will be be deleted. Recordings may be moved to stored in another location, such as your local computer.
- Recording a meeting makes it more vulnerable to being shared with others and/or downloaded to personal computers.
Recording a Zoom Meeting to the Cloud
- Open Zoom and start your meeting.
- When you are ready to record the meeting, click the Record button on the menu bar. You will select Record to the Cloud. Your meeting should start to record instantly. (Figure 1)
Figure 1: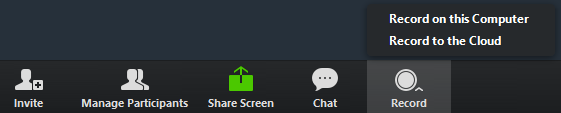
- Your meeting is now recording. You have the ability to either pause the recording or stop the recording. You can resume the recording whenever you would like after pausing it. (Figure 2)
Figure 2: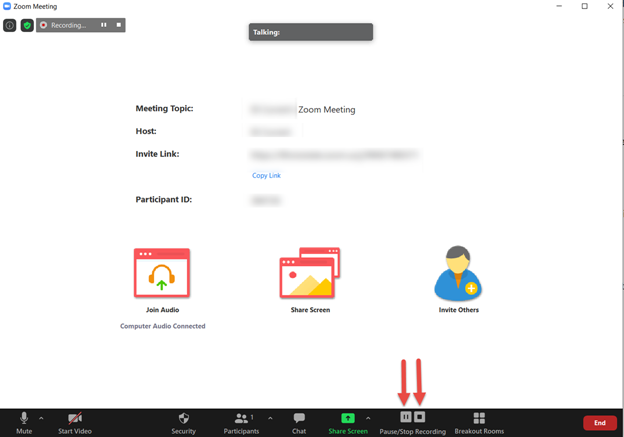
- Once you want to end the recording, click Stop Recording. This will stop the recording, but not the meeting. Stop the meeting to begin the rendering process.
- The meeting should now be rendering. When the meeting is finished rendering and is available for viewing, you will receive an email notification. The email will have two links to access the video; one link that allows only the host to access, and another link that the host can share to the meeting participants, which requires a password to view. The password is shared in the email for the host to share with the meeting participants. This method prevents unwanted users from accessing the recording.
The rendering process for Cloud recordings can take quite a bit of time. Please do not attempt to interrupt the rendering process, otherwise your video will become corrupted and may not save correctly, or at all.
Tips for Recording Your Meeting
- When you are recording your meeting, please be aware that stopping the recording will NOT stop the meeting. However, stopping the meeting WILL stop the recording and it will begin to render.
- When pausing the recording, you can resume whenever you would like and it will not interrupt the meeting.
- It can take over an hour to render your Cloud meeting, depending on the length. Please do not attempt to turn off your machine or sign out of it, otherwise it will corrupt the recording and it will not render. Cloud recordings take much longer to render than local recordings.
- Once your meeting is done rendering, go to Illinois State Zoom Portal and sign in with your ULID and password.
- Click Recordings on the left panel.
- Click Cloud Recordings if it is not already selected for you.
- You should see your meeting under Cloud Recordings. To download it, click the More drop down button and select Download. The three files that are downloaded are the video, audio, and transcript recordings of the meeting.
- The meeting is now in your Downloads folder by default.
Troubleshooting
It seems to be taking a long time for my Cloud recording to render. Why is that?
There are multiple variables when it comes to rendering a Zoom meeting. These variables include how long the meeting ran, if there was screen sharing, how much server space there is, and more. The longer the meeting, the longer the rendering time will be. If you find that your recording is taking an unusually long time to render, please do not attempt to restart your machine, as it can corrupt the recording. Your recording should not take longer than a couple of hours to render.
Cloud recordings especially take longer. The high volume of Cloud recordings across campus makes the rendering process even slower. If you find that it takes a long time to render the video, please wait for it to finish, as it will eventually finish.
My recording is nowhere to be found in the Cloud. Where could it be?
There are a few reasons why a recording could be missing.
If you have turned off your machine during the rendering process, or your computer suddenly turned off or lost power, the recording will not render and could become corrupt, which will result in a missing recording. If you lose internet connection during the rendering process, it will stop the rendering process and the video will not save to the cloud. Having a reliable internet connection is the best way to ensure that your Cloud recording will save to the Cloud. In rare cases, the recording may not render at all, and this could be due to a potential client-side error.
How to Get Help
Technical assistance is available through the Illinois State University Technology Support Center at:
- Phone: (309) 438-4357
- Email: SupportCenter@IllinoisState.edu
- Submit a Request via Web Form: Get IT Help Form
- Live Chat: IT Help Live Chat
Feedback
To suggest an update to this article, ISU students, faculty, and staff should submit an Update Knowledge/Help Article request and all others should use the Get IT Help form.