Technology
Sending Messages and other Features in Microsoft 365 Email
Last modified 1/6/2025
This article covers how to send and respond to messages using the Outlook Web Mail Web app.
To send a new email in Microsoft 365, do the following:
- Go to Office365.IllinoisState.edu, log in with your full email address (ex; ULID@ilstu.edu), and launch the Outlook app.
- Click New Message at the top left corner of your inbox.
- A New Message Template will appear in the pane on the right.
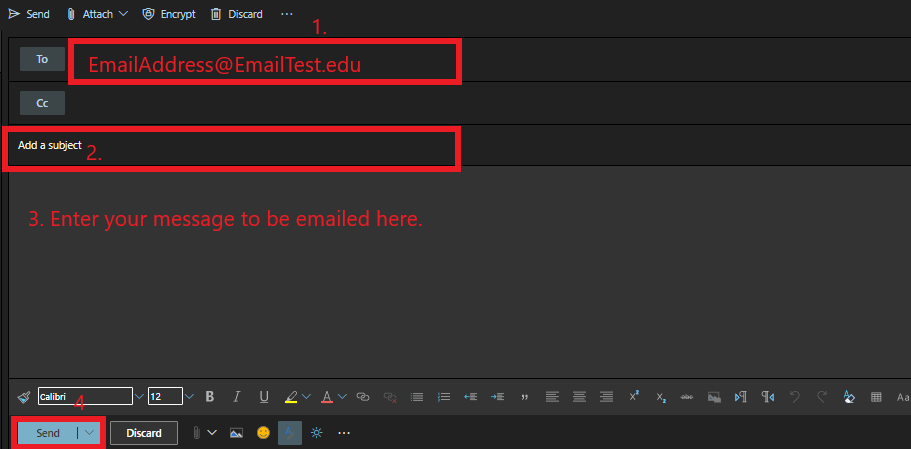
- Type the Email Address of the person or organization you wish to contact in the field next to To.
- Type in a Subject for your message in the field labeled Add a Subject.
- Type your message into the field provided beneath the Subject line. (See Figure 1, Step 3)
- When you have concluded your message and are ready to send it, press or click the Send button (See Figure 1 for a visual representation of these steps).
Figure 1:
When sending from your ISU email account, simply typing the last/first name of the individual you are wanting to reach will bring up that person's email address. Students are not included in this function.
Replying to an Email
To reply to an email, do the following:
- Go to Office365.IllinoisState.edu, log in with your full email address (ex; ULID@ilstu.edu), and launch the Outlook app.
- Click on the Outlook Icon to be taken to your Inbox.
- Click on a message in your Inbox to view its contents. Double click the message for a pop-out window of the message.
- Click the Reply button to respond, or click the ellipses next to at the top-right corner for Reply All as well as other options.
- Add your reply and click Send at the top of the message.
Adding Recipients
To add recipients do one of the following:
- As you type in the To field, Outlook Web App will display matches it finds. Click on one of the matches to add that email address to your message.
- Clicking on To (or Cc or Bcc) will bring up your Microsoft 365 My contacts list and allows you to add recipients.
- Searching My contacts returns matches from both your personal contacts and the University's people directory.
- Use the Cc field to send a copy of your email to one or more additional recipients.
- You can add the Bcc field by clicking the ellipsis above the message. From the menu, click Show Bcc.
- To remove a recipient before sending the message, click the x next to the item you want to remove.
- Multiple email addresses must be separated by semi-colons (e.g., TestMail1@Ilstu.edu; TestMail2@ilstu.edu).
Adding Attachments
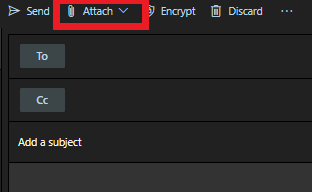
You can attach files to your email by clicking the Attach button above the message. This allows you to attach files stored in OneDrive or on your local computer. (Figure 2)
Figure 2:
- You can also attach files by dragging and dropping them directly into the body of the message.
- To remove an attachment before sending the message, click the x next to the item you want to remove.
- The size limit on sending email in Microsoft 365 is 50MB. This size limit applies to the message contents itself, as well as any attached files.
- For Files over 50MB, we recommend using SendTo, our secure emailing software. For more information on SendTo, see: How to drop off and pick up files in SendTo
How to Get Help
Technical assistance is available through the Illinois State University Technology Support Center at:
- Phone: (309) 438-4357
- Email: SupportCenter@IllinoisState.edu
- Submit a Request via Web Form: Help.IllinoisState.edu/get-it-help
- Live Chat: Help.IllinoisState.edu/get-it-help
Feedback
To suggest an update to this article, ISU students, faculty, and staff should submit an Update Knowledge/Help Article request and all others should use the Get IT Help form.

