Technology
Troubleshooting - Epson SC-9000
Last modified 4/24/2026
- Product Status Messages
- Solving Printer Problems
- Solving Printing Problems
- Solving Paper Problems
- Solving Print Quality Problems
Product Status Messages
You can often diagnose problems with your product by checking the messages on the LCD screen.
LCD screen message | Condition/solution |
Ink Cartridge Error Ink cartridge cannot be recognized. Insert again or replace ink cartridge. | The ink cartridges have a problem.
|
Ink Cartridge Error Ink cartridge cannot be detected. Insert again or replace ink cartridge. | |
Ink Cartridge Error Please install the correct ink cartridge. | Insert a genuine Epson ink cartridge that is approved for use in the printer. |
Ink Low | The ink is low. Make sure you have a replacement ink cartridge handy. |
Cleaning Error Automatic head cleaning failed. Retry? | The printer nozzles are still clogged even after running the automatic head cleaning. Select Yes to run another automatic head cleaning. |
Paper Load Error No paper detected. | The loaded paper is not detected by the printer. Check the following:
|
Paper Eject Error Could not eject paper. | Check the following:
Paper Source setting. |
Paper Cut Error Remove uncut paper. | Press the OK button, pull down on the paper, and cut it using scissors or another manual cutter. |
Paper Size Error Loaded paper size is not supported size. | The loaded paper is not a supported width. Remove the paper and press the OK button. If the message still appears when you have loaded paper in a supported width, set the Paper Size Check setting to Off. |
Paper Sensor Error Loaded paper or print out has a problem. | The loaded paper is not detected correctly by the printer. Press the pause/cancel button. If this error appears while performing an automatic head alignment, check the following:
If this error appears at any other time, make sure that the printer supports the loaded media. |
F/W Install Error Firmware update failed. Restart the printer. | The firmware updated did not install. Turn off the printer, wait for awhile, and turn on the printer again. Then run the firmware update file again. If the message still appears, contact Epson for support. |
Command Error Check driver settings. | The printer driver sent an invalid or incorrect command to the printer. Press the pause/cancel button and select Job Cancel. Make sure that the driver you are using supports your product. |
Reel Unit Error Check Auto Take-up Reel Unit and restart printer. | Turn off the printer, wait for awhile, and turn on the printer again. If the message still appears, contact Epson for support. |
Reel Unit Error Check Auto Take-up Reel Unit cable and restart printer. | Reconnect the cable that runs from the optional Auto Take-up Reel and the printer. |
Reel Unit Disconnected Auto Take-up Reel Unit is disconnected. Do you continue? | The optional Auto Take-up Reel is not connected. Reconnect the unit and select No on the control panel to turn the printer off. Wait a moment, then turn the printer on again. To continue printing without the Auto Take-up Reel, select Yes on the control panel. See the Auto Take-up Reel documentation for more details. |
Take-Up Error Is anything obstructing the take-up reel sensor system? | The optional Auto Take-up Reel cannot take up media. Check the optional Auto Take-up Reel sensor and clear any obstructions, then press the OK button. If there is any loose paper on the Auto Take-up Reel roll core, set the Auto switch to Off and hold the Manual switch in the take-up direction to remove slack in the roll paper. Confirm that the paper is attached to the roll core correctly, then return the Auto switch to the original position and press the OK button. |
HDD Error HDD used for another printer needs to be formatted. Continue? | The inserted hard drive is not formatted or is formatted for another printer. You must format an optional internal print server that has been used with another printer before using it with your product. Select the Format Hard Disk setting in the Administrator Menu. |
Storage Error Check if hard disk unit is correctly installed. | The optional internal print server cannot store the current print job. Press the pause/cancel button and select Job Cancel, then remove and reinstall the optional internal print server. If the message still appears, contact Epson for support. To continue printing regardless of the optional internal printer server's status, select Print only from the Hard Disk Unit menu in the printer driver. |
Data Size Error Data size of print job is too large. Check on print job. | The optional internal print server can store individual print jobs that are 100GB in size. To print larger jobs, select Print Only from the Hard Disk Unit menu in the printer driver. |
HDD Store Error Hard disk does not have enough space. See documentation for how to delete stored print jobs. | There is insufficient space on the optional internal print server. Delete some print jobs from the optional internal print server using the Remote Manager or LFP HDD Utility (Windows only). |
HDD Boot Error Hard disk error. Hard disk cannot be used. | Press the OK button. If the message still appears, contact Epson for support. To continue printing regardless of the optional internal printer server's status, select Print only from the Hard Disk Unit menu in the printer driver. |
Held Jobs Limit Held job queue full. | The optional internal print server has reached the limit of 200 held jobs. Press the OK button and select Resume All Jobs. |
Checking hard disk | Data on the optional internal print server is currently being checked. If the results of the check show that data restoration is necessary, the optional internal print server will start the restoration process. This may take up to 20 minutes. If the optional internal print server cannot restore the data, the Format Hard Disk option appears on the LCD screen. Format the optional internal print server to continue using it. If you do not format the disk, you will not be able to print with the optional internal print server. |
SP Connection Error See manual and reconnect cables of SpectroProofer Mounter to printer. | The optional SpectroProofer mounter is not connected correctly. Turn off the printer and make sure the SpectroProofer mounter is connected correctly. Wait a moment, then turn on the printer again. See the SpectroProofer mounter documentation for more details. |
SProofer Disconnected SpectroProofer Mounter is not recognized. Continue? | The optional SpectroProofer mounter is not connected correctly. Reconnect the cables and select No to turn off the printer. Wait a moment, then turn on the printer again. If you do not want to use the optional SpectroProofer, select Yes. See the SpectroProofer mounter documentation for more details. |
ILS30EP Error See manual and reconnect ILS30EP to SpectroProofer Mounter. Turn printer off and on again. | The optional SpectroProofer UVS is not installed correctly. Turn off the printer and make sure the SpectroProofer mounter is connected correctly. Wait a moment, then turn on the printer again. See the SpectroProofer UVS documentation for more details. |
ILS30EP Disconnected ILS30EP is not recognized. Continue? | The optional SpectroProofer UVS is not connected correctly. Reconnect the cables and select No to turn off the printer. Wait a moment, then turn on the printer again. If you do not want to use the optional SpectroProofer UVS, select Yes. See the SpectroProofer UVS documentation for more details. |
SpectroProofer Error See documentation for how to solve the problem. (error code) | See the SpectroProofer documentation for details on the displayed error code. |
Maintenance Request Replace Part Soon/Replace Part Now (maintenance request code) | A part used in the printer is nearing the end of its service life. Contact Epson for support and provide them with the displayed maintenance request code. The error persists until you replace the requested part. |
Call For Service (service code) Power off and then on. If this doesn't work, note the code and call for service. | A call for service occurs when:
When a call for service has occurred, the printer automatically stops printing. Turn off the printer, disconnect the power cable from both the outlet and the printer, and reconnect them. Turn the printer on and off several times. If the same call for service is displayed on the LCD screen, contact Epson for support and provide them with the displayed service code. |
Solving Printer Problems
Printer Does Not Turn On
If the printer does not turn on, try these solutions:
- Make sure the power cable is securely connected.
- Make sure the power outlet works by connecting the power cable for another electronic device.
LCD Screen Shuts Off
If the LCD screen shuts off intermittently, the printer may be in Sleep Mode. Try these solutions:
- Press any of the buttons on the control panel to exit sleep mode.
- You can adjust the delay time before the product enters sleep mode in the Power Settings menu.
Solving Printing Problems
Nothing Prints
If you have sent a print job and nothing prints, try these solutions:
- Make sure your printer is turned on.
- Make sure any interface cables are connected securely at both ends. If you have a spare cable, try connecting with the spare cable.
- Check the model and specifications of the interface cable to see if the cable is appropriate for your computer and printer.
- If you connected your printer to a USB hub, make sure it is a first-tier hub. If it still does not print, connect your printer directly to your computer instead of the hub.
- Make sure the USB hub is recognized correctly on the computer. Disconnect all USB hubs from the computer and connect the printer directly to the computer's USB port.
- Make sure the USB cable length does not exceed 10 feet (3 m).
Cannot Print Over a Network
If you cannot print over a network, try these solutions:
- Make sure that your printer is turned on.
- Make sure you installed your printer's network software as described in the Network Guide.
- If you are using TCP/IP, make sure the printer's IP address is set correctly for your network. If your network does not assign IP addresses using DHCP, set the IP address manually.
- Check your wired LAN router or access point to see if the LED for the port to which your printer is connected is on or flashing. If the link LED is off, try the following:
- Make sure the Ethernet cable is securely connected to your printer and to your router, access point, switch, or hub.
- Try connecting your printer to a different port or a different router, access point, switch, or hub.
- Try connecting with a different Ethernet cable.
- Try printing to your printer from another computer on the network.
Print Head Moves But Nothing Prints
If the print head is moving and nothing prints, try these solutions:
- Print a nozzle check pattern. If the pattern does not print correctly, clean the print head again. (If the printer has not been used for a long time the nozzles may be clogged.)
- If you see the message Motor Self Adjustment on the product's LCD screen, the printer is adjusting its internal motor. Wait a few moments for the message to disappear and do not turn off the printer.
Red Light Shines Inside the Printer
The red light always shines inside the printer. This is normal.
Solving Paper Problems
Paper Feeding Problems
If you have problems feeding paper, try these solutions:
- Make sure paper is loaded in the correct orientation. Load cut sheets vertically.
- For best results, follow these guidelines:
- Use new, smooth, high-quality paper that is not damp, curled, creased, old, too thin, or too thick.
- Follow any special loading instructions that came with the paper.
- If roll paper does not feed, cut the end straight across and uncurl it by rolling it backward, if necessary. Then reload the paper.
- If you cannot insert paper easily into the paper feed slot, make sure the paper is perfectly flat and not curled.
- Do not load more than one piece of cut sheet paper.
- Make sure your paper meets the specifications for your product.
- If thick media does not feed, make sure you are loading it straight into the product, not at an angle.
- If paper does not eject correctly, decrease the Paper Suction setting for the loaded paper type.
- Make sure that paper is not jammed inside the product.
Roll Paper Jam Problems
If roll paper has jammed in the printer, follow the steps here to clear the jam.
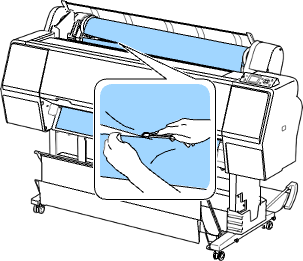
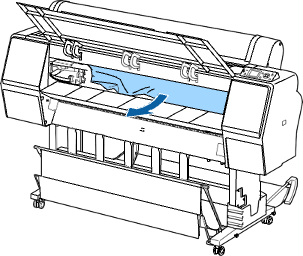
- Open the roll paper cover.
- Cut the paper above the paper feed slot.
- Check that the pause/cancel light is not flashing and press the load paper button.
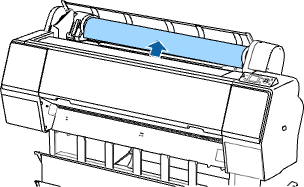
- Rewind the roll paper
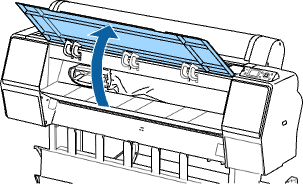
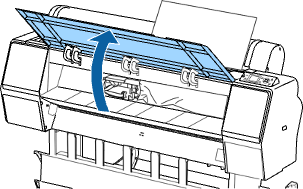
- Open the front cover.
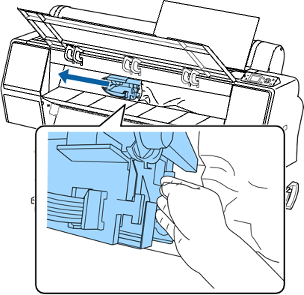
Caution: Do not touch the ribbon cable inside the printer. - Carefully move the print head away from the paper jam.
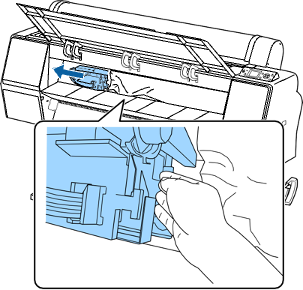
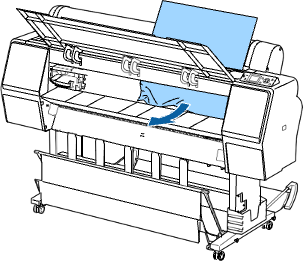
Caution: Do not touch the print head unless you are removing a paper jam. Touching the print head may cause a static shock that damages the printer. - Remove the jammed paper.
- Close the front cover.
- Turn the printer off and back on again.
- Cut the edge of the roll paper straight horizontally, then reload the roll paper.
Note: Make sure to cut off any jagged or folded sections of paper.
Cut Sheet Paper Jam Problems
If cut sheet paper has jammed in the printer, follow the steps here to clear the jam.
- Open the front cover.
Caution: Do not touch the ribbon cable inside the printer. - Carefully move the print head to the opposite side of the printer from the paper jam.
Caution: Do not touch the print head unless you are removing a paper jam. Touching the print head may cause a static shock that damages the printer. - Remove the jammed paper.
- Close the front cover.
- Turn the printer off and back on again.
- Reload the paper, making sure it is not skewed.
If paper does not collect correctly in the paper basket, try these solutions:
- If paper does not collect in the basket, gently press on the paper basket as paper is ejected from the printer. This prevents the paper from catching on the basket.
- If the paper folds after cutting, set the Auto Cut setting to Off. Cut the paper manually while supporting the print.
- If the paper creases and does not collect in the basket, close the basket and resume printing. Before the paper reaches floor, hold the paper with both hands and continue to support it until printing is complete. Do not load more than one piece of cut sheet paper at a time.
Solving Print Quality Problems
Nozzle Check Pattern Prints Incorrectly
If the nozzle check pattern does not print correctly, try these solutions:
- Clean the print head and print the check pattern again. If cleaning the print head several times does not solve the problem, use a stronger print head cleaning level.
- If the printer has not been used for a long time, nozzles may be dried and clogged. Turn the printer on at least once every two weeks to prevent the nozzles from clogging.
Overall Print Quality is Poor
If you notice that your print quality is uneven, too light, too dark, or there are lines in the print (banding), try these solutions:
- Run a nozzle check to see if any of the print head nozzles are clogged. Then clean the print head, if necessary.
- Align the print head.
- Make sure you are using genuine Epson ink cartridges. If you use non-Epson ink cartridges, the print result may be faint or the color of the printed image may be inaccurate because the remaining ink level is not correctly detected.
- Make sure your ink cartridges have not expired. For best results, use ink cartridges before the expiration date printed on the package (within six months of installation in the printer). Replace expired cartridges with new ones.
- Shake the cartridges before installing them in the printer. To maintain optimum print quality, remove and shake the installed cartridges if the printer has not been used in the last three months.
- Make sure you selected the correct Media Type setting in the printer driver that matches the paper loaded in the printer.
- Compare the print result with the image on your computer screen. Since monitors and printers produce colors differently, printed colors and screen colors do not always look the same.
- Make sure that the printer cover is closed during printing.
- Check the ink levels on the LCD screen. Replace any cartridges that are low on ink.
- Enable color management in the software application or in the printer driver.
- If you are using non-Epson media, make sure you create a custom paper configuration for the media.
- Check the quality setting that you selected in the printer driver. Using a faster printing method may decrease the overall print quality.
Lines Are Misaligned
You may see vertical lines in the (bi-directional) print output. If this occurs, align the print head.
Prints are Scuffed or Smeared
If your prints are scuffed or smeared, try these solutions:
- Make sure your paper meets the specifications for your product.
- Do not use paper with folds or creases and always use new media.
- If you are using cut sheet paper, check that changes in humidity and temperature have not made the paper wavy. Flatten the paper before loading it or use new paper.
- If the surface of the paper is scuffed, select a wider Platen Gap setting.
- If the bottom edge is scuffed, try widening the bottom margin.
- If ink is smeared on your prints, clean the rollers. Load blank paper and press the paper feed button to feed it through the printer.
- If you are using non-Epson media, make sure you create a custom paper configuration for the media.
- Make sure the Paper Size Check setting is set to On, or the printer may print outside the edges of the loaded paper and smear ink on the back of the print.
- Depending on the print density and type of paper you are using, the ink may take a while to dry. Do not stack the prints until the ink is completely dry.
Margins Appear in Borderless Prints
If borderless prints still have margins, try these solutions:
- Check the print settings selected in your print application you are using, as well as the printer driver.
- Make sure that the paper settings on the LCD screen match the paper you loaded.
- Make sure borderless enlargement is not set to Min in the printer driver.
- Paper that is stored incorrectly may expand or contract. Make sure you have stored the paper according to the manufacturer's specifications.
- Check that the paper you are using supports borderless printing.
- If you are using roll paper, change the Adjust Cut Position setting. This may reduce the margins at the top and bottom of the print.
Too Much Ink is Consumed
If your printer is consuming too much ink during printing, try these solutions:
- Make sure you selected the correct Media Type setting in the printer driver that matches the paper you loaded in the printer. The amount of ink used during printing is controlled by the Media Type setting.
- Lower the density of ink in the Paper Configuration menu in the printer driver.
Feedback
To suggest an update to this article, ISU students, faculty, and staff should submit an Update Knowledge/Help Article request and all others should use the Get IT Help form.