Technology
Loading Roll Paper
Last modified 4/24/2026
You can load roll paper with a 2- or 3-inch core and a width of up to 24 inches (61 cm) (SC-P6000/SC- P7000) or 44 inches (112 cm) (SC-P8000/SC-P9000).
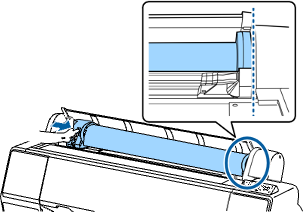
- Open the roll paper cover.

- Firmly push down the lock lever on the roll paper holder and move the holder to the left.
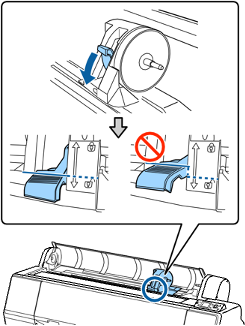
Note: Make sure you push the lock lever all the way down to unlock it completely. - Place the roll paper on top of the printer.

- If necessary, slide the tabs on the roll media adapters to the position that matches the core size of the roll paper.
- 2-inch core:

- 3-inch core:

- 2-inch core:
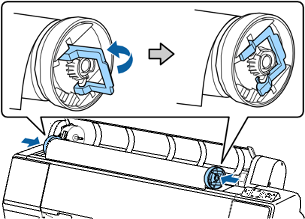
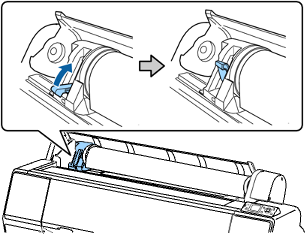
- Release the tension levers on both roll media adapters.

- Push the adapters into the paper core at both ends of the roll. Then push down the tension levers.
- Move the roll paper to the right side until it touches the roll paper guide.
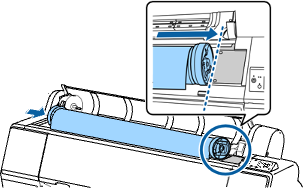
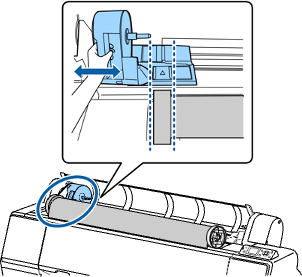
- Slide the roll paper holder until the left adapter aligns with the arrow on the holder.
- Roll the paper slowly into position.

- Slide the roll paper holder to the right to secure it in the printer. Make sure both ends of the roll paper are secured in the adapters.
- Pull up the lock lever on the roll paper holder to it in place.
- If the load paper light is not on, press the load paper button.
- Insert the paper into the paper feed slot and pull it down until the edge of the paper is even with the center of the stand.
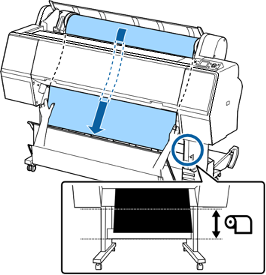
Note: If the paper does not feed through the slot, you may need to decrease the suction by pressing the paper feed button. Make sure you return the suction to its default setting after the paper is loaded. - Close the roll paper cover.

Note: To prevent dust from accumulating inside the printer, always keep the roll paper cover closed unless you are loading or unloading media. - Press the load paper button.
Note: An uneven or damaged leading edge on the roll paper may cause loading issues. Press the paper cut button once within 3 seconds of pressing the load paper button to trim the edge of the roll paper. - Press the pause/cancel button to move the paper into printing position or wait for the paper to move into position automatically.
- On the screen that appears, select one of the following settings:
• If the paper settings are correct, select Keep Settings Above.
• Select Change Settings so you can adjust the settings. - Press the OK button.
To avoid indenting or creasing the paper, remove it from the paper path and roll it up when you are not printing.
Note: Store roll paper on its end or horizontally (if the packaging end-caps are installed). Never store roll paper on its edge, as a flat spot can develop and lead to imaging artifacts on the prints.
Feedback
To suggest an update to this article, ISU students, faculty, and staff should submit an Update Knowledge/Help Article request and all others should use the Get IT Help form.