Technology
Loading Cut Sheets
Last modified 4/23/2026
Loading Cut Sheets
Always load cut sheet paper in the portrait orientation (short edge first). You can load most photo and fine art sheet papers up to 19 mil (0.5 mm) thick without pressing the load paper button.
Note: Make sure the paper path is clear and any roll paper is rolled up before you load cut sheet paper.
- Make sure the printer is turned on and the roll paper cover is closed.
- Press the paper source button.
- Select Cut Sheet and press the OK button.
- Feed the sheet into the right side of the paper slot until it meets resistance. Align the sheet with the vertical line on the roll paper cover.
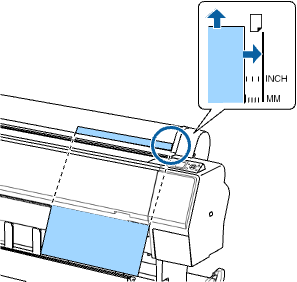
Note: For paper smaller than letter or A4 size, align the right edge of the sheet with the vertical line below the roll paper cover.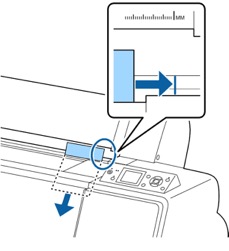
- Press the paper feed button. The sheet feeds into printing position automatically.
- On the LCD screen, select one of these settings:
- If the paper settings are correct, select Keep Settings Above.
- Select Change Settings so you can adjust the settings.
- Press the OK button.
- Print your page. After printing, the sheet stays in the printer.
- To remove your print, hold the sheet and press the paper feed button.
Note: Store cut sheet media flat in its original packaging. Storing sheet media unprotected or on its long or short edge can lead to excess paper curl and cause damage to the printer and ruined prints.
Loading Thick or Large Cut Sheets
Load most thick or large papers in the portrait orientation (short edge first). Load paper that is more than 19 mil (0.5 mm) thick and 30 inches (762 mm) long in landscape orientation (SC-P8000/SC-P9000).
Note: Make sure the paper path is clear and any roll paper is rolled up before you load cut sheet paper.
- Make sure the printer is turned on and the roll paper cover is closed.
- Press the paper source button.
- Select Cut Sheet and press the OK button.
- Press the load paper button.
- Feed the sheet into the right side of the paper slot until the trailing edge is below the horizontal line on the roll paper cover.

- Adjust the paper until the right and top edges are aligned with the horizontal and vertical lines on the printer.
Note: You may need to increase the suction by pressing the up arrow button. This helps hold the paper in place during loading and printing. - Press the load paper button.
- Press the pause/cancel button to move the paper into printing position or wait for the paper to move into position automatically.
- On the LCD screen, select one of the following:
- If the paper settings are correct, select Keep Settings Above.
- Select Change Settings so you can adjust the settings.
- Press the OK button.
- Print your page. After printing, the sheet stays in the printer.
- To remove your print, hold the sheet and press the paper feed button.
Note: Store cut sheet media flat in its original packaging. Storing sheet media unprotected or on its long or short edge can lead to excess paper curl and cause damage to the printer and ruined prints.
Adjusting the Platen Gap
If the print quality is not satisfactory when printing on very thin or very thick media, you may need to adjust the Platen Gap setting.
Note: If you notice scuffs on the first few inches of your prints, this is caused by paper curl and print head strikes. Make sure your paper is flat. You can also try changing the Platen Gap setting to Wide. If that doesn’t solve the problem, try changing it to Wider.
- Press the Menu button.
- Press the down arrow button to select Printer Setup and press the right arrow button.
- Press the right arrow button to select Platen Gap.
- Press the up or down arrow to select a platen gap setting and press the OK button.
Note: To avoid damaging the printer, do not select the Narrow setting when loading thick media. A check mark appears next to the selected setting. - Press the pause/cancel button to exit the menu. The platen gap symbol on the LCD screen changes to match the new setting.
Feedback
To suggest an update to this article, ISU students, faculty, and staff should submit an Update Knowledge/Help Article request and all others should use the Get IT Help form.