Technology
Generate the OSHA 300 Incident Log
Last modified 11/18/2024
Learn how to generate the 300 Incident Log.
Before You Begin
To sign in to iPeople, go to hcm.illinoisstate.edu. Once there, click the sign in using CentralLogin button. Then, log in with your ISU Email and password.
Off Campus Authentication Note
If you are off campus, iPeople will require an MFA request approval. Follow this link to set up your MFA if you still need to. MFA Info/Setup
Requesting Access
OSHA reports can be generated by Environmental Health and Safety (EHS) and Human Resources (HR) superusers.
How to Generate the OSHA 300 Incident Log
- On the HCM homepage, select the Reporting and Integration tile.
- This will open the Reporting and Integration page. On the left side of the screen, expand the OSHA Injury/Illness Reporting menu.
- In the OSHA Injury/Illness Reporting menu that appears, select OSHA 300 Incident Log.
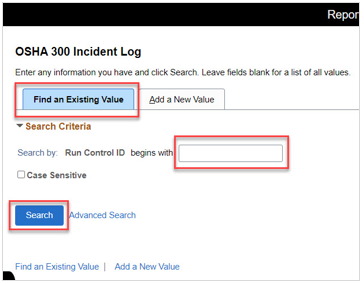
- If a new report is being created for the first time, click the Add a New Value tab and enter a new ID in the Run Control ID field. Then, click the Add button. This ID will save the parameters used when it was first created.
If a Run Control ID has already been created, click the Find an Existing Value tab and enter the Run Control ID in the Run Control ID field. Then, click the Search button. Due to the parameters being saved when the Run Control ID was first created, the same parameters will be used again.
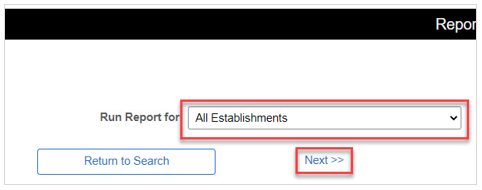
- On the next screen, select the type of report to run using the dropdown menu in the Run Report for field. The choices are:
- All Establishments
- Establishments in Company
- HQ & Controlled Establishments
- Single Establishment
For this example, choose All Establishments. Click the Next link.
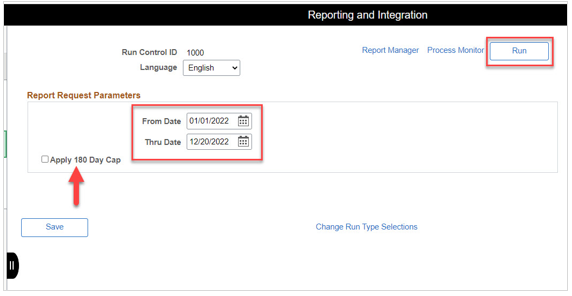
- In the Report Request Parameters section, enter the From Date in the From Date field and the Thru Date in the Thru Date field using the mm/dd/yyyy format. The From Date is the date from which the report will start running and the Thru Date is the date from which the report will stop running.
Alternatively, click on the calendar icons next to each field and select the date from the calendar that appears.
Apply 180 Day Cap: OSHA allows the time away due to injury to be capped at 180 days for reporting purposes. Therefore, if an employee has not returned to work after 180 days, select this checkbox to apply the cap at 180 days, if needed.
Click the Run button.
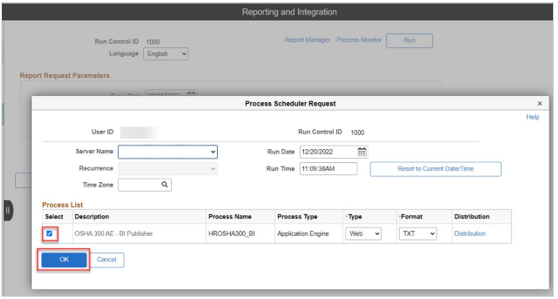
- In the pop-up window that appears, confirm that the checkbox in the Select column is selected. If it is not selected, click the checkbox.
Click the OK button. This will close the window.
- Click the Process Monitor link.
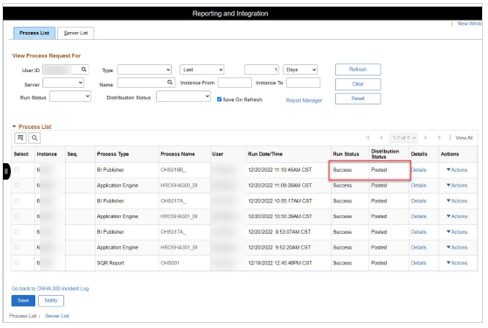
- On the Process List tab, click the Refresh button until the Run Status is “Success” and the Distribution Status is “Posted.”
- Next, view the report. First, click the NavBar icon at the upper right of the screen.
- In the dropdown menu that appears below, click the Menu icon.
- Click Reporting Tools.
- The Reporting Tools menu will appear. Click Report Manager.
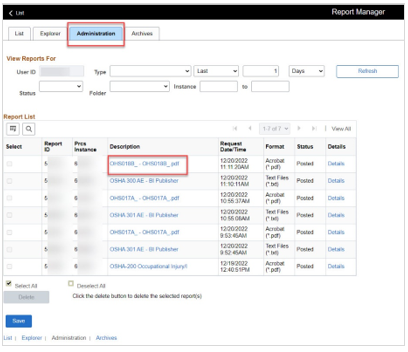
- On the Report Manager page, click the Administration tab. Then, click the .pdf link in the row that contains the report that was run.
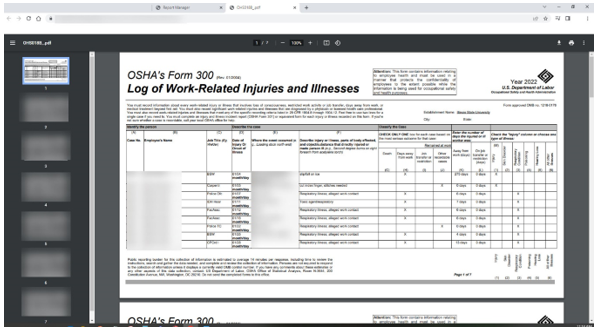
- The report will open in a new tab.
Video Demonstration
The following video demonstrates how to generate the OSHA 300 Incident Log:
How to Get Help
Technical assistance is available through the Illinois State University Technology Support Center at:
- Phone: (309) 438-4357
- Email: SupportCenter@IllinoisState.edu
- Submit a Request via Web Form: Help.IllinoisState.edu/get-it-help
- Live Chat: Help.IllinoisState.edu/get-it-help
Feedback
To suggest an update to this article, ISU students, faculty, and staff should submit an Update Knowledge/Help Article request and all others should use the Get IT Help form.
