Technology
Transfer Files from OneDrive to Alternate Storage Options
Last modified 4/21/2026
All current students, faculty, and staff are assigned a Microsoft 365 license with 1TB (Terabyte) of OneDrive cloud storage. Anyone who has retired, graduated, or left the University is given a new Microsoft 365 license that includes only 100gB (Gigabytes) of OneDrive cloud storage. If you are exceeding this 100gB limit and are nearing the end of your time at the University, it is recommended that you transfer your data to an alternate storage option. The most common alternative storage options would be your computer's local hard drive, a flash drive, or another cloud storage solution (Google Drive/iCloud).
Warning
Research data where IRB approval requires OneDrive or university-managed storage should not be moved to personal storage solutions. Potentially restricted or highly restricted data likewise should not be moved to personal storage solutions.
- Transferring to a Local Drive or Flash Drive
There are two main ways to transfer files from OneDrive to a local drive on your computer or to a flash drive. Files are able to be either copied directly from OneDrive into your drive of choice, or they can be downloaded directly from OneDrive and then moved into your drive of choice.
Important Info and Tip
Before copying files from OneDrive, you will need to make sure OneDrive is synced with your computer. Please see the directions Here on how to do this.
For better organization, it is recommended to create a new Folder in your desired location to store these newly transferred files. To do this, do the following:
- Navigate to the location you are transferring the files to (local or flash drive)
- Right click and choose New then Folder
- Name this new folder something easy to find. Ex: Transferred ISU OneDrive Files
- You now have a place to transfer your OneDrive files
Copying Files from OneDrive (Windows)
To copy files from OneDrive to your local Windows computer or flash drive, follow the steps below.
- Navigate to File Explorer on your computer, this can be found by searching for it in the Windows search bar or by finding the icon in your taskbar (Figure 1).
Figure 1:
- Find and open your synced Illinois State OneDrive. It will appear as (Your Name) - IL State University in the upper left of File Explorer (Figure 2).
Figure 2: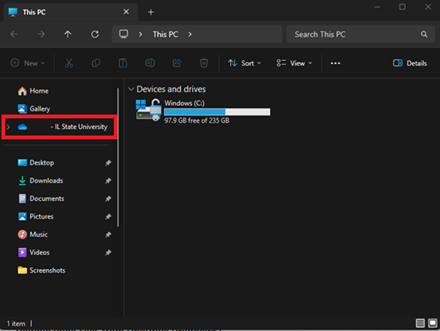
- Locate the files needed transferred, right click them, Copy them, and Paste them into your desired new location (Figure 3).
Tip: You can highlight and copy multiple files by holding down the CTRL button and clicking the appropriate files. You can also choose all files by holding the Shift key down and selecting the top and bottom file.
Figure 3: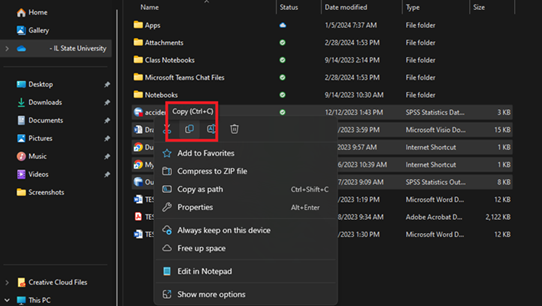
- Once all of the appropriate files are transferred you can then delete them from your OneDrive to get below the 100 gB limit.
Copying Files from OneDrive (Mac)
To copy files from OneDrive to your local Mac computer or flash drive, follow the steps below.
- Navigate to Finder on your computer, this can be found in the taskbar at the bottom of the screen (Figure 4).
Figure 4:
- Find and open your synced Illinois State OneDrive. It will appear as OneDrive in the left hand menu in Finder (Figure 5).
Figure 5: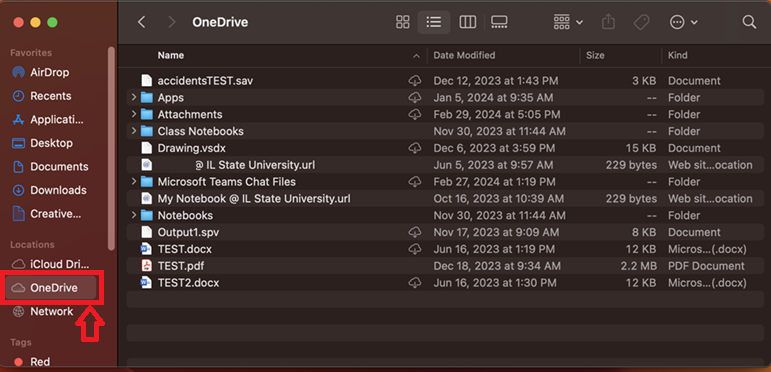
- Locate the files needed transferred, right click them, Copy them, and Paste them into your desired new location.
Tip: You can highlight and copy multiple files by holding down the CTRL button and clicking the appropriate files. You can also choose all files by holding the Shift key down and selecting the top and bottom file. - Once all of the appropriate files are transferred you can then delete them from your OneDrive to get below the 100 gB limit.
Downloading Files from OneDrive (Windows and Mac)
To download files from OneDrive to your computer, you will need to head to the OneDrive web version and follow the steps below.
Navigate to the Illinois State University Microsoft 365 website and choose OneDrive.
- Navigate to My Files in the left hand menu (Figure 6).
Figure 6: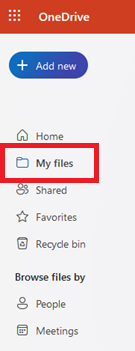
- This will bring up all of your OneDrive files. Here you can select the files you want to download by clicking the button next to each file. Once your files are selected find the Download button at the top of the screen (Figure 7).
Figure 7: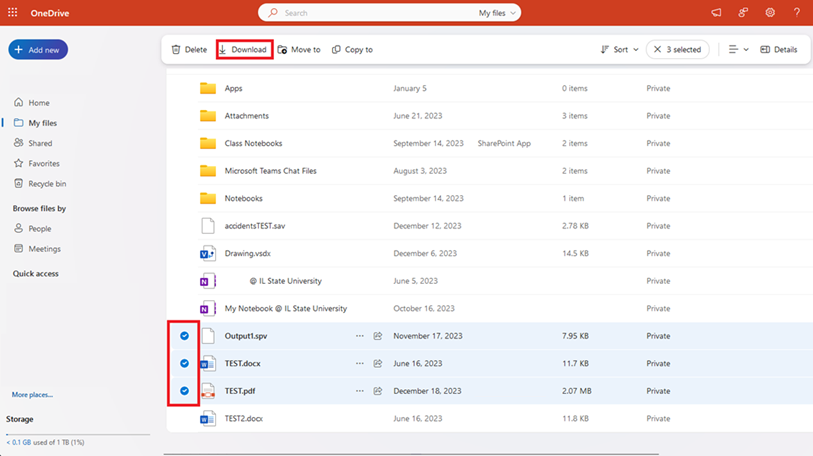
- Once your files are downloaded they will be located in your Downloads folder in File Explorer (Windows) or Finder (Mac). From here you will then Copy and Paste these files into your new desired location like in the above section Copying Files from OneDrive for your OS (Windows or Mac).
- Transferring to a Different Cloud Storage Service
In order to transfer your files to another Cloud storage service, you will first need to move your files onto to a local drive or flash drive. Please follow the appropriate steps in Transferring to a Local Drive or Flash Drive above before continuing with this step.
Transferring to Google Drive
To transfer files previously stored in your OneDrive to your Google Drive, follow the steps below.
- Navigate to Google Drive and sign into your Google account.
- At the top left, click New > File Upload or Folder Upload (Figure 8).
Figure 8: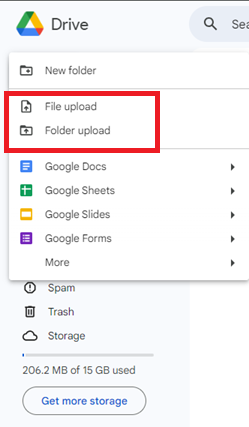
- Choose the files/folders you copied over from OneDrive previously and they will begin to upload to your Google Drive.
Transferring to iCloud
To transfer files previously stored in your OneDrive to your iCloud, follow the steps below.
- Navigate to Finder in the bottom taskbar.
- Go to the files/folders you previously copied from OneDrive and copy and past them into your iCloud Drive. Your iCloud Drive will be located in the left side menu in Finder (Figure 9).
Figure 9: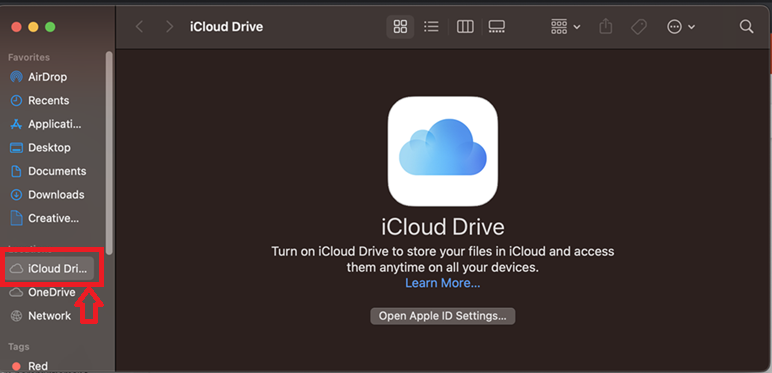
- Your files will now be uploaded to your iCloud Drive
How to Get Help
Technical assistance is available through the Illinois State University Technology Support Center at:
- Phone: (309) 438-4357
- Email: SupportCenter@IllinoisState.edu
- Submit a Request via Web Form: Help.IllinoisState.edu/get-it-help
- Live Chat: Help.IllinoisState.edu/get-it-help
Feedback
To suggest an update to this article, ISU students, faculty, and staff should submit an Update Knowledge/Help Article request and all others should use the Get IT Help form.