Technology
Sending a Mass Email
Last modified 4/24/2026
Per University Policy 9.7, a Mass email is any single message sent via email to (potentially) all students, all TT/NTT faculty, all staff, groups of parents and family members, campus community groups and stakeholders, or a combination of those groups. This policy does not apply to recurring communications sent to a pre-approved contact or distribution list (e.g., all students in a college) approved by the Mass Email Guidance Council (for details on Mass Email Guidance Council, see 9.7.1 Procedures for Use of Mass Electronic Mail).
Any member of the University community can send individual email messages to one or more individuals; current restrictions limit the number to fewer than 100, either in multiple or single mailings of the same or similar message.
University faculty/staff members needing to communicate regularly with 100 or more individuals should consider using a Listserv. A Listserv is an application that automatically distributes email to individuals subscribed to a Listserv email list. Listservs are used at Illinois State University by faculty, staff, and students to receive announcements and to communicate about classes, business, technology, and many other issues. For more information regarding listservs, please refer to the following Knowledge Base (KB) article:
University faculty/staff wishing to send a single email to more than 100 recipients may utilize the Mass Mail request process described below.
To Send an Email to More than 100 Recipients
- Navigate to https://help.illinoisstate.edu/get-it-help.
- Open the ServiceNow Support Portal by clicking on the Go to the Portal button.
- Log in using Central Login, if prompted.
- Search for Mass Mail in the search bar and click on the Request a Mass Email result.
- Alternatively, access it directly with this link: https://illinoisstate.service-now.com/esc?id=sc_cat_item&sys_id=747963a83b39e210dc13db8a04e45a4a&table=sc_cat_item&searchTerm=mass%20mail
Important!
You must submit Mass Mail requests at least 5 business days before the target date to ensure adequate time for processing.
Image of the form:
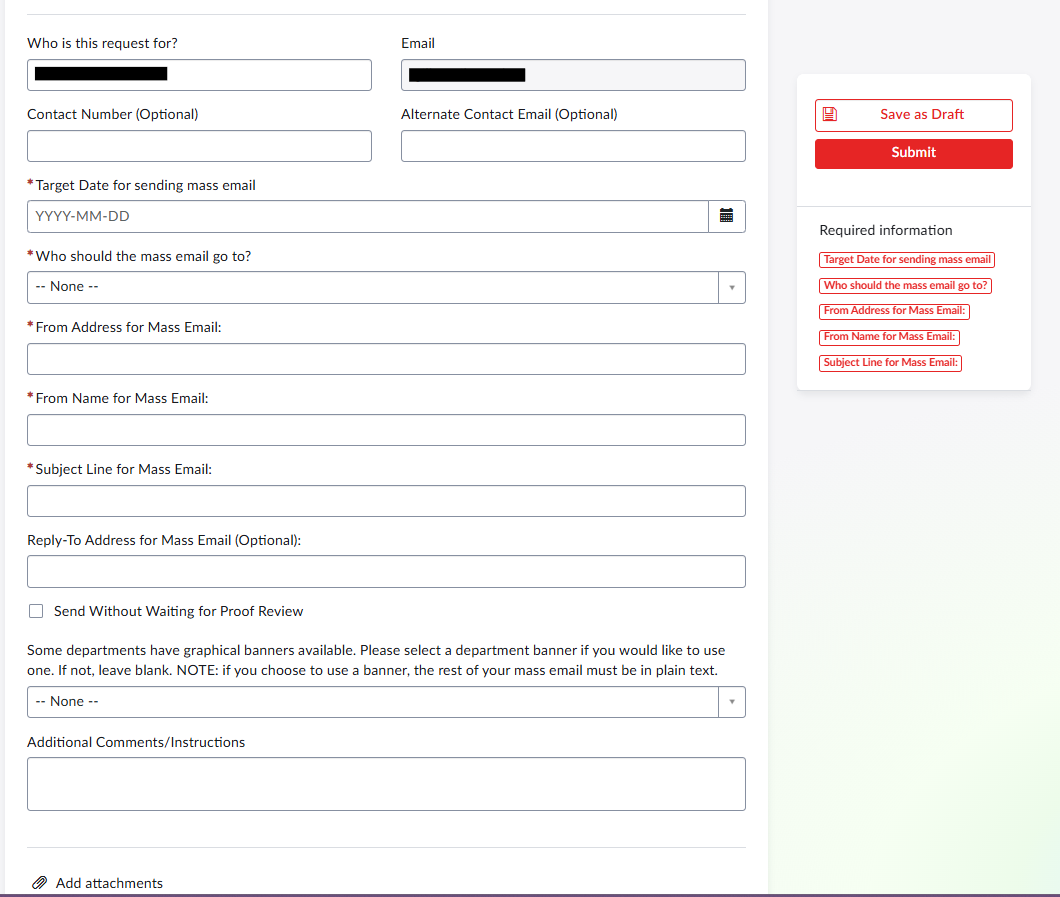
Steps to fill out the form
- Select an answer from the drop-down list next to the question Who should the mass email go to?
- Please note that if you select Other Audience, you will be required to describe the audience in the provided field. You will also need to either add a list of intended recipients' email addresses in the field provided, separated by semicolons, or attach a document (.csv or .xlsx) containing the addresses using the paperclip (attach) icon at the bottom of the form.
- Please note that if you select Other Audience, you will be required to describe the audience in the provided field. You will also need to either add a list of intended recipients' email addresses in the field provided, separated by semicolons, or attach a document (.csv or .xlsx) containing the addresses using the paperclip (attach) icon at the bottom of the form.
Important!
If you do not have a list of the intended recipients ready, but want to ensure your timely submission of the Mass Mail request, you may email the list as an update to the Request ticket later, provided it is at least 3 business days before the target date.
To submit an attachment to the ticket after initial creation, locate a copy of the ticket creation email in your inbox, click Reply, then attach your document and add any other information to our email reply, and click Send.
- In the field labeled From Address for mass email, enter the email address you would like to appear in the From field as the sender.
- In the field labeled From Name for mass email, enter the desired Name for this communication (this may be the same as the subject line).
- In the field labeled Subject Line for mass email, enter the subject as you wish it to appear in the mass email Subject Line.
- If you would like to send the email without proofing, check the box labeled Send without waiting for proof review. If you prefer to proof the copy first, leave the box unchecked.
- If you are sending the email on behalf of a university department and would like to use a pre-existing graphical banner available for that department, click to expand the list of departments and select the appropriate one. If you would rather not use a department banner, leave the field blank.
- Please note that not all departments have graphical banners available.
- Also note that if you choose to use a banner, the rest of your mass email must be in plain text.
- Please attach the content (body) of the mass email to the ticket in a text file or Word document. You may attach a file by clicking on the paperclip (attach) icon located at the bottom of the page.
Important!
If you do not have the body document ready but want to ensure your timely submission of the Mass Mail request, you may email the content as an update to the Request ticket later, provided it is at least 3 business days before the target date.
To submit an attachment to the ticket after initial creation, locate a copy of the ticket creation email in your inbox, click Reply, then attach your document and add any other information to our email reply, and click Send.
Note:
We recommend avoiding heavy formatting in your mass email. It may not look the same in different email applications.
- Save the Request by clicking the Save button on the top-right of the Service Request form.
- When you are ready, click the Submit button to send the Request. You can also note the Service Ticket Request Number provided to you after submission.
An automatic process will create your service request ticket, and you will receive an update email from Illinois State IT Help. Once the Mass Email is approved, you will receive another email update.
How to Get Help
Technical assistance is available through the Illinois State University Technology Support Center at:
- Phone: (309) 438-4357
- Email: SupportCenter@IllinoisState.edu
- Submit a Request via Web Form: Get IT Help Form
- Live Chat: IT Help Live Chat
Feedback
To suggest an update to this article, ISU students, faculty, and staff should submit an Update Knowledge/Help Article request and all others should use the Get IT Help form.