Technology
Create an Email Signature in Microsoft 365
Last modified 1/6/2025
The Outlook Web App for Microsoft 365 users gives you the option to create and use a personal signature, which will appear at the end of outgoing email messages. The signature can include text, images, a logo, links to a website, etc. You can choose to have the signature on all outgoing mail automatically, or choose which messages include a signature.
Before you Begin
Email signatures previously set up in an email client (such as Microsoft Outlook, Apple Mail or Mozilla Thunderbird) will not automatically be present in Microsoft 365. These instructions refer to creating an email signature in the Microsoft 365 Outlook Web App in within the Microsoft 365 web portal (Office365.IllinoisState.edu).
Important!
If you use both the Microsoft 365 Outlook Web App (Office365.illinoisstate.edu), as well as an email client, you will need to create the signature in both locations.
Automatic Signature using the Outlook Web App
To create and automatically include a signature on new messages:
- Sign into Office365.IllinoisState.edu.
- Click the Outlook icon from the row of icons to the left. This will take you to your Inbox.
- Click the gear icon located in the upper-right corner of the window and select View All Outlook Settings at the bottom of the list.
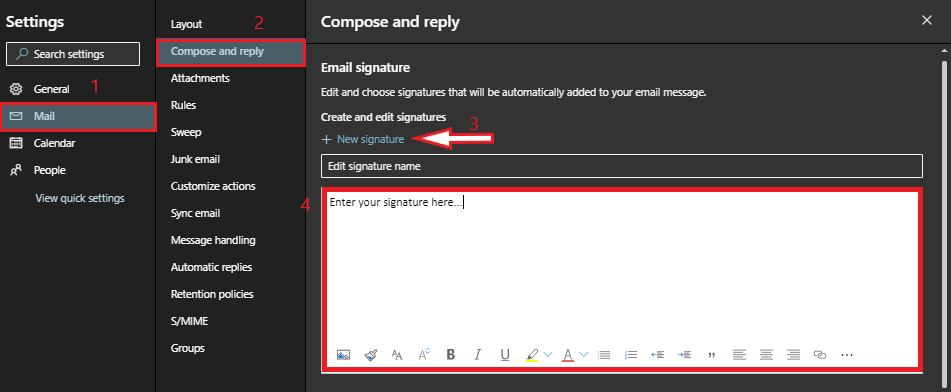
- Click Mail → Compose and Reply → +New Signature
- Enter the information you would like to appear in your email signature in the field provided.
- Indicate when you would like for your automatic signature to appear, whether it appears in new messages or on forwards and replies, and other personalized signature settings.
- Click Save. (Figure 1)
Figure 1:
The signature will now automatically appear at the bottom of new messages, when using the Outlook Web App at Office365.IllinoisState.edu.
How to Get Help
Technical assistance is available through the Illinois State University Technology Support Center at:
- Phone: (309) 438-4357
- Email: SupportCenter@IllinoisState.edu
- Submit a Request via Web Form: Help.IllinoisState.edu/get-it-help
- Live Chat: Help.IllinoisState.edu/get-it-help
Feedback
To suggest an update to this article, ISU students, faculty, and staff should submit an Update Knowledge/Help Article request and all others should use the Get IT Help form.
