Technology
Creating an Out of Office Reply in the Outlook Web App
Last modified 12/4/2024
An Out of Office reply allows a personal message to be sent automatically informing the person sending the message that you are unavailable and may not be able to respond to their message in a timely manner.
The Technology Support Center will only support setting up your out of office reply using the Microsoft 365 Outlook Web App to ensure the settings are properly applied. The Technology Support Center recommends including the following words in your Out of Office reply to ensure they are processed correctly:
- I am away
- out of office
- out of the office
Setup an Out of Office Reply
- Go to https://office365.illinoisstate.edu
- Log in to Office 365 via Central Login.
- For more information about Central Login at ISU, please refer to: Central Login
- When you are navigated to the Microsoft 365 home page, click on the Outlook application icon on the left panel.
- When Outlook is opened, click on the gear icon on the top-right corner.
- Click View all Outlook settings on the bottom of the new pane that appears.
- Click Automatic Replies.
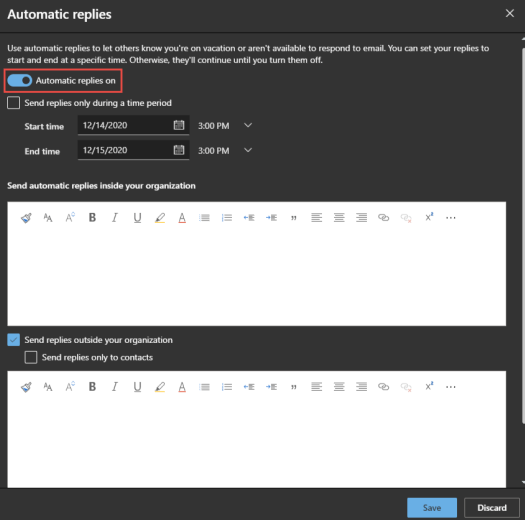
- Click the Turn on Automatic Replies switch to turn it on. (Figure 1).
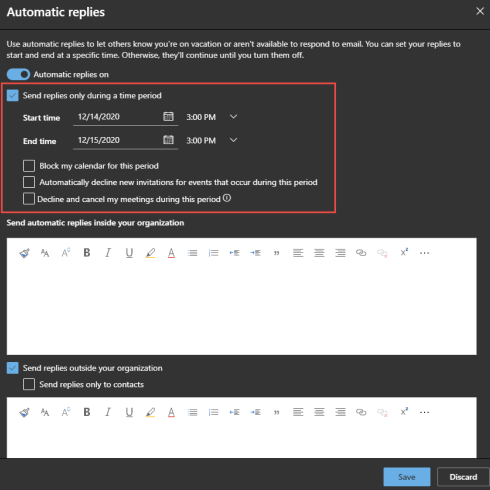
Figure 1: - If you are wanting to have your automatic replies be sent during a specific time period, check the Send replies only during a time period and set a date and time range. You can also choose to block your calendar during this time, automatically decline new invitations for events that occur in that period, and to decline and cancel all of your meetings during the period. (Figure 2).
Figure 2: - Next, type in your message that you would like to be sent as your automatic reply. There are two fields; the first field is the automatic reply that is sent to those inside your organization (in this case, ISU contacts), and the second field, which appears upon checking the Send replies outside your organization, sends automatic replies to anyone outside of the ISU domain that emails you. You can also check the Send replies only to contacts if you wish.
- Once you are satisfied with your message, click the Save button to save your changes.
Important!
If you specify an end time, your automatic reply will automatically turn off when that date/time is reached. If you do not specify an end time, your automatic reply will be active until it is manually turned off. To turn off your automatic reply, simply follow the first three steps above and click the button next to Don’t send automatic replies.
You have successfully created an out of office reply.
How to Get Help
Technical assistance is available through the Illinois State University Technology Support Center at:
- Phone: (309) 438-4357
- Email: SupportCenter@IllinoisState.edu
- Submit a Request via Web Form: Help.IllinoisState.edu/get-it-help
- Live Chat: Help.IllinoisState.edu/get-it-help
Feedback
To suggest an update to this article, ISU students, faculty, and staff should submit an Update Knowledge/Help Article request and all others should use the Get IT Help form.

