Technology
Starting and Managing Breakout Rooms in Zoom
Last modified 4/21/2026
Breakout Rooms allow you to split your Zoom meeting in up to 50 separate sessions. The meeting host can choose to split the participants of the meeting into these separate sessions automatically or manually, and can switch between sessions at any time.
- Maximum of 200 participants in a breakout room (requires Large Meeting 200 add-on).
- Breakout room participants have full audio, video and screen share capabilities
If the meeting is being cloud recorded, it will only record the main room, regardless of what room the meeting host is in. If local recording is being used, it will record the room the participant who is recording is in. Multiple participants can record locally.
You will need to ensure that the option to enable breakroom creation is on. The permission to do so is automatically enabled by Zoom admins, but you will need to ensure the feature is turned on first on your end.
Enable Breakout Rooms
While Zoom Pro users are able to use Breakout Rooms, as granted by Zoom admins, the feature by default, is usually “OFF”. You will need to go into your advanced settings and ensure that the feature is turned “ON”. Instructions on how to do so are below:
- Sign into the ISU Zoom web portal by visiting Illinois State Zoom Portal and clicking Sign In. Enter your ULID and password when you are redirected to the Central Login page. (Figure 1)
Figure 1: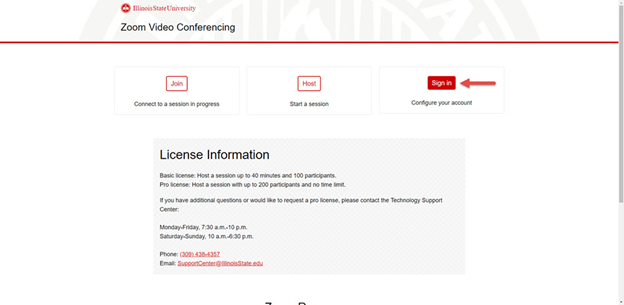
- Once you are signed in, you will be directed to your profile page. From there, click Meeting Settings. (Figure 2)
Figure 2: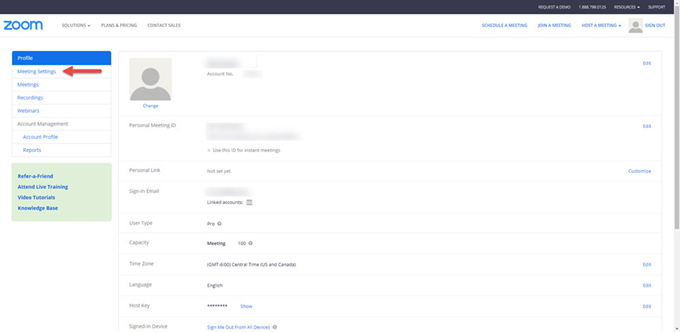
- Scroll down to the In Meeting (Advanced) section, or click the In Meeting (Advanced) button on the left to be automatically directed to that section. (Figure 3)
Figure 3:
- Ensure that the Breakout Room slide is turned ON. The Toggle Switch should appear blue to signal that it is on. If it is grayed out, simply click the button toggle to turn it on as seen in Figure 3 above.
How to Start a Breakout Room
Once you have ensured that the breakout room functionality is turned on, you will be able to start hosting breakout rooms. This feature allows you to split up a meeting into multiple sessions, and you can control almost every aspect of these rooms, which includes adding users to a room, removing them, or having all rooms join back into the main meeting at any time. Use the steps below to start your Breakout Rooms.
- Start an instant or scheduled meeting.
- On the Meeting Toolbar, click the Breakout Rooms button. (Figure 4)
Figure 4:
- Select the number of rooms you would like to create, and how you would like to assign your participants to those rooms. You can add and remove users at any time.
- After you have assigned users to rooms and have created those settings, click Create Rooms. (Figure 5)
Figure 5: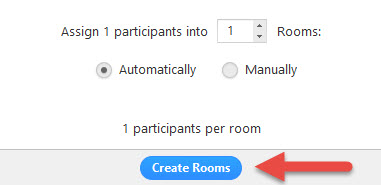
- Your rooms will be created, but will not start automatically. You can Manage the Rooms prior to starting them by following the instructions below. Once you have assigned participants to a room, you will be able to “start” the rooms when you are ready to do so.
Assigning Participants to Rooms
- To assign participants to your rooms, click Assign next to the room you wish to assign participants to and select participants you want to assign to that room. Repeat this for each room. (Figure 6)
Figure 6:
- Once a participant has been assigned (manually or automatically) to a room, the number of participants will replace the Assign button. (Figure 7)
Figure 7:
Preparing the Breakout Rooms
- After manually or automatically assigning participants in their respective rooms, you can “start” the rooms by clicking Open All Rooms (Figure 8).
Figure 8: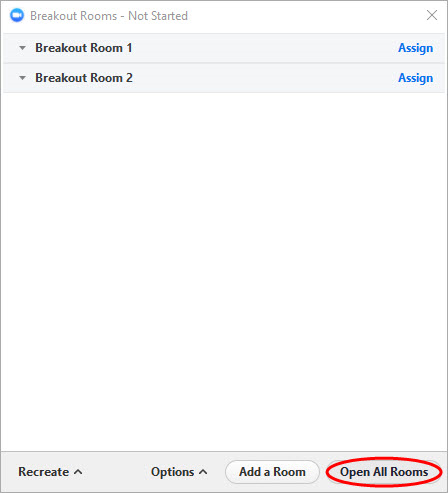
Managing Breakout Rooms in Progress
- Once the Breakout Rooms have been started, the participants will be asked to join the Breakout Session. The host will stay in the main meeting until joining a session manually. If a participant has not joined the session yet, it will be noted by (not joined) next to their name. To end the rooms, click Close All Rooms.
Figure 9: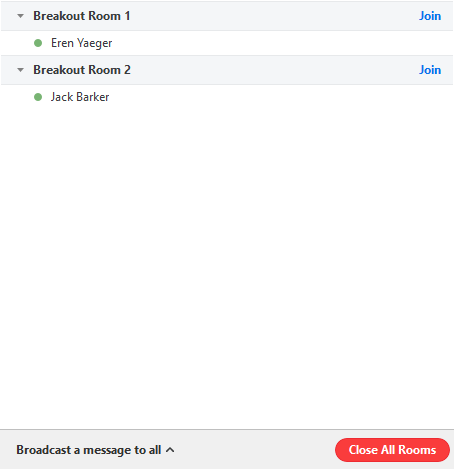
How to Get Help
Technical assistance is available through the Illinois State University Technology Support Center at:
- Phone: (309) 438-4357
- Email: SupportCenter@IllinoisState.edu
- Submit a Request via Web Form: Get IT Help Form
- Live Chat: IT Help Live Chat
Feedback
To suggest an update to this article, ISU students, faculty, and staff should submit an Update Knowledge/Help Article request and all others should use the Get IT Help form.