Technology
OptiSigns Environment Navigation
Last modified 6/12/2026
This article will provide an overview and general concept of the OptiSigns portal navigation and what is possible in each available tab.
Overview
When you log into the Illinois State University (ISU) OptiSigns portal, you will use the left-side navigation menu and top action bar to move between different management areas. The portal is divided into these primary sections shown below:
- Screens
The Screens section is used to display and manage all screens/devices connected to OptiSigns.
Main Controls:
- Add Screen: Allows you to add/register a new screen or display to your account.
- Add Folder: Creates a folder to organize screens into groups.
- Add-ons(Not Currently in-use): Opens additional features or integrations that can be enabled.
- More Options: Shows 'shared with me' and preconfigured screens.

Search and Filter Controls:
- Search Bar: Allows you to search for screens or folders by name.
- Checkbox: Select/deselect all visible items for bulk actions.
- Sort/List Options Icon: Adjust how items are sorted or displayed.
- Filter Icon (funnel): Filter screens based on Criteria (e.g., status, tags, etc.).
- View Toggle Icon (map/grid icon): Switch between different layout views.

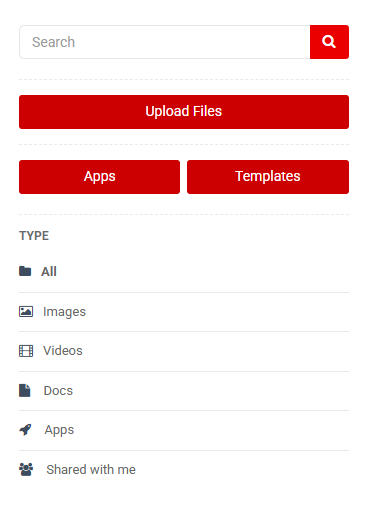
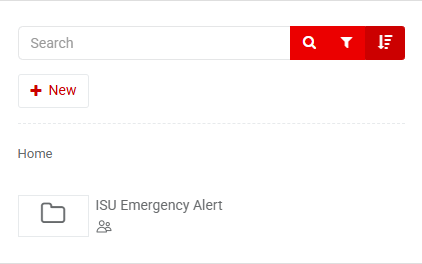
- Files / Assets
The Files/Assets section allows the user to store, upload, and organize all media and content.
Main Controls:
- Select Checkbox: Select/deselect all items in the current view for bulk actions.
- Address bar ("Home"): Indicates current folder location; click "Home" to return to root directory.
- New Folder: Create a new folder to organize files and assets.
- View Toggle Icon:
- Grid/List View: Switch between grid and list display formats.
- Sort Icon (lines with arrow): changes the sorting order.

Left Sidebar Navigation:
- Search Bar: Search for files, folders, or assets by name.
- Upload Files: Upload media files (images, videos, or documents) into the platform.
- Apps: Access built-in apps (e.g., weather, social feeds, dashboards) that can be added as content.
- Templates: Browse and use pre-designed templates for creating content.
- Playlists
The Playlists section is used create and manage playlists of content.
Left Sidebar Navigation:
- Search Bar: Search for playlists by name.
- Sort Icon (lines with arrow): Adjust how playlists are sorted.
- Create Playlist Button: Create a new playlist to begin adding content.
- Shared with me: shared playlists.
- Add Folder: Create or add a playlist/folder.
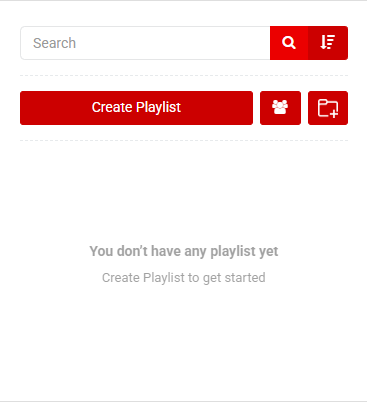
Right Sidebar Navigation:
- Search Bar: Search for files to add to a playlist.
- Filter (funnel): Filter assets by type or category.
- Sort (lines with arrow): Sort assets.
- + New: Upload files, create folders, or new assets.
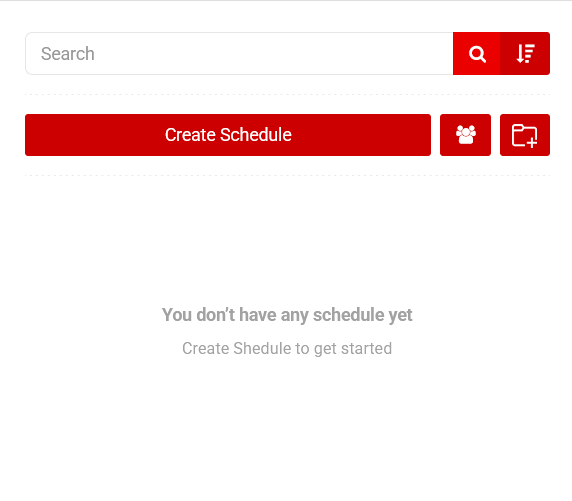
- Schedules
The Schedules section is used to create and manage content playback timelines.
Left Sidebar Navigation:
- Search Bar: Search for schedules by name.
- Sort Icon (lines with arrow): sort Schedules.
- Create Schedule Button: Create a new schedule to begin planning content.
- Shared with me (Group Icon): Access schedules shared by other users.
- Add Folder (Folder with Plus Icon): Create a folder to organize schedules.
- Templates
The Templates section is used to discover pre-built layouts or access custom frameworks to quickly design and deploy content to your screens.
- New Design Button: Opens the canvas creator tool, allowing you to start building a customized digital signage layout entirely from scratch.
- Your Designs Button: Displays your saved, personalized creations and custom templates built specifically by or for your team.
- Search Bar: Search the central library for speccific types of layout templates by keyword or industry name.

How to Get Help
Technical assistance is available through the Illinois State University Technology Support Center at:
- Phone: (309) 438-4357
- Email: SupportCenter@IllinoisState.edu
- Submit a Request via Web Form: Get IT Help Form
- Live Chat: IT Help Live Chat
Feedback
To suggest an update to this article, ISU students, faculty, and staff should submit an Update Knowledge/Help Article request and all others should use the Get IT Help form.