Technology
Sharing Externally in SharePoint
Last modified 9/13/2024
Illinois State University allows students, staff, and faculty to share files with external users. This means that you will be able to share a file with somebody that does not have an ISU email account. You can still set editing permissions for the shared file, just as you could with internal users. Below are steps on how to share files with external users, as well as other tips about this new feature.
Sharing Your File to an External User in SharePoint
Note:
For live collaboration, the external user must have a Microsoft Office account with their email account and must also have a Microsoft Office license. If they do not have a Microsoft account with a license for Office, they will only be able to access these documents on the web browser version and will not have the ability for live collaboration.
- Select the file or folder that you wish to share externally from SharePoint.
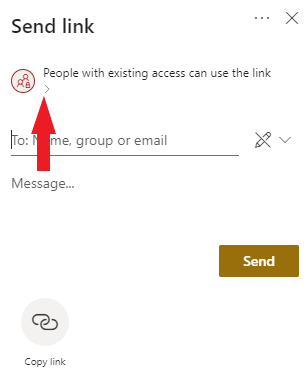
- Select the Share button at the top or next to the selected file. (Figure 1)
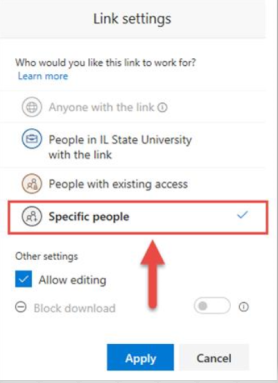
Figure 1: - Select the button People in IL State University with the link and change it to Specific People. (See Figures 2 and 3)
Figure 2:
Figure 3: - Select or Remove the check mark next to 'Allow Editing' based on the access you would like the external user(s) to have.
- Select Apply.
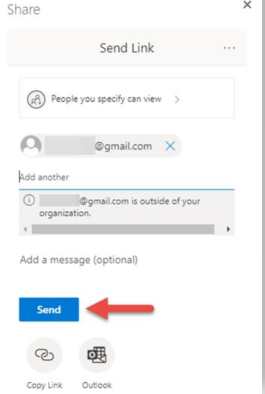
- Type in the user's Microsoft Account Email Address.
- Select Send. (See Figure 4)
Figure 4:
You will see a banner that says “User is outside of your organization." You have successfully shared a file externally using SharePoint.
How to Get Help
Technical assistance is available through the Illinois State University Technology Support Center at:
- Phone: (309) 438-4357
- Email: SupportCenter@IllinoisState.edu
- Submit a Request via Web Form: Help.IllinoisState.edu/get-it-help
- Live Chat: Help.IllinoisState.edu/get-it-help
Feedback
To suggest an update to this article, ISU students, faculty, and staff should submit an Update Knowledge/Help Article request and all others should use the Get IT Help form.


