Technology
Canvas Getting Started Guides
Last modified 1/23/2025
As we transition to a new Learning Management System, knowing exactly where to start can sometimes be the hardest part. These guides will give you all the basics you need to get started as a user in Canvas and build out content for your students.
- Three Steps to Getting Started as a Canvas User
A great way to start: Get familiar with your dashboard, global tools, and setting your user preferences, which includes deciding what notifications you’d like to receive.
In this video, you will learn about the Canvas Dashboard, sidebar, Global Navigation menu, and course interface. For more detailed steps to getting started as a Canvas User: Canvas Overview
Login and get familiar with your Canvas Dashboard
To log into Canvas, go to Canvas.IllinoisState.edu
Once in Canvas, you’ll see the current courses you have been assigned to teach. To view all courses, select Course from the Global Navigation along the left side, and then select All Courses at the bottom of the list. To customize which courses you’d like to see on your Dashboard, select the star next to each course.

On your Dashboard, you will see the course name, the course code, and the semester listed for each course. There are various ways you can customize each course card, including choosing custom nicknames, changing the color, and changing the position of each card. These changes will only be visible to you.
Note: If you are not assigned to teach any courses yet in Canvas, you can request a temporary sandbox.
Get familiar with your Global Navigation Menu
In Canvas, the gray bar on the left of your screen is your Global Navigation Menu. This remains constant as you navigate Canvas, while your Course Navigation Menu is specific to your individual courses. The tools in your Global Navigation Menu pull from all of your courses. This means that, for example, the Calendar tool pulls Calendar items from all of your courses.

Some key tools you will find in your Global Navigation Menu are:
Calendar
Calendar Overview Video
In your Calendar, you can filter your view by course or view events for all courses at once. You can add calendar items to your course calendars, like an event, an assignment, or a Scheduler appointment group. Scheduler appointment groups can be used for presentation sign-ups, office hours, etc.
Inbox
In your Inbox, you can view all the messages you have sent and received on Canvas. You can filter your messages by course or by type of message (Inbox, Unread, Starred, Sent, Archived, and Submission Comments).
Studio
In your Studio account, you can create, upload, and store video content for all your courses.
Commons
In the Canvas Commons, you can find, import, and share resources with other educators in the Canvas community.
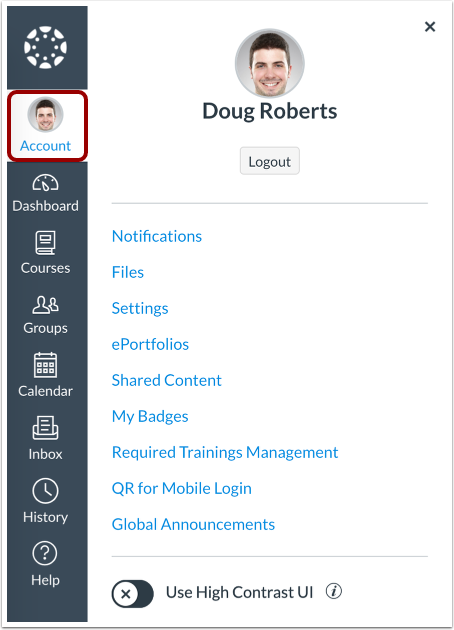
Adjust your Account Settings
Before you begin teaching in Canvas, you’ll want to go through your Account settings. Your Account settings can be found at the very top of your Global Navigation Menu on the left by clicking on Account. In your Account settings, you can adjust notification preferences and adjust your user settings.
Notifications
When you click on Notifications, you’ll see a Settings for drop-down menu. Here, you can adjust settings for your entire Canvas account or adjust settings for specific courses you are enrolled in.
Below, Settings for, Course Activities will be listed with your different contact methods and how often you will be contacted. You can adjust each of these notification settings based on your preferences.
User Settings
When you click on Profile, you can edit your profile. Here, you can add a profile picture, a biography, and personal links (such as links to your website, blog, portfolio, LinkedIn account, etc.).
When you click on Settings, you can set your pronouns, language preferences, time zone, and additional contact methods.
After you are done adjusting your settings and getting familiar with your dashboard, it’s time to build out a course! Select which course you would like to start adding content to and determine if you want to build your course by using migrated content or by starting from scratch. See instructions below for instructions for each.
- Three Steps to Building Your Course with Copied Content
Course Content Import Video
In this video, you will learn about how to transfer course content between Canvas courses, which you can do from your existing course to another shell:
1. Import Your Copied Content Into Your Live Course
It’s easy to copy content over from one Canvas course to another. To do this, you’ll want to ensure that you are in your blank site for the upcoming semester. You’ll navigate to Import Course Content under Settings. Select Copy a Canvas Course from the drop menu. From there, you can determine if you’d like to import all content from your existing course or only some. You can also choose if you’d like to adjust or remove any due dates.
After hitting Import, you may be notified that errors occurred during the process. Select the error link and make note of these issues and see if they need to be fixed manually.
2. Look and Adjust for Common Errors Found in Copied Content
Once your content has been imported, you’ll want to adjust for common issues that have occurred during the import process. Double check the following items.
Announcements in Discussion
For many courses, the announcements migrated into the Discussions tool. You can delete these discussions, or you can manually copy the content into a separate document to save for your archives. Announcements are labeled with “(Announcement Draft).”

Assignment Group Weighting
For many courses, assignment groups have been given a weight of 0%. This means that these groups and the assignments within are not being factored into students’ grades. You can choose to remove weighting entirely or adjust the weighting for each group. Ensure that if you are adjusting the weighting, it totals 100% across all groups.

3. Add and Edit your Copied Content
It’s important to note that material copied over may change during the import. Look through your assignments, discussions, quizzes, files, pages, and modules to ensure that everything is organized correctly and clear for students. If you’d like guidance on how to add new or edit materials in Canvas, explore the steps in our Building Your Course from Scratch guide, below.
After you’ve completed these steps, you can begin the process of Finalizing Your Course (see section below). This will include setting policies, double-checking settings, and publishing!
- Four Steps to Building Your Course from Scratch
If you’re starting fresh with your course, this guide will get you started.
Determine How You Want to Organize Your Course Content in Modules
Canvas uses the Modules tool to organize course content and guide student workflow. You can set up your modules by week, chapter, unit, etc., depending on how your course is structured. Once you’ve determined your course flow, you can start to create Modules. You can also begin to add other content (like Pages, Assignments, etc.) directly from the Modules tab by clicking Create, or you can proceed to Step 2.
Instructor Module Overview Video
Add Assignments, Quizzes (Classic or New), and Discussions
Assignments Overview Video
Classic Overview Video
New Overview Video
Discussions Overview Video
In Canvas, all graded items are stored in the Assignments Index page (or, simply put, the Assignments tab). This includes Assignments, Classic and New Quizzes, and graded Discussions.
Before you can create a quiz, you will have to decide whether you want to create a Classic Quiz or a New Quiz; you can find information on the distinctions between these two tools in this comparison chart, or on the Center’s Canvas page under Online Resources and Help Guides.
The Assignments page is also where you can create assignment groups, which will help categorize your gradebook. An important distinction from ReggieNet is that you cannot create any gradebook items directly in the gradebook. The gradebook is only for grade entry, not for item creation; gradebook items will mirror the Assignments Index page.
Build content using the Syllabus tool, Files, and Pages
Syllabus Overview Video
Files Overview Video
Pages Overview Video
The Syllabus tool will appear in your Course Navigation Menu, and this is where we recommend you upload your syllabus. You can also add course-specific files (there is a storage limit for each course, so we recommend uploading video files to Studio instead) or begin to create pages using the Rich Content Editor (RCE). With the RCE, you will be able to embed media, include links, and format your content the way you want.
Add items to your Modules
You can create the items from steps two and three within the respective tool (e.g. within the Pages tool) or you can create them directly in the Modules tab. Either way, make sure that they are added to the appropriate module. This will help students successfully navigate your course. You can add any of the following to a module: Assignment, Quiz, File, Page, Discussion, Text Header, External URL, and External Tool. When you’re organizing your modules, you can also add a text header or indent an item to improve navigation.
After you’ve completed these steps, you can begin the process of finalizing your course (see section below). This will include setting policies, double-checking settings, and publishing!
- Finalizing Your Course: Eight Things to Double-Check
Once you’ve built out your course (whether migrated or from scratch), you’ll want to double-check a few items to finalize your course!
Edit Course Navigation Menu
You’ll want to double-check which tools are enabled/disabled (or visible/hidden from students). Go to Settings > Navigation to enable the tools you’d like students to see in their Course Navigation Menu. Here you can also change the order that tools appear in.

Canvas recommends leaving Home, Syllabus, Announcements, Modules, and Grades enabled. And in general, Canvas recommends leaving Assignments, Discussions, Quizzes, Pages, and Files disabled so students access all course content items through Modules.
Link course content items to Modules
Since the Assignments, Discussions, Quizzes, Pages, and Files tools are hidden from students by default, students will need to access all course content items through Modules. Make sure that you’ve added all course content items to the Modules you want them to appear in. You can do this by going to Modules and clicking on the plus symbol next to the appropriate Module.
Customize your course Home Page
Course Home Page Customization Video
By default, a template will be applied to your course Home Page. If you’d like to use this template, you can edit the red text and fill in information related to you and your course. Go to Home > Edit to begin editing the template Home Page.
If you’d like to create your own Home Page or set your Home Page to an already existing page, you can do that in Pages. You can set any page as the “Front Page” in your course.

You can also choose a different layout for your course Home Page. Canvas allows you to set the Home Page as an activity stream, as Modules, as an Assignments list, or as your Syllabus. You can change your Home Page layout by going to Home > Choose Home Page.
Set up your Gradebook and grading policies
The Gradebook has quite a few features that need to be enabled/disabled prior to grading student work. To begin, make sure all of your graded assignments, discussions, and quizzes appear as columns in the Gradebook. If they do not appear in the Gradebook, go back into Assignment settings and edit grading details. Assignments set to “Not Graded” do not appear in the Gradebook.
You can also choose to weight your Gradebook based on assignment groups. double-check if your assignment groups are weighted or not and if they are weighted correctly. You can access weighting by going to Assignments > clicking on the three dots in the right corner > Assignment Groups Weight.
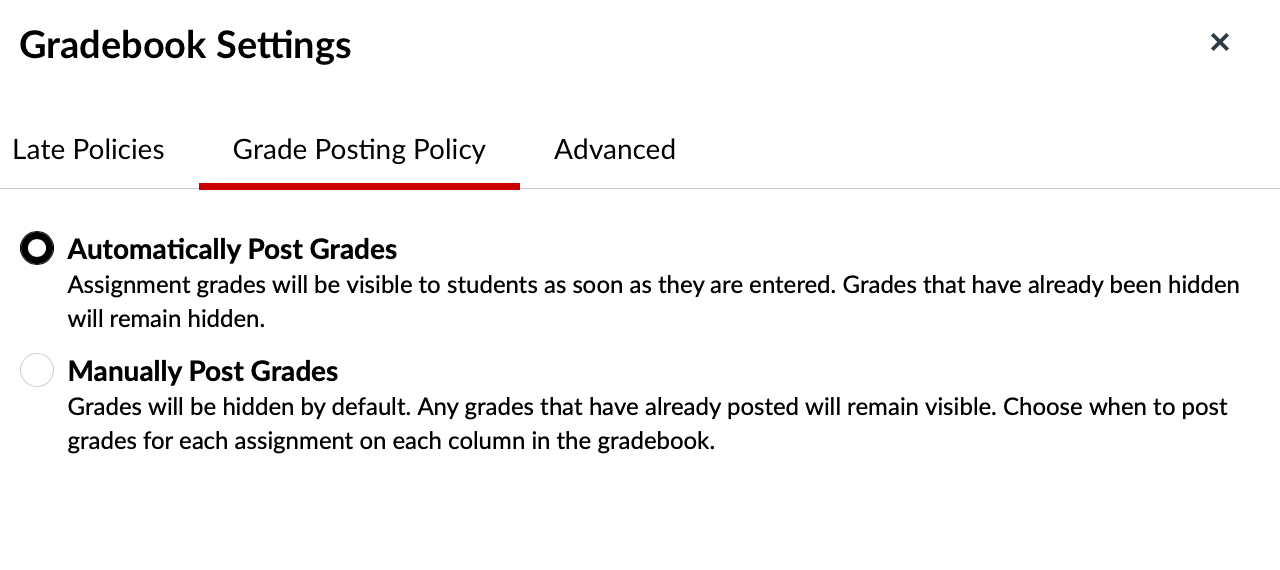
Next, check your grade posting policies. You can use posting policies in the Gradebook to manage assignment grade visibility for students. Posting policies can be set for an entire course and individual assignments. By default, grades are automatically posted and visible to students unless you switch to a manual grade posting policy. You can change your grade posting policies for the entire course by going to Grades > click on the gear in the right corner > Grade Posting Policy. You can also change grade posting policies for individual assignments by clicking on the three dots next to the assignment > Grade Posting Policy.
Finally, you can set up missing submission policies and late submission policies in the Gradebook. These policies allow you to automatically apply a grade for all missing submissions or automatically deduct points on all late submissions. You can set up missing and late submission policies by going to Grades > click on the gear in the right corner > Late Policies.
Check for broken links using the Link Validator
Canvas has a cool accessibility feature called the Link Validator. This tool allows you to verify that links in your course are valid. The Link Validator searches through course content and identifies invalid links in both published and unpublished content. You can access the Link Validator by going to Settings > Validate Links in Content > Start Link Validation. Take this quick step to make sure links in your course are accessible!
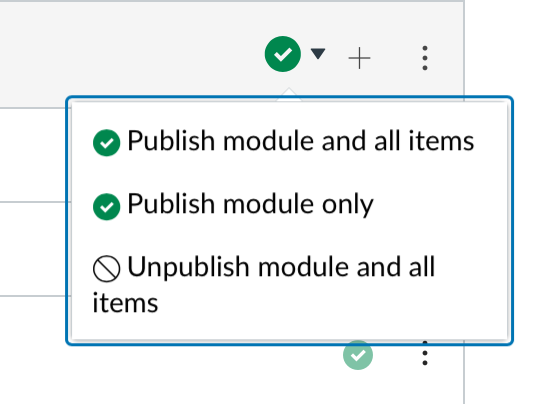
Publish Modules and Module Items
Once all your settings and content are in place, make sure that Modules and Module Items you want students to access are published. If a Module or item is left unpublished, students won’t be able to see it. Be aware that an unpublished Module overrides a published item. This means that an item can only be visible to students if the larger Module the item is under is published. You can publish Modules and items by going to Modules and clicking on the circle-backslash symbol next to the Module or item you want to publish.
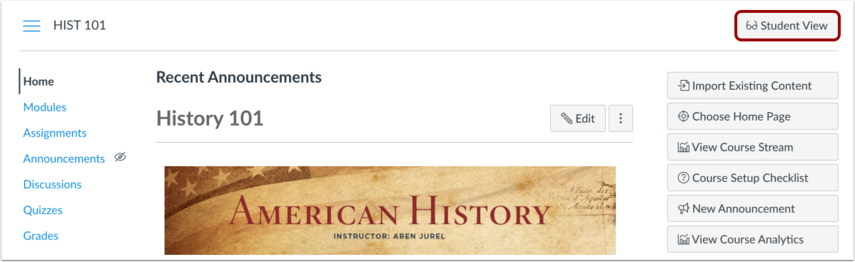
Check Student View
Before you publish your course, use the Student View to test the visibility of your course materials. In Student View, you can practice submitting assignments, taking quizzes, contributing to discussions, viewing grades, accessing links, and so on. While in Student View, be sure all resources you want students to access have been published. If an item appears in gray, it is not accessible to students and needs to be published.
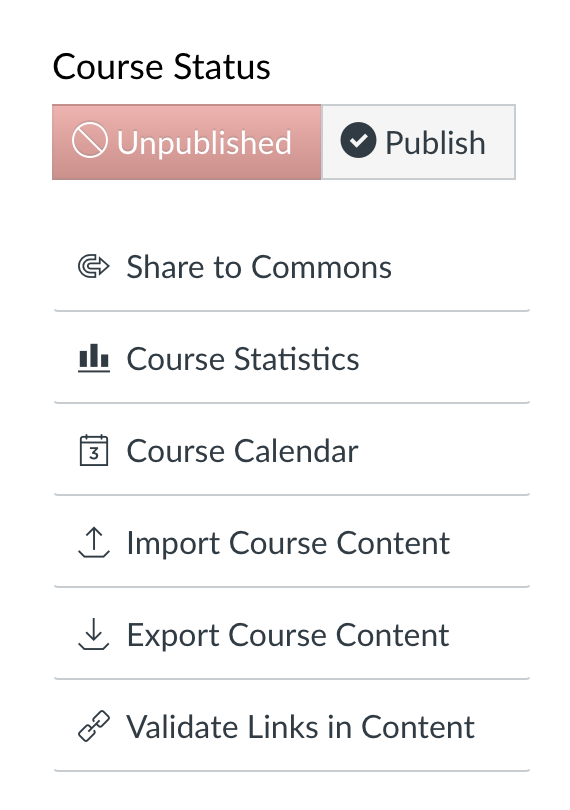
Publish the course
When you are ready for students to access the course, be sure to publish the course! You can publish your course by going to Home > Course Status > Publish. You can also publish the course directly from your Dashboard by clicking on Publish in the left corner of your course card.
It is also best practice to send out a welcome announcement inviting your students to the course. Keep in mind any announcements you post will not be sent out until the course is published.
These guides are inspired by the guide from https://www.csusm.edu/iits/services/ats/idesign/canvas/gettingstartedquickguide/index.html
How to Get Help
Technical assistance is available through the Illinois State University Technology Support Center at:
- Phone: (309) 438-4357
- Email: SupportCenter@IllinoisState.edu
- Submit a Request via Web Form: Help.IllinoisState.edu/get-it-help
- Live Chat: Help.IllinoisState.edu/get-it-help