Technology
Sharing Files to External Users in Microsoft 365 Using an iOS Device
Last modified 4/21/2026
Illinois State University allows students, staff, and faculty to share files to external users. This means that you will be able to share a file with somebody that does NOT have an ISU email account. You can still set editing permissions for the shared file, just as you could with internal users. Below are steps on how to share files with external users, as well as other tips about this new feature.
Note:
At this time, if you receive a shared document, it will open ONLY in your Safari browser and will NOT open in OneDrive or the specified mobile application. Currently, there is no workaround other than editing the document in the browser version of the application. You can only create and share the document from the iPhone application, you cannot open the shared document in the application. The external user (the person receiving the file) will also need a Microsoft account with an Office subscription in order to collaborate.
You can share virtually any type of document from the suite of apps in Microsoft (Office) 365 (Microsoft Word, Microsoft Excel, Microsoft Powerpoint, etc.). The instructions below work for all Microsoft 365 applications that allow document sharing, but you may notice the “Share” button appears in different areas of each application. They are usually in the top right corner of the screen. To share your document, follow these instructions:
- Save your file before sharing. To do so, tap the three dots on the top right corner and tap Save As and name your file.
- Once you are ready to share the document, tap the Share button (Figure 1).
Figure 1: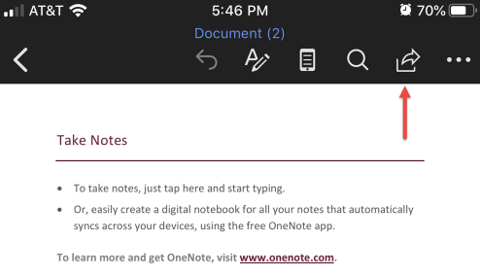
- From there, tap the People in your organization with the link can view so that you can edit who can see the document (Figure 2).
Figure 2: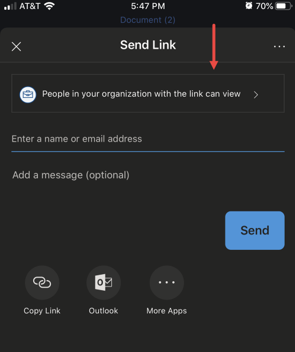
From there, tap Specific People and then tap Apply (Figure 3).
Note:
If you desire, you can select the Allow Editing option, or you can also specify if you want to block downloads of the document by selecting Block download (See Figure 3).
Figure 3: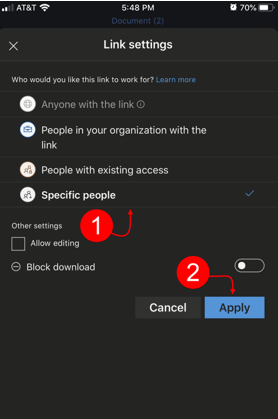
- Now you can specify a recipient. In the Enter a name or email address field, type in the email address or name of the contact. When the name or email pops up, tap it, and it will be applied to the field. You will get a warning that the user is outside of your organization. This is a normal security measure. Double-check that the email is typed in correctly, and when you are ready, tap Send to send the document (Figure 4).
Figure 4: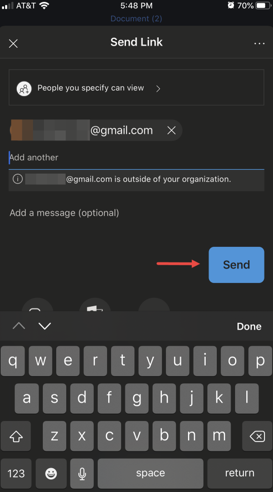
The file is now sent. As a reminder, for the recipient on their iPhone, the document will only open in Safari and not the application (Excel, Word, PowerPoint, etc.) the document was made in. Currently, there is not a workaround for this. We highly recommend using a laptop or desktop if you are wanting to edit the document correctly. Files shared from an iPhone will open in their correct application if the recipient opens the document on a computer, however. Sharing from an iPhone is the best way to share if you are on the go, it is not recommended for use if you want to edit or collaborate on the shared file with others.
How to Get Help
Technical assistance is available through the Illinois State University Technology Support Center at:
- Phone: (309) 438-4357
- Email: SupportCenter@IllinoisState.edu
- Submit a Request via Web Form: Help.IllinoisState.edu/get-it-help
- Live Chat: Help.IllinoisState.edu/get-it-help
Feedback
To suggest an update to this article, ISU students, faculty, and staff should submit an Update Knowledge/Help Article request and all others should use the Get IT Help form.