Technology
Editing Your About.IllinoisState.edu CampusPress Website
Last modified 11/21/2024
This article will go over some of the basics of editing your About.IllinoisState.edu CampusPress website.
Recommended Usage:
It is recommended that you use the default colors, font style, and types. Using these defaults will keep your website in line with ADA (Americans with Disabilities Act) standards. Please be aware that these websites are publicly accessible and thus, reflect on the University.
Logging In:
To log in for the first time, click the link sent to you in the email you received after requesting a website.
- Log in to About.IllinoisState.edu/ULID/wp-admin/ via Central Login.
- For more information about Central Login at ISU, please refer to: Central Login
Creating Pages:
You should have a few pages pre-made for you with examples in them on all of the commonly used blocks.
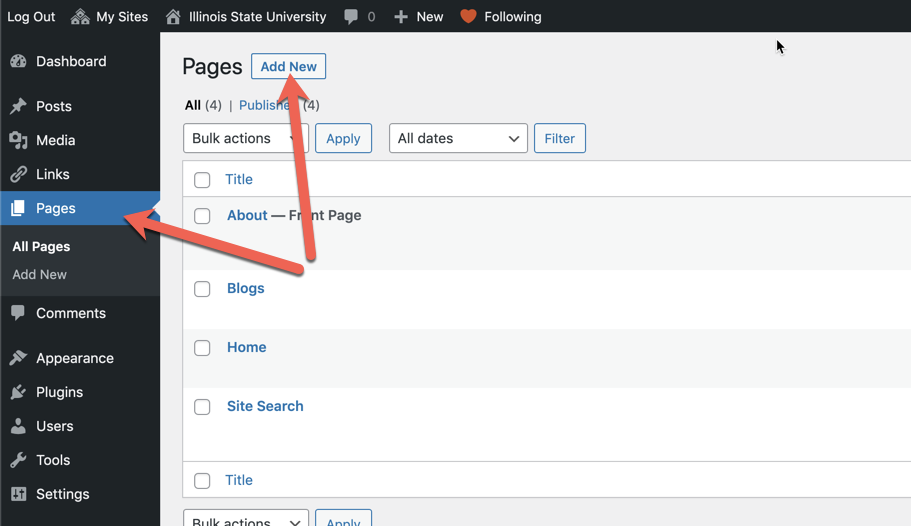
- Click Pages in your side menu, then click the Add New button located at the top of the Pages pane or in the side menu (Figure 1).
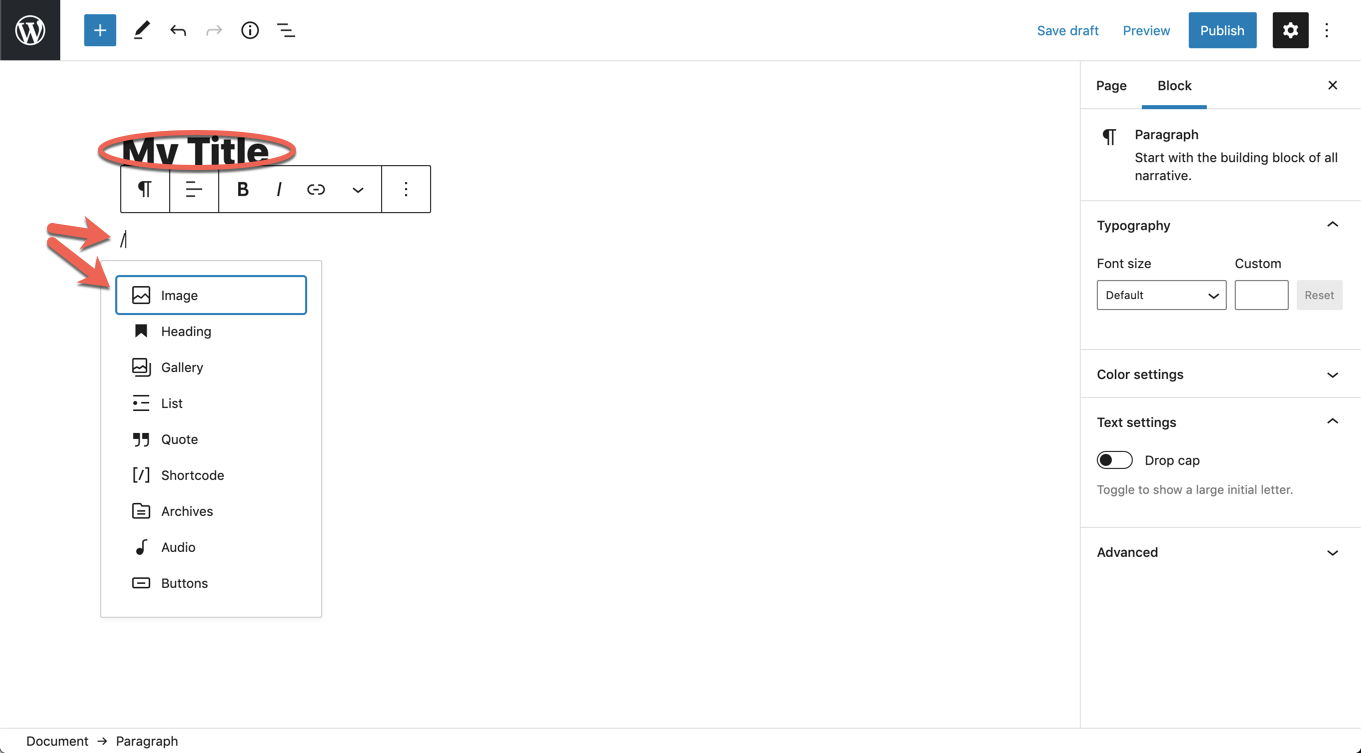
Figure 1: - Enter a Title for your new page and/or add information using blocks (Figure 2). Type a forward slash / to view the Blocks menu. See information about blocks in the section below titled, Editing Pages Using Blocks.
Figure 2: - In the upper-right corner of the screen, click Preview at any time to preview what your page will look like once published. Click Save Draft when you wish to save edits you have completed, and Publish when you have finished creating a new page (Figure 3).
Figure 3:
Editing Pages Using Blocks:
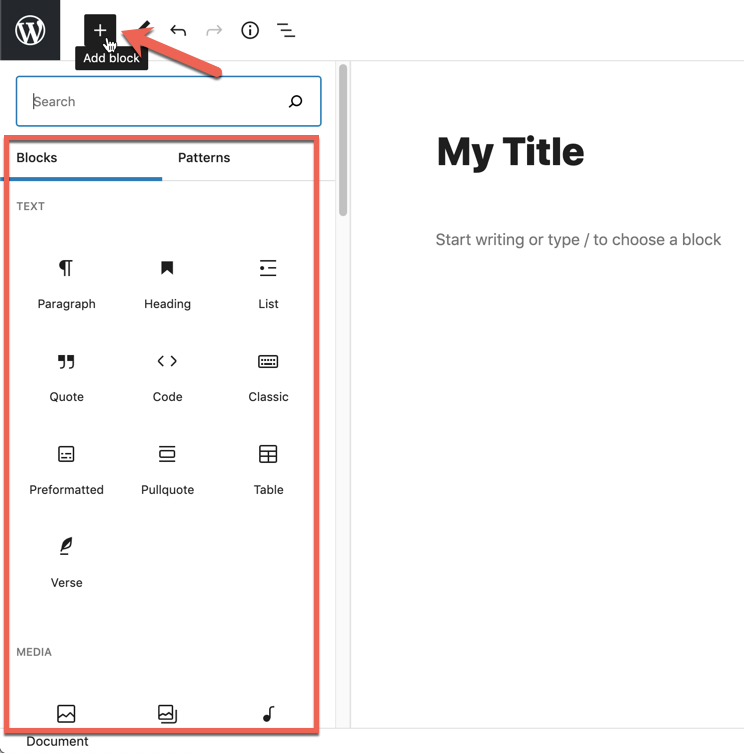
Your About.IllinoisState.edu website on CampusPress will be edited by using available Blocks to fit the needs of your website. There are many different types of blocks available for you to stack and use together to fit the needs of your website. To get started, edit the blocks already on your page or click the plus sign icon + (Add block) to select from a full list of blocks (Figure 4).
Figure 4:
Common Blocks:
- Heading:
- H1 – Use only for the main titles of your pages.
- Ex: organization name, home, about, contact
- H2—Secondary titles for introducing information on your pages.
- Ex: Titles for individual paragraphs underneath your main heading.
- H3 –Tertiary titles used for further detailing information.
- Ex: Introducing detailed lists or information within your titled paragraphs.
- H4—Individual sections within your information.
- Ex: Rarely used, but can be used to further detail and emphasize information.
- H1 – Use only for the main titles of your pages.
- Paragraph: Used for dense sections of information.
- Image: Used for putting up large images on site.
- Media & Text: Used for putting images or other media in line with text.
- List: Used for bullet lists or numbered lists that you are needing before after or within a paragraph.
- Gallery: Used to put many images up in line with each other.
- File: Used to attach documents and PDFs to your website.
- Video: Used to insert playable video into your website.
- Embeds: Used to link Facebook, YouTube, Instagram, and media from other sites into your website.
Creating and Editing Links
To add a hyperlink within your CampusPress website, follow these instructions:
- Highlight the area to which you would like to add the hyperlink.
- Click the Link button.
- Enter the web address in the prompt (Figure 5).
Figure 5:
- Click the down arrow button next to the URL field to pull up the Link Settings, allowing you to choose for the hyperlink to open in a new tab if desired (Figure 6).
- Click the down arrow button next to the URL field to pull up the Link Settings, allowing you to choose for the hyperlink to open in a new tab if desired (Figure 6).
Figure 6:
- Click the Return-Arrow button next to the link you’ve added (Figure 7), or press Enter on your keyboard to save the link.
- Click the Return-Arrow button next to the link you’ve added (Figure 7), or press Enter on your keyboard to save the link.
Figure 7:
Editing Your Menu
You can edit your menu bar to include drop down menu capability. Each page creates a link within your menu bar. To edit your menu bar, follow the instructions below:
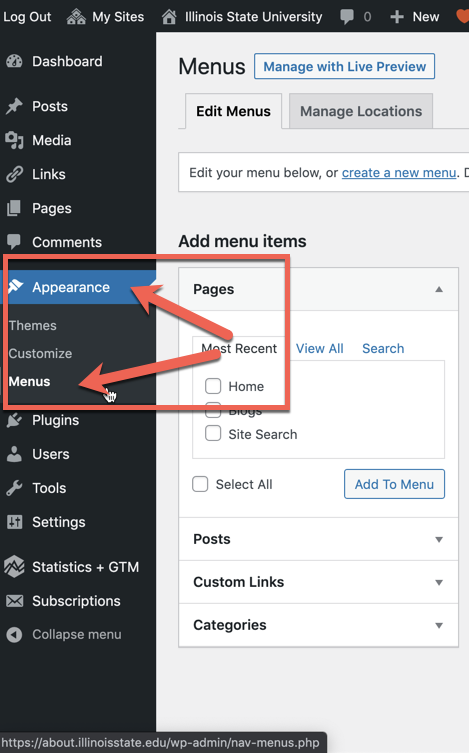
- Click on Appearance in the side menu, then click Menus (Figure 8).
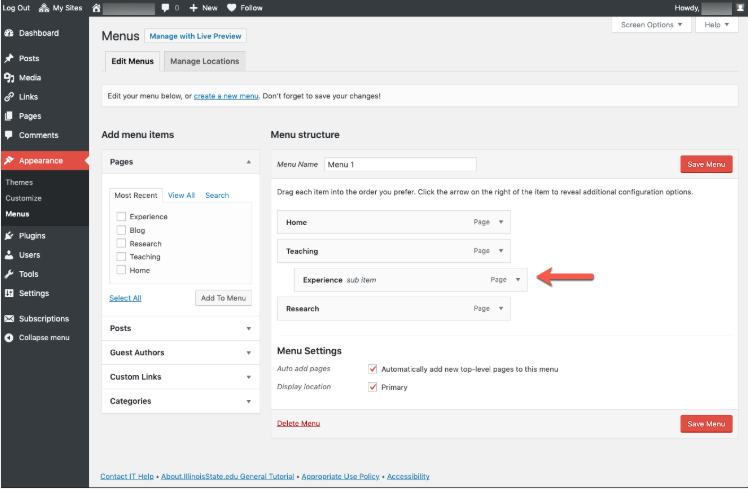
Figure 8: - Drag the page or pages you want in your drop-down into the main page you want the drop-down to be on. If they are properly under the main page, they will appear indented. (Figure 9).
Figure 9:
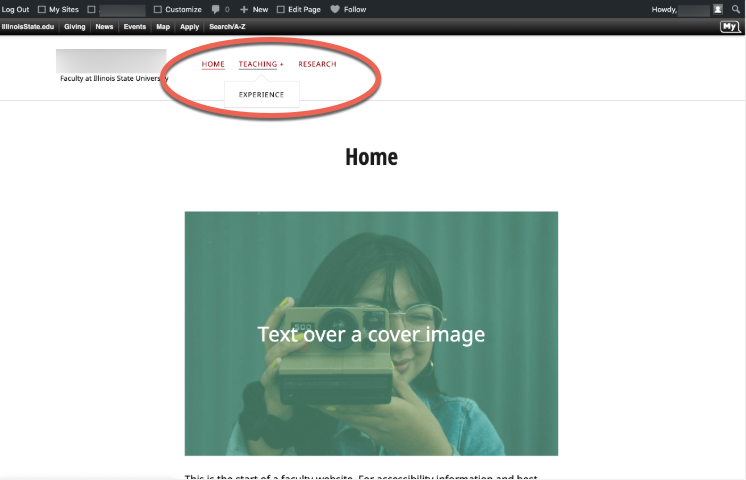
- Your page titles will appear as your menu names (Figure 10).
Figure 10:
- Your page titles will appear as your menu names (Figure 10).
Adding Images to Your Media Library:
- In the Dashboard, click Media → Add New → Select Files (Figure 11).
Figure 11: - Navigate to the file(s) you want to upload.
- Select your file(s):
- To select multiple files in MacOS press and hold the Command key and click each file.
- To select multiple files in Windows press and hold the Ctrl key and click each file.
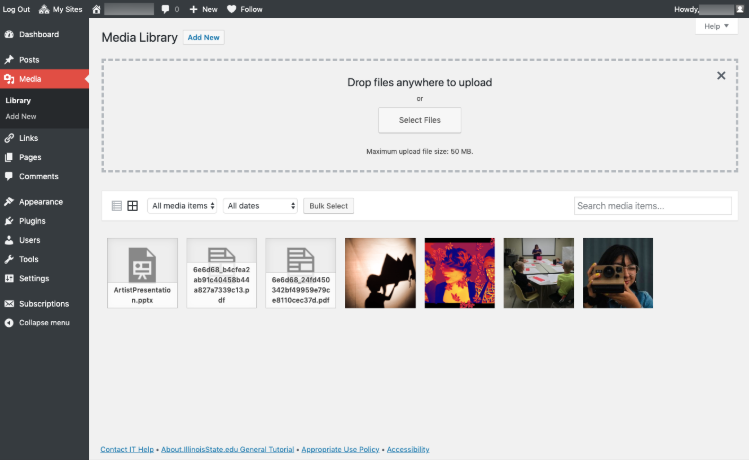
- After your files upload, they will be available as part of your media library for you to use within your blocks (Figure 12).
Figure 12:
How to Get Help
Technical assistance is available through the Illinois State University Technology Support Center at:
- Phone: (309) 438-4357
- Email: SupportCenter@IllinoisState.edu
- Submit a Request via Web Form: Help.IllinoisState.edu/get-it-help
- Live Chat: Help.IllinoisState.edu/get-it-help
