Technology
Configure Your Microsoft Bookings Calendar
Last modified 11/18/2024
Once created, access your Microsoft Bookings Calendar with your role of Admin. As an Admin, you can configure and personalize your Bookings calendar. To access your Microsoft Bookings Calendar:
- navigate to Office365.IllinoisState.edu
- Log in to Office 365 via Central Login.
- For more information about Central Login at ISU, please refer to: Central Login
- Select the Bookings icon
Important!
When first logging into your Microsoft Bookings calendar, the first thing you will want to do is delete the Admin Account of the individual who created your calendar. Use the following steps:
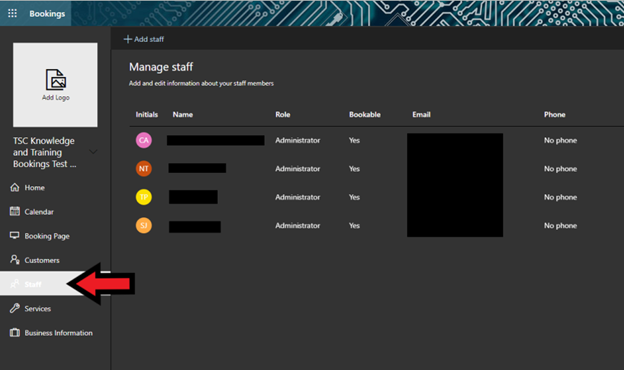
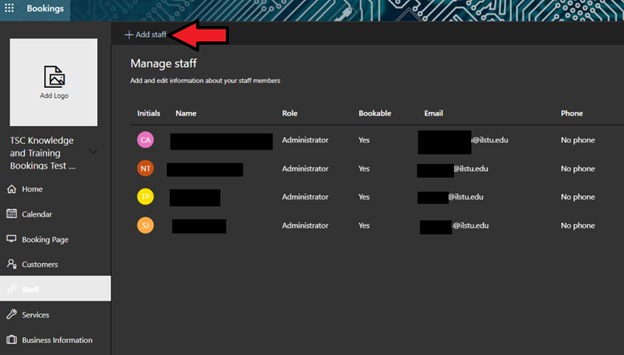
- Navigate to the Staff tab on the left hand menu in Microsoft Bookings (Figure 1).
- At this point, there are only two names: yours and the individual who created your calendar. Hover your cursor over the individual who created the calendar and click the trash bin.
Figure 1:
The creator of your Microsoft Bookings calendar has been removed.
Configuring Your Calendar
Use the tabs on the left side of the screen to configure your Bookings calendar.
Business Information
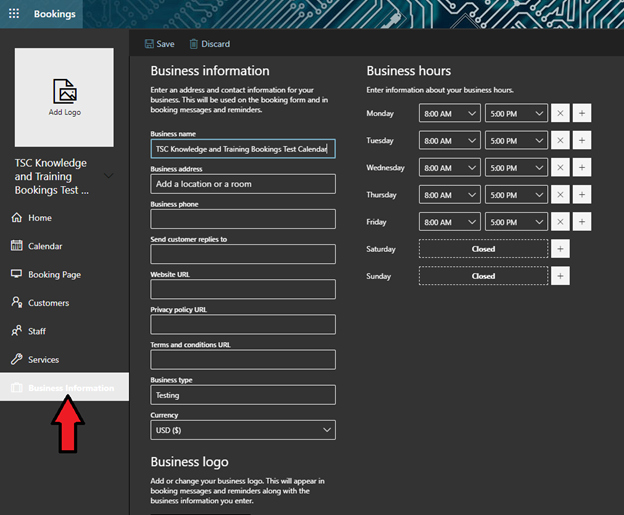
First, click the Business Information tab on the left hand menu. Enter your business/department’s information and hours. Additionally, you can upload a logo (optional) (see Figure 2).
- Business name: Enter the name you originally requested for your Bookings calendar; it is not recommended to change this name. If you do feel this name needs to be changed, please submit a ticket at Help.IllinoisState.edu with the requested name change.
- Business address: Enter a location; this should be an official address. This field can be left blank or a general address can be listed as opposed to your immediate location. This address will be visible on the customer facing request form; anyone who obtains the URL to the form will be able to view the address.
- Business phone: This number should be the number customers can call requesting information about their appointment. This field can be left blank if you wish to keep your number private.
- Send customer replies to: Enter a valid email address (ILSTU address recommended). Customer inquiries will be sent to this address.
- Website URL: The URL of the site of your department or business (e.g.: Help.IllinoisState.edu).
- Privacy Policy URL: Unless your department has its own privacy policy, this field can be left blank.
- Terms and conditions URL: Unless your department has its own terms and conditions URL, this field can be left blank.
- Business type: This field is optional, but can be used to describe the type of business (e.g.: Admissions, Support, etc.).
- Currency: It is recommended to leave this field as "USD ($)".
- Business logo: (Optional) Upload a staff picture or department logo here (within university guidelines).
- Business hours: Set your business hours based on appointment availability.
Figure 2:
Services
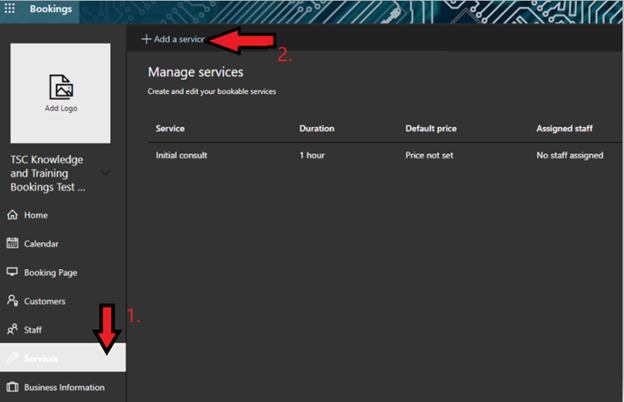
Add services you provide in the Services Tab. To get started, click the Services tab in the left hand menu, then click Add a Service (See Figure 3).
- Service Name: Name your service (e.g., Initial Consult).
- Description: Add a basic description of the service provided.
- Default Location: This should be the same as the address in the Business Address field that was previously entered unless the appointment will be at another location.
- Adding an online meeting: Enable this option to allow for the use of an online Teams meeting. Zoom or Google Meets are incompatible through Microsoft Bookings.
- Default Duration: Enter the duration of the appointment time.
- Buffer Time: Enter the amount of time allowed between appointments.
- Maximum Number of Attendees: Set the maximum number of attendees for an appointment.
- Default Price: Do not set a default price in this field unless your services have a cost.
- Notes: This is an optional field. Enter notes in the Notes field for internal department purposes.
- Custom Fields: Select Modify to add customized fields that will display for customers when booking an appointment. Additionally, select Add Additional Questions to add questions that are not included by default.
- Reminders and Confirmations: Edit the fields in the Reminders and Confirmations section so customers receive appointment reminders and confirmations.
- Add an Email Reminder: Add additional email reminders your customers can receive. Include a link, helpful hints on what to bring, or anything else pertinent to their appointment with you.
- Enable Text Message Notifications: This feature has not been tested and is currently not recommended for use.
- Scheduling Options/Default Policy: Enabled by default; leave as is.
- Email Notifications: Enable the Email Notifications option to add the appointment to a user’s Office 365 calendar.
- Staff: If enabled, Staff will allow the customer to choose to meet with a specific staff member from a pre-designated list.
- Availability: Customize Availability if your staff will be out of office and no one will be available to see customers.
Figure 3:
Staff
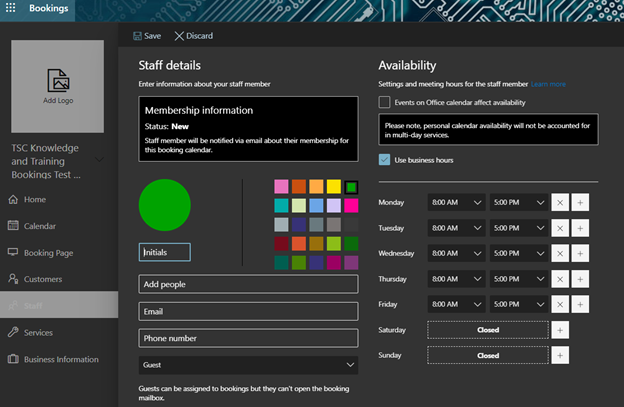
In the Staff tab, you can add users and assign various roles to them (See Figures 4 & 5).
- In the new window that opens after clicking Add Staff, customize the added staff member by adding basic information, a role, and their availability.
- After making changes, click the Save button at the top of the page to save your changes.
- Selecting the radio button next to Events on Office Calendar Affect Availability will have Bookings consider any conflicting meetings/events you already have scheduled in your Outlook calendar for the day the appointment is being made.
Figure 4:
Figure 5:
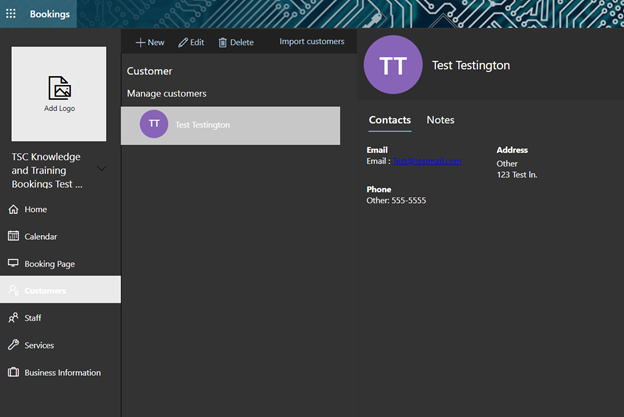
Customers
The Customers tab allows you to enter information about your customers and store data. This section is optional (See Figure 6).
Figure 6:
Bookings Page
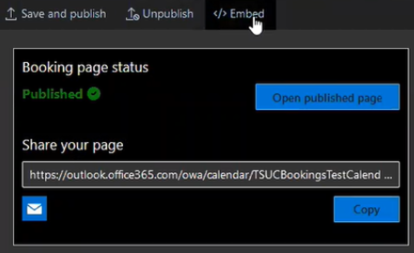
Use the Bookings Page tab to customize the appearance of your page; save and publish your page; or choose to receive an embedding code to embed the bookings page into Canvas or another site that accepts embedded codes (See Figure 7).
- Save and Publish: Click Save and Publish to save and publish your newly created Bookings calendar. This will provide a direct link to your bookings page and provide an embed code.
- Bookings Page Access Control: Select the radio button next to Bookings Page Access Control to require users to have an Illinois State University Office 365 account in order to create an appointment. Do not select this radio button if you are allowing third party email addresses (non-Illinois State University Office 365 accounts) to book appointments.
- Disable Direct Search Engine: Leave this option as is; it is currently being tested.
- Customer Data Usage: Not recommended to use at this time.
- Scheduling Policy: Choose the duration of appointments (e.g.: 30 mins = 8:00am – 8:30am).
- Minimum/Maximum Lead Time: Set the time frame in which you will allow for cancellations.
- Email Notifications: Use the Email Notifications field to send or not send email notifications to customers.
- Staff: The Staff field allows customers to choose a specific staff member for an appointment instead of being automatically assigned a staff member.
- Availability: Use the Availability field to customize a staff member's availability (e.g.: being unavailable during winter break).
Figure 7:
Calendar
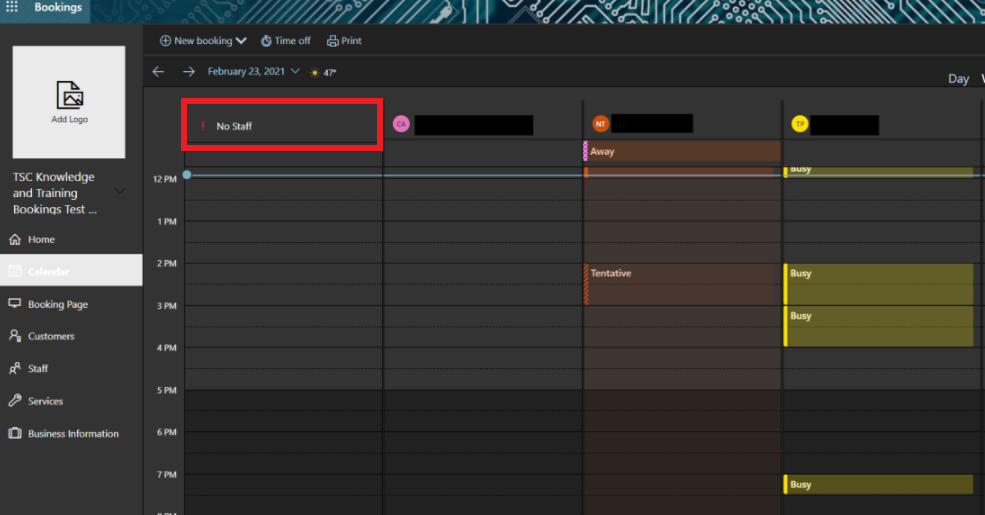
The Calendar tab shows a calendar that displays all added staff’s availability and appointments. Staff appointments from their Office 365 calendars will only show up on the Daily View, while appointments made through the Bookings Page will show up in any view. If an appointment is not assigned to a staff member, it will show up in the "! No Staff" section; the appointment will need to be assigned to an available staff member (See Figure 8).
- ! No Staff: For appointments that are unassigned, a user with an Admin Role can select the appointment, then click Edit. A list of staff members will be displayed. Assign the appointment to a staff member by selecting their name.
Figure 8:
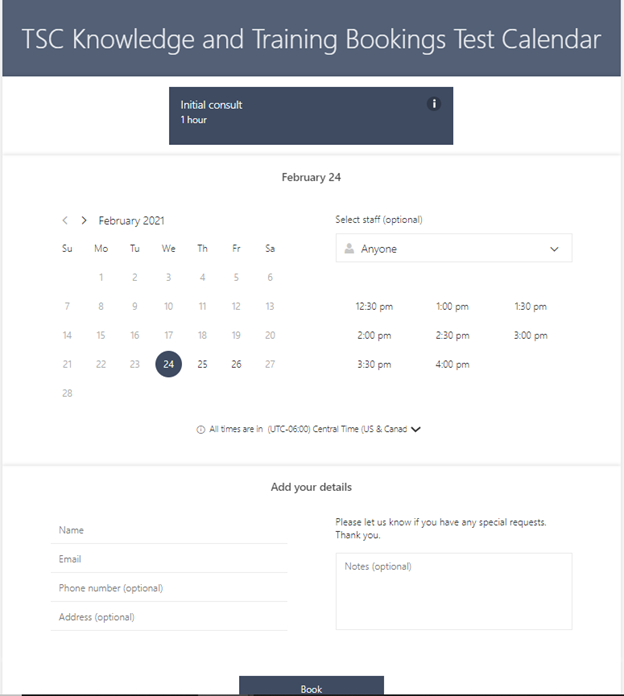
Once all modifications are complete, select Save and Publish from the Bookings Page tab. See Figure 9 for an example of what the customer sees when opening your Bookings link or views the embedded calendar.
Figure 9:
How to Get Help
Technical assistance is available through the Illinois State University Technology Support Center at:
- Phone: (309) 438-4357
- Email: SupportCenter@IllinoisState.edu
- Submit a Request via Web Form: Help.IllinoisState.edu/get-it-help
- Live Chat: Help.IllinoisState.edu/get-it-help
