Technology
Use ScreenConnect to Allow Remote Access to your Windows Computer
Last modified 9/18/2023
ScreenConnect is a free application that you may use to allow someone access to your computer for extra troubleshooting. This is useful when you are experiencing an issue with your computer and would like to allow a Technology Support Center associate or member of your direct support team access to be able to see what is occurring on you computer.
If a TSC associate (or member of your direct support team) asks to use ScreenConnect in order to gain access to your computer to troubleshoot an issue, and you agree to do so, the associate may initiate the ScreenConnect session with you in one of two ways:
- They may send you a ScreenConnect invitation via email.
- They may direct you to the ScreenConnect website where you will enter a code in order to join the session.
Joining a ScreenConnect Session via Email Invitation
To join a ScreenConnect session via email invitation:
- Depending upon how you are instructed to join the ScreenConnect session, do one of the following:
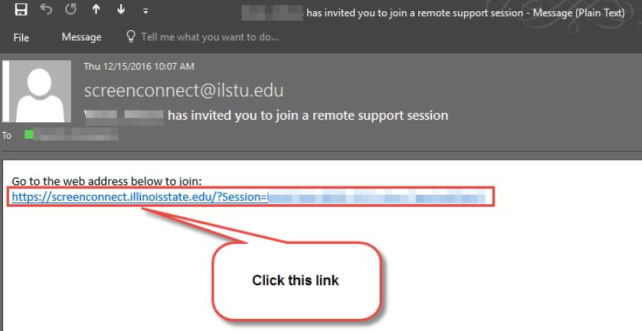
1a. If the associate sent you an email with a link to Join the ScreenConnect Session, click on the link provided in the email (Figure 1).
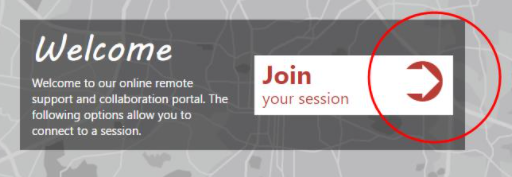
Figure 1: - The link will take you to the ScreenConnect website (ScreenConnect.IllinoisState.edu). Click on the Arrow next to the text, Join Your Session (Figure 2).
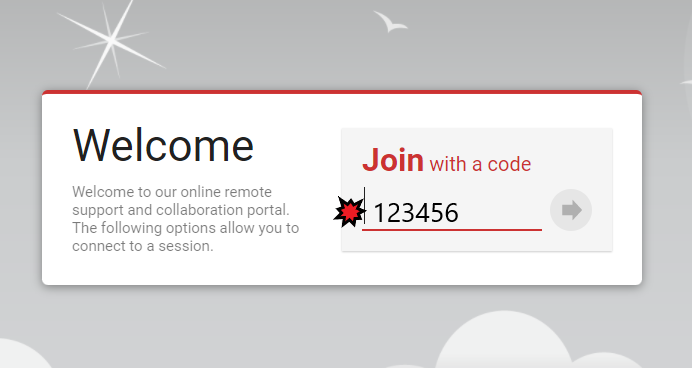
Figure 2: - If the associate instructs you to the ScreenConnect website to join the ScreenConnect session, navigate to ScreenConnect.IllinoisState.edu and enter the four-digit code provided you by the associate in the field labeled Join with a Code (Figure 3).
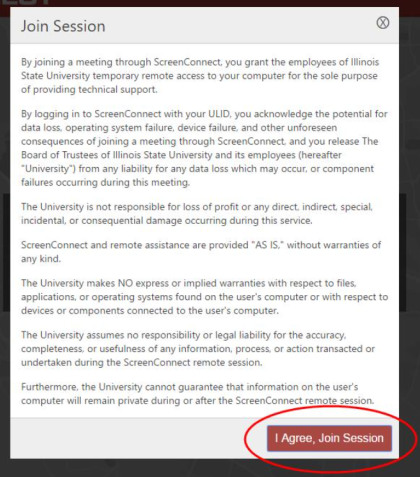
Figure 3: - When presented with the Terms of Using ScreenConnect, click I Agree, Join Session (Figure 4).
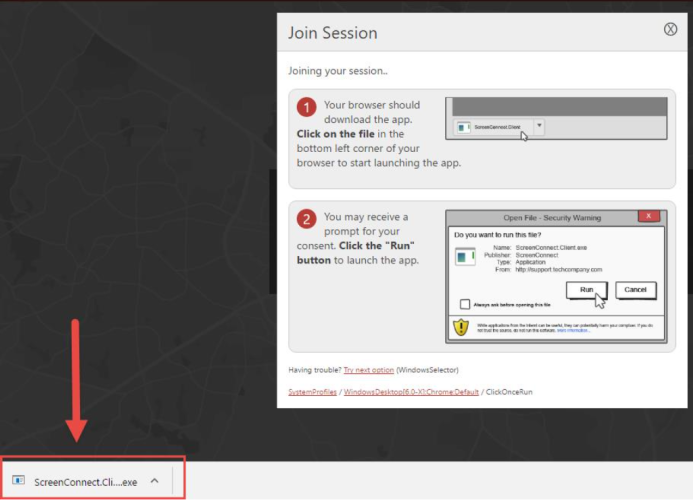
Figure 4: - A pane entitled Join Session will appear (Figure 4) which contains instructions to download and run the ScreenConnect application. To begin the download, click on the file in the bottom left of your browser.
Figure 4: - You will now see a message stating, “You have successfully connected to your session.” Close the window by clicking on the X in the upper-right of the window.
- You will now see a message stating, “Your computer is being controlled by (Name of associate).” (Figure 5). The associate will be able to click on items, and type information into your computer as though they were using your computer.
Figure 5: - When the associate ends the session, you will see a dialogue box informing you of this. Click OK (Figure 6).
Figure 6: - Your ScreenConnect Sessions has ended.
How to Get Help
- Technical assistance is available through the Technology Support Center at (309) 438-4357, by email at SupportCenter@IllinoisState.edu, or by Live Chat at Help.IllinoisState.edu.
Feedback
To suggest an update to this article, ISU students, faculty, and staff should submit an Update Knowledge/Help Article request and all others should use the Get IT Help form.
