Technology
Microsoft Teams Webinar
Last modified 4/20/2026
Microsoft Teams Webinar is a feature within Microsoft Teams that allows users to host large-scale virtual events, such as online presentations, training sessions, or conferences, with interactive features for engagement. It's an extension of the regular Teams meeting functionality but with additional tools for managing larger audiences and providing more control over the event. Teams Webinars
Teams Webinar can be found by following the instructions below:
- Open Teams and navigate to the Calendar tab in the left sidebar
- Click on the drop-down arrow next to New Meeting and choose Webinar (Figure 1)
Figure 1: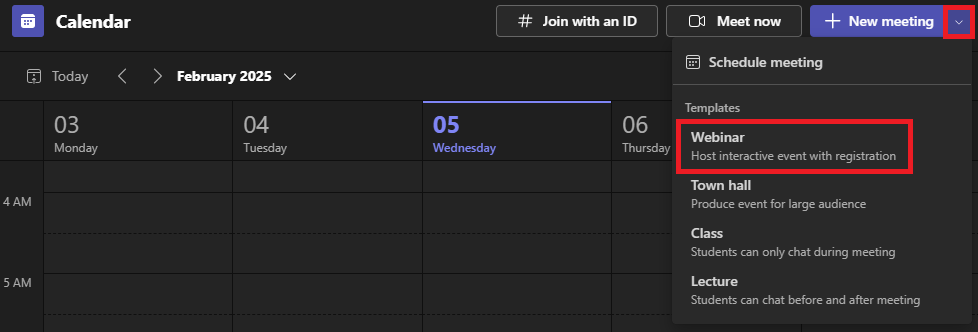
- A new window will pop up where you can manage your Webinar settings
Note
Sessions currently only allow 4 hour periods of recording at a time.
Webinar Setup
- Details
Basic Info:
Underneath the basic info section you will input the necessary information for your webinar including:
- Title
- Start Date and time
- End Date and time
- Description (Explaining what the webinar is about)
- Add in Co-Organizers
- Add in Presenters
- Choose event access
- Your Organization (Recommended that event is private or within your organization only)
- Public
- Enable attendee Emails
- Set up attendee experience
- Allow Mic for attendees
- Allow camera for attendees
- Q&A
- Choose to continue to meeting options for a more detailed set up after the above information is completed.
- To learn more about meeting options see Meeting Options below.
- Presenter Bios
Before adding Presenter Bios, you will need to add presenters in the details section of the Webinar.
- Select Edit next to the presenters name.
- Fill out the users Bio information.
- Presenters from within your organization will have partial bio information filled out.
- Select Save
Adding Presenters
You can add presenters in two ways.
- Individually add presenters by typing in their names in the box labeled "Presenters from your org:"
- Or select the add external presenters to add an individual external presenter.
- You can also add an entire Teams group as presenters by typing the Team name in the "Presenters from your org:" section.
- Theming
Here you can change the banner image, logo, and theme color for your Webinar site. These images will also be seen in the emails that your attendees receive.
Meeting Options
- Meeting Access
Who can bypass the Lobby?
- Choose who is able to bypass the lobby or waiting room. Options that can be chosen:
- People who were invited
- Everyone
- People in my org
- People in my org, trusted orgs, and guests
- People in my org and guests
- Only organizers and co-organizers
Who can admit from the Lobby?
- Choose of you and your co-organizers or presenters who can admit users from your Lobby. Options that can be chosen:
- Organizers, co-organizers, and presenters
- Organizers and co-organizers.
- Roles
This section will allow you to Enable language interpretation. Choose from your presenters, co-organizers, presenters or guests to interpret. Include which language they are interpreting from and to.
- Production Tools
This section allows you to enable the "Green Room" which will allow presenters and organizers to check their audio, video, and content sharing before attendees are admitted.
- Participation
This section allows you to do the following:
- Allow Mic for attendees
- Turning this on allows attendees to unmute and mute themselves individually as needed.
- Allow Camera for attendees
- Turning this on allows attendees to share video individually as needed.
- Meeting Chat
- Meeting chat can be In-Meeting Only, On or Off
- Q&A
- Turn this on to customize Q&A to allow anonymous posts, reveiw questions before they are published and more.
- Who can manage Q&A
- Choose whether you want only organizers and co-organizers, or organizers, co-organizers and presenters to be able to manage Q&A
- Allow reactions
- Turn this on to allow meeting reactions.
- Recording and Transcription
Turn this on to record and transcribe automatically.
Spoken language in this meeting:
- After turning on Record and Transcribe automatically, choose the language that will be spoken in the meeting to help with the transcription
- Accessibility
Turn this on to provide Communication Access Realtime Translation (CART) captions.
Registration
- Configuration
Registration Requirements
- Event Capacity
- This is automatically set at 1000 which is the current maximum number of active participants allowed.
- Note: 300 extra participants are allowed as view only.
- Form
- This allows you to create a form to collect data from your participants.
- Attendee status
After you publish your site, you should be able to see your list of registrants and their status here.
Adding Attendees
To add attendees you will need to email them the link of your published site. You can get this link after you publish when it pops up or one of the following:
- Open your event and select Manage Event from the top menu and then select Share Event from the pop-up window, then copy the link to share.
- Open your even and select Details and copy and paste that information into your Email.
After you have the link you can email it out individually, teams message it to users, or use a Mass Email to send out the link to many users. Please view Sending a Mass Email article to decide if this is the right option for you.
Other Setup Information
- Emails
Here you can choose which emails are going out to registrants and when they would be sent.
- Reports
After your event ends you can view reports of the event here.
- Recordings
This is where you will find recordings of your event after the event has ended, so that you can view or publish them.
Note:
Within the Meeting Options you will see CoPilot AI, but this is not currently being used in our instance and you will not be able to access it.
Within the setup for your Webinar you will see a Connected Apps option. This is not currently being used in our instance.
Webinar in Microsoft Teams Video
The following video provides an overview of how to set up a webinar in Microsoft Teams:
How to Get Help
Technical assistance is available through the Illinois State University Technology Support Center at:
- Phone: (309) 438-4357
- Email: SupportCenter@IllinoisState.edu
- Submit a Request via Web Form: Get IT Help Form
- Live Chat: IT Help Live Chat
Feedback
To suggest an update to this article, ISU students, faculty, and staff should submit an Update Knowledge/Help Article request and all others should use the Get IT Help form.