Technology
External File Sharing in OneNote
Last modified 4/17/2026
Illinois State University allows students, staff, and faculty to share files to external users. This means that you will be able to share a file with somebody that does NOT have an ISU email account. You can still set editing permissions for the shared file, just as you could with internal users. Below are steps on how to share files with external users, as well as other tips about this new feature.
Note:
For live collaboration, the external user must have a Microsoft Office account with their email account and must also have a Microsoft Office license. If they do not have a Microsoft account with a license for Microsoft 365, they will only be able to access these documents on the web browser version and will not have the ability for live collaboration.
Sharing your OneNote Document to an External User
- Once you are ready to share your document, go to the top-left corner and click File → then click Share in the left pane that appears.
- You will have several sharing options after clicking Share. They are:
Share with People: Here, you can manually enter the email address of the external recipient or click the Global Address Book button (it is shaped like a silhouette) to the right of the field where you enter an email address or contact. Below that field, you can enter a personal message for the recipient(s) receiving the document. To set editing permissions, click the Can Edit button to the right of the Global Address Book button. From there, you can enable or disable editing of the document. You can also require the recipient(s) to sign-in before viewing the document by checking the Require User to Sign in Before Accessing Document box. When you are ready to share the document, click Share. (Figure 1)
Figure 1: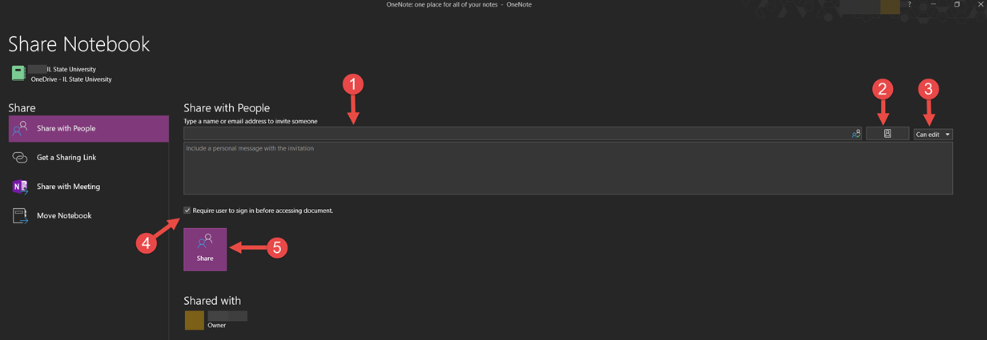
- Contact Field
- Global Address Book Button
- Enable/Disable Editing
- Require User Sign-In
- Share
Get a Sharing Link: This is a good feature to use when you are inviting multiple people to edit the document, or if you do not know the addresses of the recipients. You can either click Create a View Link to make the document Read Only when shared, or you can click Create an Edit Link to enable editing for the document when shared. Once the links are created, simply copy the link and paste it in an email to the recipient(s) and send it. (Figure 2)
Figure 2: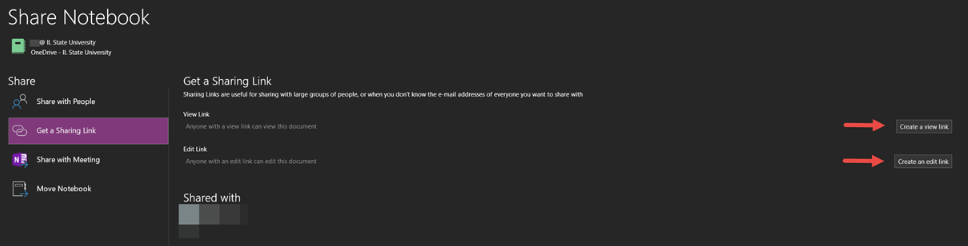
Share with Meeting: This function only works if you are currently in an online meeting. It will only share the document to those who have been granted access view and edit your notebook.
Move Notebook: This moves the notebook to another notebook. Moving a notebook that has already been shared can cause syncing issues.
To learn more about moving notebooks, read this Microsoft Knowledge Article.
How to Get Help
Technical assistance is available through the Illinois State University Technology Support Center at:
- Phone: (309) 438-4357
- Email: SupportCenter@IllinoisState.edu
- Submit a Request via Web Form: Get IT Help Form
- Live Chat: IT Help Live Chat
Feedback
To suggest an update to this article, ISU students, faculty, and staff should submit an Update Knowledge/Help Article request and all others should use the Get IT Help form.