Technology
Creating a Form or Quiz in Microsoft Forms: Add Sections and Questions
Last modified 4/17/2026
After selecting the new form or quiz option, the Questions page will be displayed. Use this page to add questions and other information to the form.
Form or Quiz Information
At the top of the form or quiz, add the title and if needed, a description or other information for the respondent.
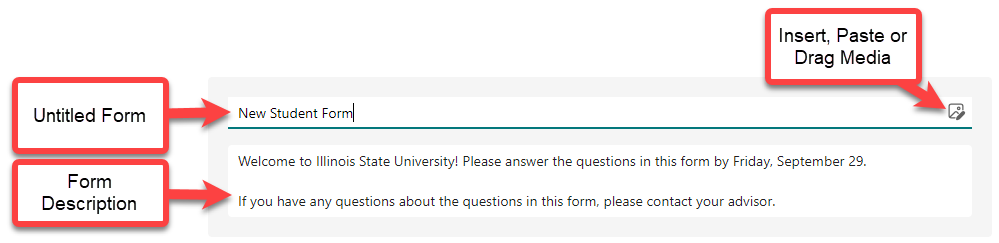
Untitled Form
When the form is first being built, the top of the form will be auto-filled with the title, "Untitled Form". Click Untitled Form to add the title.
Once Untitled Form is selected, this will display two textboxes. Enter the title of your form in the Untitled Form field.
Insert, Paste or Drag Media Icon
To the right of the Untitled Form field is the Insert, Paste or Drag Media icon. Use this icon to insert an image file.
Note
An Illinois State University theme is not available in Microsoft Forms. One option to have your form have an Illinois State University look is to use the "Insert, Paste, or Drag Media" icon to insert the ISU logo at the top of the form next to your title.
Form Description
Below the Untitled Form field is the Form Description field. Enter any additional information about the form in this field. This information can include a deadline, contact information, or additional information, such as a link to another webpage.
Sections
Questions in your form are placed in sections. Sections can be used to group related questions together.
A section is auto-entered into your form by default. Add additional sections by clicking the +Add new button > down arrow > Section.
Additionally, sections can be used to implement branching logic. Use branching to display a question (or questions) based on how a respondent answers a previous question.
Sections are displayed to respondents by clicking an arrow at the bottom right of the form; this will display the next section and its questions.
Each section can be edited to include their own information. The image below have different fields numbered. Below this image is a bulleted list that describes each numbered section.
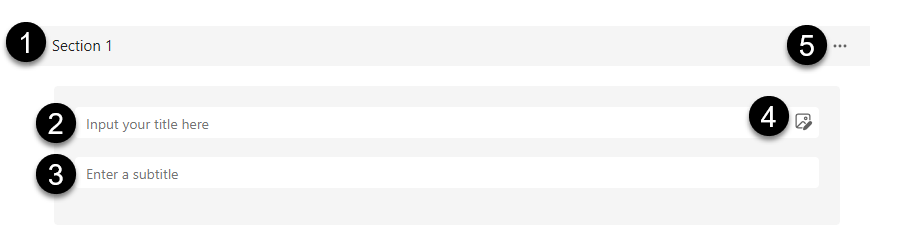
- Section heading - Sections are numbered and collapsed. Select the Section (number) heading to expand or collapse the fields underneath.
- Input your title here - Enter the name of your title here.
- Enter a subtitle - If there is a subtitle to the section, enter it here. Alternatively, use this section to enter additional information, such as directions.
- Insert, paste or drag media icon - Select this icon to enter an image to the top of the section.
- More settings for section - Once you select the More settings for section dots, this will open a dropdown menu that contains more options to edit the section. The image below have different fields numbered. Below this image is a bulleted list that describes each numbered section.
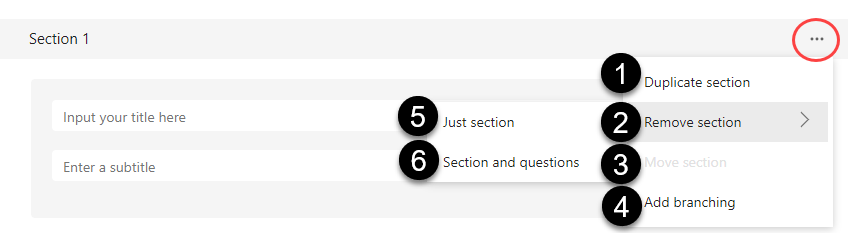
- Duplicate section – Select this option to create a copy of this section.
- Remove section – Select this option to open an additional menu that allows you to remove the just the information under the Section heading or both the section and questions.
- Move section – Select this option to open an additional window that allows you to rearrange the order of the sections of your form.
- Add branching – Use this option to branch to another question based on how a respondent answers a question. Click this link to open a webpage the contains directions on how to use this feature: Use branching logic in Microsoft Forms
- Just section – If Remove section is selected, a second menu will open asking if the section or section and questions will be removed. Just section will remove just the section title and subtitle.
- Section and questions - If Remove section is selected, a second menu will open asking if the section or section and questions will be removed. Section and questions will remove the section title, subtitle, and the questions in the section.
Questions
Select the +Add new button to add questions. This will open a list of question types to ask. Select the type of question you would like to ask.
Next to the +Add new button is a Question suggestion icon that looks like a lightning bolt:

Select this icon to display a question (or questions) that Microsoft Forms recommends for your form. Click on the question to input the question into your form.
Below is a list of all question types that can be asked in Forms. Click each question type to expand each section and learn about each type.
- Choice
Choice
Use the Choice question type to ask a question and provide answers that a respondent can select.
- Question - Enter your question in the Question field.
- Options - Enter the choices that a respondent can select in the Options field
- +Add option - Select +Add option to add additional choices.
- Add "Other" option (Note this option is only available in a Form, and will not appear in a Quiz) - Select Add "Other" option to provide a freeform textbox. Respondents can enter their own answer in this textbox instead of selecting one of the listed options.
- Select total options - The Select total options field contains a dropdown menu that allows respondents to choose more than one response.
- No limit - Respondents can choose as many responses as they wish
- Equal to - Respondents can only choose the number of responses based on the limit determined by the form creator.
- At most - Respondents can only choose up to a certain number of responses based on the limit determined by the form creator.
- Copy question - Choose Copy question to duplicate the question.
- Delete question - Choose Delete question to delete the question.
- Move question down - Select the Move question down icon to move the question below the next question.
- Move question up - Select the Move question up icon to move the question above the previous question.
- Insert, paste or drag media icon - Select this icon to enter an image next to the question.
- Multiple answers - Select the slider bar next to Multiple answers to allow multiple answers to be selected. Sliding this slider bar "off" will convert the checkboxes into radio buttons, only allowing one response to be selected.
- Required - Select the slider bar next to Required to have this question be required to be completed by the respondent. This form cannot be submitted until all required questions are answered.
- More settings for question - Select the More settings for question menu (three dots) to open a menu that allows you to change additional settings for this question.
- Shuffle options - Select Shuffle options to shuffle the answer choices. The order of the choices will be different each time the form is opened.
- Subtitle - Select Subtitle to open an additional textbox under the Question textbox. Enter additional information about this question in the Subtitle textbox.
- Add branching – Use this option to branch to another question based on how a respondent answers a question. Click this link to open a webpage the contains directions on how to use this feature: Use branching logic in Microsoft Forms
- Text
Text
Use the Text question type to ask a question and provide a freeform textbox in which respondents can enter their response.
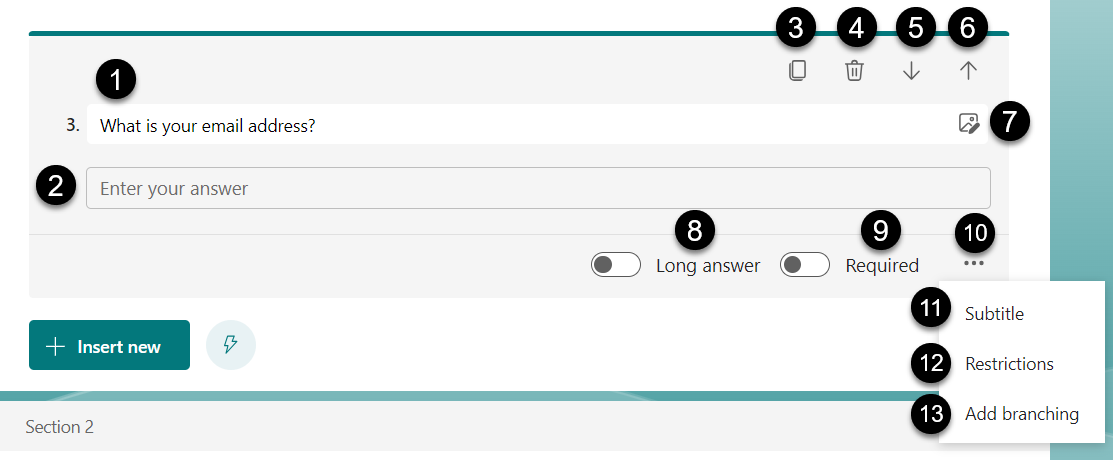
- Question - Enter your question in the Question field.
- Enter your answer - The Enter your answer field is the freeform textbox in which respondents can enter their responses.
- Copy question - Choose Copy question to duplicate the question.
- Delete question - Choose Delete question to delete the question.
- Move question down - Select the Move question down icon to move the question below the next question.
- Move question up - Select the Move question up icon to move the question above the previous question.
- Insert, paste or drag media icon - Select this icon to enter an image next to the question.
- Long answer - Select the slider bar next to Long answer to increase the size of the freeform textbox. Multiple lines (and paragraphs) can be entered into a Long answer textbox.
- Required - Select the slider bar next to Required to have this question be required to be completed by the respondent. This form cannot be submitted until all required questions are answered.
- More settings for question - Select the More settings for question menu (three dots) to open a menu that allows you to change additional settings for this question.
- Subtitle - Select Subtitle to open an additional textbox under the Question textbox. Enter additional information about this question in the Subtitle textbox.
- Restrictions - If the question requests the respondent to ask a number, use the Restrictions option to restrict the type of number(s) allowed. A dropdown menu will appear, allowing you to select from a variety of ways to confirm that you receive the correct type of response, such as an exact number, a range of numbers, or greater than or equal to a specified number.
- Add branching – Use this option to branch to another question based on how a respondent answers a question. Click this link to open a webpage the contains directions on how to use this feature: Use branching logic in Microsoft Forms
- Rating
Rating
Use the Rating question type to ask a question in which respondents can rate their thoughts on a question.
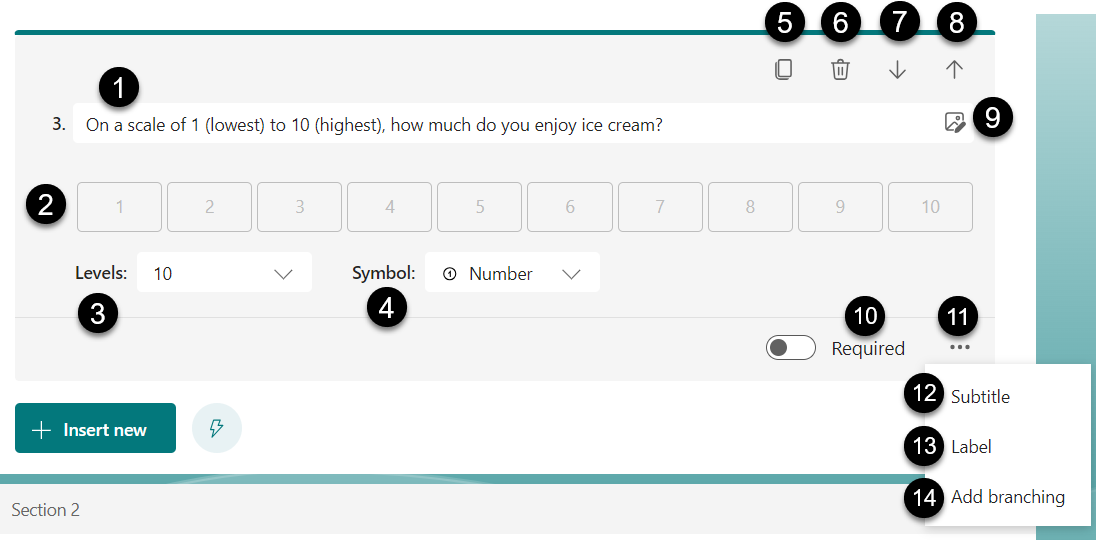
- Question - Enter your question in the Question field.
- Rating type - Rating type is the type of rating from which respondents can answer your question.
- Levels - Choose the highest rating type that a respondent can select using the provided dropdown menu.
- Symbol - Use the dropdown menu in the Symbol field to choose the type of symbol.
- Copy question - Choose Copy question to duplicate the question.
- Delete question - Choose Delete question to delete the question.
- Move question down - Select the Move question down icon to move the question below the next question.
- Move question up - Select the Move question up icon to move the question above the previous question.
- Insert, paste or drag media icon - Select this icon to enter an image next to the question.
- Required - Select the slider bar next to Required to have this question be required to be completed by the respondent. This form cannot be submitted until all required questions are answered.
- More settings for question - Select the More settings for question menu (three dots) to open a menu that allows you to change additional settings for this question.
- Subtitle - Select Subtitle to open an additional textbox under the Question textbox. Enter additional information about this question in the Subtitle textbox.
- Label - Choose Label to place a label at the beginning and end of the rating type displayed. For example, in the screenshot above, instead of writing "1 (lowest) to 10 (highest)", the word "lowest" can be used in the Label field and placed at the left next to 1. The word "highest" can be used in the Label field and placed at the right next to 10.
- Add branching – Use this option to branch to another question based on how a respondent answers a question. Click this link to open a webpage the contains directions on how to use this feature: Use branching logic in Microsoft Forms
- Date
Date
Use the Date question type to ask a question in which respondents can answer a question by entering a date.
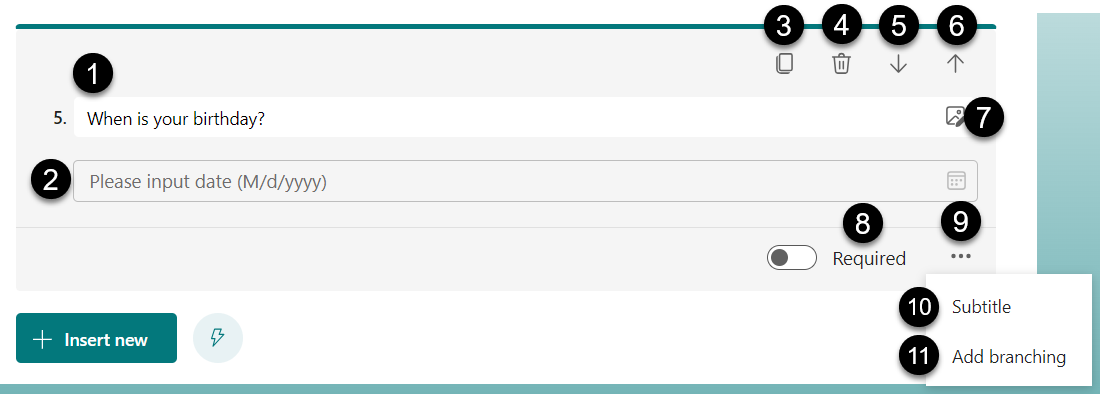
- Question - Enter your question in the Question field.
- Please input date (M/d/yyyy) - The textbox in which respondents can enter in the date is shown here. The "Please input date (M/d/yyyy)" will be displayed in the textbox and is viewed by respondents.
- Copy question - Choose Copy question to duplicate the question.
- Delete question - Choose Delete question to delete the question.
- Move question down - Select the Move question down icon to move the question below the next question.
- Move question up - Select the Move question up icon to move the question above the previous question.
- Insert, paste or drag media icon - Select this icon to enter an image next to the question.
- Required - Select the slider bar next to Required to have this question be required to be completed by the respondent. This form cannot be submitted until all required questions are answered.
- More settings for question - Select the More settings for question menu (three dots) to open a menu that allows you to change additional settings for this question.
- Subtitle - Select Subtitle to open an additional textbox under the Question textbox. Enter additional information about this question in the Subtitle textbox.
- Add branching – Use this option to branch to another question based on how a respondent answers a question. Click this link to open a webpage the contains directions on how to use this feature: Use branching logic in Microsoft Forms
- Ranking
Ranking
Use the Ranking question type to ask a question in which respondents can arrange a list of choices.
When a respondent views this type of question, they can select an option and drag and drop it to the intended location.
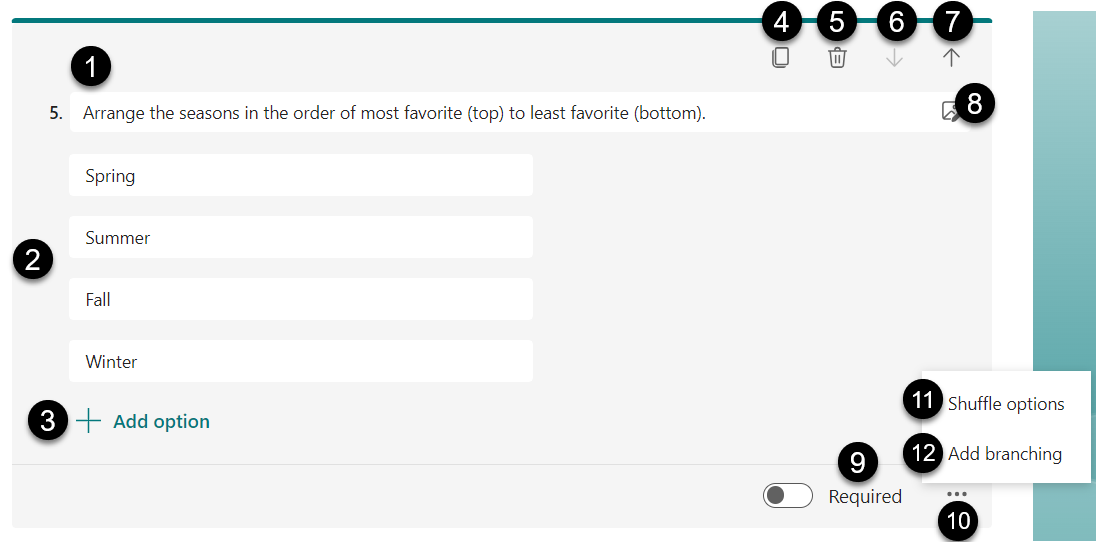
- Question - Enter your question in the Question field.
- Options - Enter the choices that a respondent can select in the Options field
- +Add option - Select +Add option to add additional choices.
- Copy question - Choose Copy question to duplicate the question.
- Delete question - Choose Delete question to delete the question.
- Move question down - Select the Move question down icon to move the question below the next question.
- Move question up - Select the Move question up icon to move the question above the previous question.
- Insert, paste or drag media icon - Select this icon to enter an image next to the question.
- Required - Select the slider bar next to Required to have this question be required to be completed by the respondent. This form cannot be submitted until all required questions are answered.
- More settings for question - Select the More settings for question menu (three dots) to open a menu that allows you to change additional settings for this question.
- Shuffle options - Choose Shuffle options to shuffle the listed options when the form is opened. The order of the choices will be different each time the form is opened.
- Add branching – Use this option to branch to another question based on how a respondent answers a question. Click this link to open a webpage the contains directions on how to use this feature: Use branching logic in Microsoft Forms
- Likert
Likert
Use the Likert question type to gauge attitudes and opinions about a topic.

- Question - Enter your question in the Question field.
- Statements - Enter the statements that a respondent is responding to in the Statements field.
- +Add statement - Select +Add Statement to add additional statements.
- Options - Enter the options for the Likert scale. Microsoft offers suggestions above the Options field.
- Plus sign - Select the plus sign to add additional options to the Likert scale.
- Copy question - Choose Copy question to duplicate the question.
- Delete question - Choose Delete question to delete the question.
- Move question down - Select the Move question down icon to move the question below the next question.
- Move question up - Select the Move question up icon to move the question above the previous question.
- Insert, paste or drag media icon - Select this icon to enter an image next to the question.
- Required - Select the slider bar next to Required to have this question be required to be completed by the respondent. This form cannot be submitted until all required questions are answered.
- More settings for question - Select the More settings for question menu (three dots) to open a menu that allows you to change additional settings for this question.
- Shuffle options - Choose Shuffle options to shuffle the listed options when the form is opened. The order of the choices will be different each time the form is opened.
- Add branching – Use this option to branch to another question based on how a respondent answers a question. Click this link to open a webpage the contains directions on how to use this feature: Use branching logic in Microsoft Forms
- Upload
Upload
Use the Upload question type to allow respondents to upload a file with their form submission.
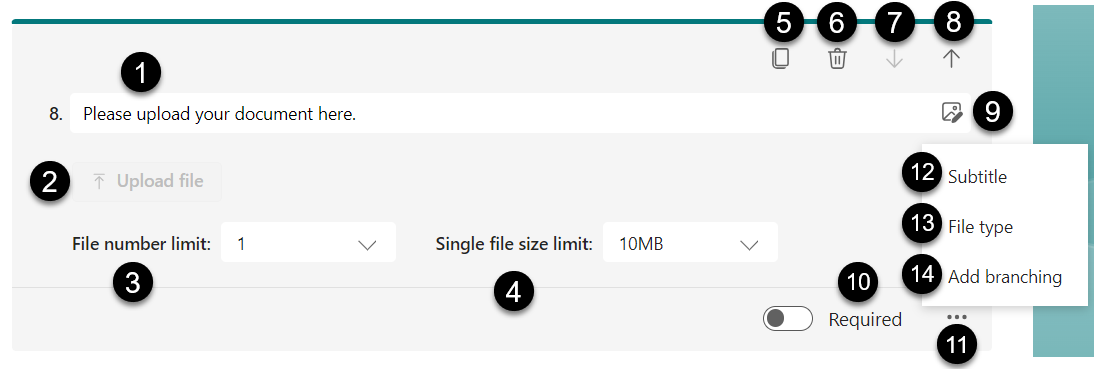
- Question - Enter your question in the Question field.
- Upload file - The upload file button is displayed here. This is the button that the respondent will select to upload their file.
- File number limit - Use the dropdown menu in this field to select the number of files a respondent can upload.
- Single file size limit - Use the dropdown menu in the Single file size limit field to limit the size of the file that can be uploaded.
- Copy question - Choose Copy question to duplicate the question.
- Delete question - Choose Delete question to delete the question.
- Move question down - Select the Move question down icon to move the question below the next question.
- Move question up - Select the Move question up icon to move the question above the previous question.
- Insert, paste or drag media icon - Select this icon to enter an image next to the question.
- Required - Select the slider bar next to Required to have this question be required to be completed by the respondent. This form cannot be submitted until all required questions are answered.
- More settings for question - Select the More settings for question menu (three dots) to open a menu that allows you to change additional settings for this question.
- Subtitle - Select Subtitle to open an additional textbox under the Question textbox. Enter additional information about this question in the Subtitle textbox.
- File type - Select File type to display a list of file choices that can be uploaded. Select the checkbox next to each file type that the respondent can upload. The respondent will see the acceptable file choices below the Upload file button.
- Add branching – Use this option to branch to another question based on how a respondent answers a question. Click this link to open a webpage the contains directions on how to use this feature: Use branching logic in Microsoft Forms
- Net Promoter Score
Net Promoter Score
Use the Net Promoter Score question type to allow respondents to rate something.
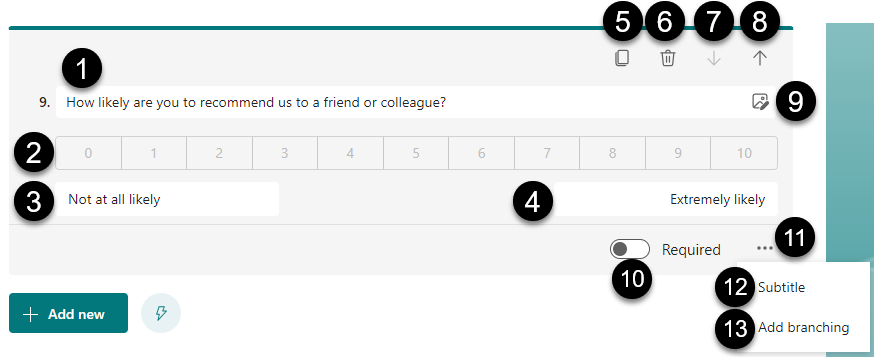
- Question - Enter your question in the Question field. By default, the Net Promoter Score question will auto-fill this question with "How likely are you to recommend us to a friend or colleague?"
- Rating score - Numbers 1-10 will be displayed as boxes that can be selected by respondents.
- Not at all likely - A label will appear at the far left below the rating scoring range, indicating that this is the lowest possible score. "Not at all likely" is auto-filled by default.
- Extremely likely - A label will appear at the far right below the rating scoring range, indicating that this is the highest possible score. "Extremely likely" is auto-filled by default.
- Copy question - Choose Copy question to duplicate the question.
- Delete question - Choose Delete question to delete the question.
- Move question down - Select the Move question down icon to move the question below the next question.
- Move question up - Select the Move question up icon to move the question above the previous question.
- Insert, paste or drag media icon - Select this icon to enter an image next to the question.
- Required - Select the slider bar next to Required to have this question be required to be completed by the respondent. This form cannot be submitted until all required questions are answered.
- More settings for question - Select the More settings for question menu (three dots) to open a menu that allows you to change additional settings for this question.
- Subtitle - Select Subtitle to open an additional textbox under the Question textbox. Enter additional information about this question in the Subtitle textbox.
- Add branching – Use this option to branch to another question based on how a respondent answers a question. Click this link to open a webpage the contains directions on how to use this feature: Use branching logic in Microsoft Forms
How to Get Help
Technical assistance is available through the Illinois State University Technology Support Center at:
- Phone: (309) 438-4357
- Email: SupportCenter@IllinoisState.edu
- Submit a Request via Web Form: Get IT Help Form
- Live Chat: IT Help Live Chat
Feedback
To suggest an update to this article, ISU students, faculty, and staff should submit an Update Knowledge/Help Article request and all others should use the Get IT Help form.