Technology
Youtube Player for Education
Last modified 4/14/2026
YouTube Player for Education is a new embedded player in Canvas Studio that allows students to view YouTube videos in Canvas without distracting ads or showing recommendations for other YouTube videos. The YouTube Player for Education prevents student usage data from being sent to Google, and it retains the captions present in YouTube videos.
Adding YouTube Videos into Canvas Studio
In the left-side global navigation menu, click the Studio button to open Canvas Studio My Library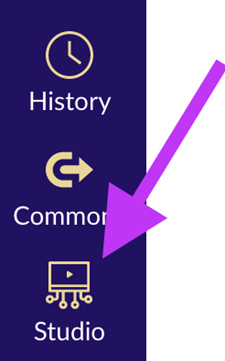
In the My Library page, click the Create drop-down menu (1). Then, click the Add Media link (2).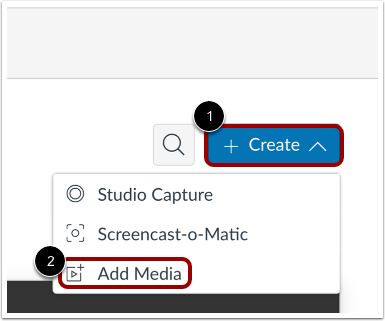
Enter the video URL in the Paste External Link field (1). Then click the Add Video button (2).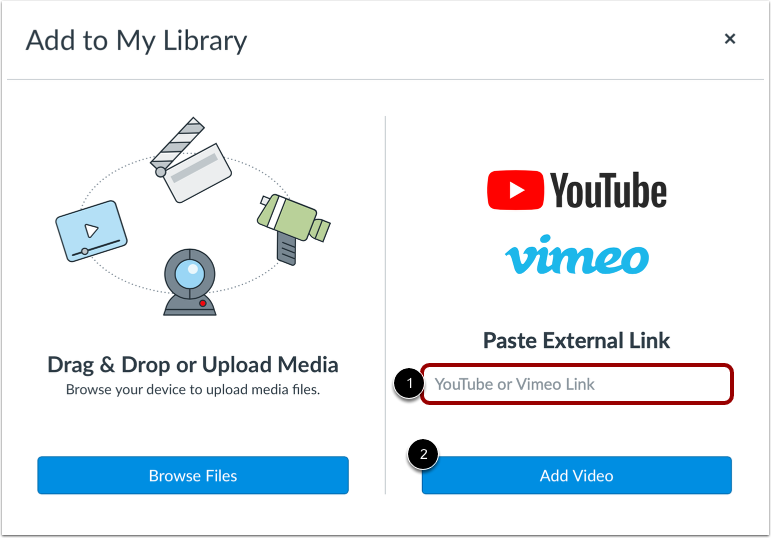
Media added via external sources (Vimeo or YouTube) displays the source's logo and the name of the user who uploaded the media.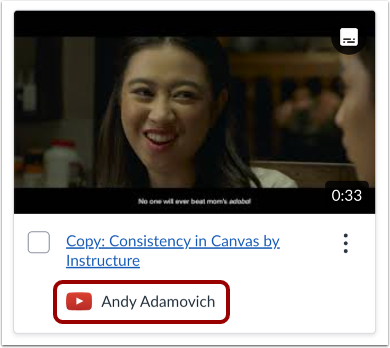
Adding YouTube videos into Canvas Studio will give them the following additional capabilities:
- Deploying a single video across multiple courses
Once a video is added to your Canvas Studio library, it functions as a centralized file that can be embedded into any course you instruct without needing to be re-uploaded.
This process can be repeated across any of your courses.
- Navigate to the desired course and open the assignment or discussion where you want to embed the video, click Edit.
- In the Text Editor, click the Canvas Studio icon.
- With your Canvas Studio library open, locate and click on the YouTube video you previously added.
- Click the Select button, configure your embed options, and click Embed.
- Click Save or Save & Publish on the Canvas item.
- Embedding test questions into videos
Canvas Studio allows you to overlay quizzes directly onto the video timeline to check for student comprehension.
- In the left-side navigation menu, click the Studio button to open your My Library.
- Locate the YouTube video, click the Options menu (the three vertical dots on the video thumbnail), and select Create Quiz.
- Enter a Quiz Title and Description, toggle whether you prefer to hide questions on the timeline, and click Get Started.
- Select your question type (Multiple Choice, True or False, or Multiple Answer), after filling out the question and answers, click Save.
- When finished, click the Done button in the upper right corner.
- Making videos into graded assignments
All Studio video quizzes need to be setup as an External Tool Assignments to score directly into the Canvas Gradebook.
- Click Assignments in the course navigation menu, and click the +Assignment button.
- Enter the Assignment Name, Points, and Assignment Group.
- Scroll down to the Submission Type dropdown and select External Tool.
- Click the Find button, scroll through the list, and select Canvas Studio.
- Select the video that has the quiz attached from your library.
- Click the Video Quiz Embed tab, select the specific quiz you created from the dropdown, and click Embed.
- Click Select on the Configure External Tool menu, then click Save & Publish on the assignment.
- Adding hyperlinks to videos
Users can provide external resources or links to students directly underneath the video player using the Details tab.
- Open the video in your Canvas Studio My Library.
- Below the video player, click the Details tab.
- Click the Edit Details button.
- In the Description field, type your text, highlight it, and use the hyperlink tool to insert your URL.
- Click Save.
- Students will now see the clickable link when they view the video.
- Adding student comments to videos
Canvas Studio allows for timestamped commenting, bringing discussion directly onto the video timeline.
- When embedding the video into a course using the Text Box, ensure the Display Media Tabs option is toggled on before clicking Embed.
- Once embedded, students can watch the video and click into the Comments tab located directly below the player.
- As the video plays, students can type their thoughts into the "Comment at (TimeStamp)" field and click Comment.
- The comment will appear in the tab and as a dot in the video timeline for all viewers to see.
- Changing the video's title
By default, Canvas Studio pulls the title from YouTube, but this can be customized for your course's needs.
- Open your video in Canvas Studio's My Library.
- Below the video player, click the Details tab, then click Edit Details.
- Erase the current text in the Title field and enter your preferred naming convention.
- Click Save.
- Changing the video's thumbnail image
The default YouTube thumbnail can be replaced with a custom image to keep your Canvas modules visually cohesive.
- Open your Canvas Studio My Library.
- Hover over the video you wish to edit, click the Options menu (the three vertical dots), and select Replace Thumbnail.
- Select the desired image file to use and click Open.
- The thumbnail will update automatically.
- Running reports that will show how long each student watched your video
Canvas Studio provides granular analytics on student viewing behaviors, allowing you to see exactly who watched the video and for how long.
- Navigate to the course where the video is deployed and open the page or assignment containing the embedded video.
- Below the video player, click the Insights tab.
- The graph displays viewing data, scrolling below the graph will show a list of individual students.
- While clicking on a specific student's name, the graph will change to show their personal viewing data. Highlighted sections indicate portions they watched, while blank sections indicate skipped or unwatched portions.
How to Get Help
Technical assistance is available through the Illinois State University Technology Support Center at:
- Phone: (309) 438-4357
- Email: SupportCenter@IllinoisState.edu
- Submit a Request via Web Form: Get IT Help Form
- Live Chat: IT Help Live Chat
Feedback
To suggest an update to this article, ISU students, faculty, and staff should submit an Update Knowledge/Help Article request and all others should use the Get IT Help form.