Technology
Approve, Edit, and Check Shifts in TimeClock Plus
Last modified 5/17/2024
As a manager, you are responsible for approving your employees’ clock-in and out times. After approving the times, this will be automatically exported into iPeople, which will allow them to get paid.
If the shift is not approved, the shifts will still be exported to iPeople. Therefore, it is important to have the shifts approved to ensure that the employee receives their paycheck. If the shift has not been approved, the manager will have to approve the time in both iPeople and TimeClock Plus.
How to Approve Shifts in TimeClock Plus
- By Individual for the Pay Period
- Open your TimeClock Plus dashboard.
- Select Hours at the top of the screen.
- In the menu that appears, select Individual Hours.
- Select an employee from the left side of the screen where your supervisees are listed.
- (Optional) Click the Sort by button to sort your supervisees by first name, last name, ID, etc.
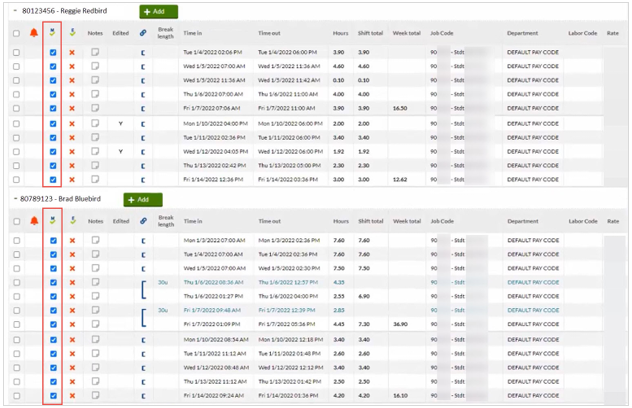
- Click the checkbox in the M column to approve the shift.
- The E column is for employee approval. This column is optional. You can have your employees approve their hours for their records, but this does not mark this shift as being approved for iPeople.
- The O column is used if you want someone to check the hours, too. Another individual can check the hours; afterward, you can log into TimeClock Plus and give the final approval by clicking the M column. This column is also optional (Figure 1).
Figure 1:
- The column with the red bell is the Exceptions column. For this example, blue dots are listed in this column. If there is an exception, this blue dot will be orange.
- Exceptions can consist of early or late clock-in, early or late clock-out, or missed in or out punch. Most exceptions have to do with scheduling, though it is possible to get exceptions while not using scheduling. As a result, this column is an indication of what will prevent the shifts from being exported for an employee.
- If you forget to approve a time before it is exported into iPeople, the time won’t export, so you will have to than manually approve the time in both TimeCLock Plus and iPeople. As a result, confirm that the M is checked before payroll goes out.
- Click Apply Changes. If this button is not selected, you will see a warning asking if you want to Discard Changes or Save changes.
- By Group for the Pay Period
- Open your TimeClock Plus dashboard.
- Select Hours at the top of the screen.
- In the menu that appears, select Group Hours.
- Set the parameters for the pay period:
Select the pay period in the Start date and Stop date fields.
Leave the Period field as “Manual”.
Click the Update button (Figure 2).
Figure 2:
- This will generate a list showing all your supervisees and the times they clocked in and out.
- Scroll through the list and click the checkboxes in the M column (Figure 3).
Figure 3: - Click the Apply Changes button.
- How to Edit a Shift in TimeClock Plus
Occasionally, someone may forget to clock in and out of their shift. If this happens, follow these steps:
- Find the start and end time of the shift that the employee worked.
- Open your TimeClock Plus dashboard.
- Select Hours at the top of the screen.
- In the menu that appears, select Individual Hours.
- Select an employee from the left side of the screen where your employees are listed.
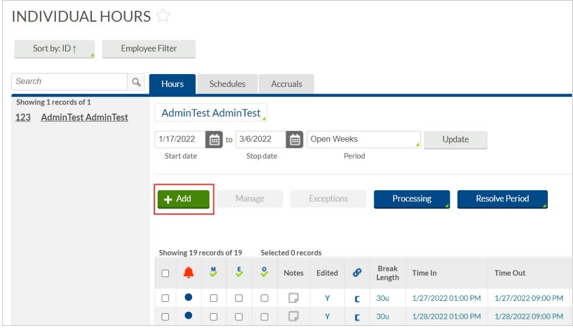
- Navigate to the top of the screen and click the green Add button (Figure 4).
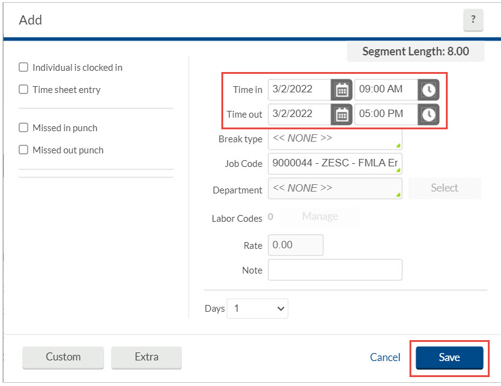
Figure 4: - Enter the date and time the employee started their shift in the Time in fields. Enter the date and time the employee ended their shift in the Time out fields (Figure 5).
Figure 5: - Click the Save button.
- A column labelled “Edited” will contain the letter “Y”, indicating that an edit was made.
- How to Check an Employee's Location When They Clock In or Clock Out
Because employees can clock in and out of their shifts from any device with an internet connection, managers can check the shifts to verify that they have logged into work on campus by viewing the IP address of the clock in and clock out. To view the IP address, use the following steps:
- Open your TimeClock Plus dashboard.
- Select Hours at the top of the screen.
- In the menu that appears, select Individual Hours.
- Select an employee from the left side of the screen where your employees are listed.
- Scroll to the time you want to check.
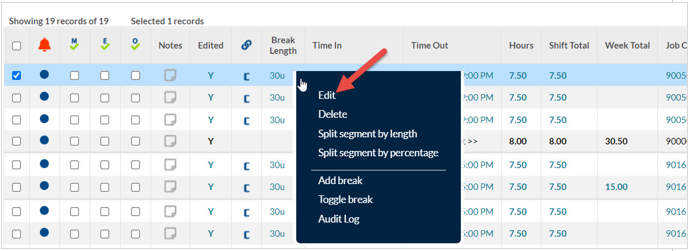
- Right click on the time and click Edit (Figure 6).
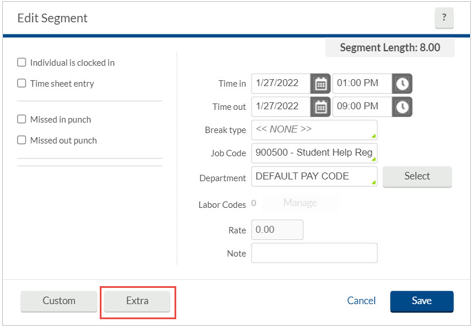
Figure 6: - In the Edit Segment window that appears, click the Extra button (Figure 7).
Figure 7: - View the Location field in the Punch in information and Punch out information sections. are Illinois State University’s IP addresses. ISU’s IP range is 138.87.0.0.16 or 138.87.0.0-138.87.255.255.
- It is not required to memorize the ISU’s IP address. As you view the IP addresses for the employee, you will see an IP address that does not match the others when compared to the other shifts the student has worked. This will be an indication that the student has clocked in and/or out from somewhere other than on campus.
How to Get Help
Technical assistance is available through the Illinois State University Technology Support Center at:
- Phone: (309) 438-4357
- Email: SupportCenter@IllinoisState.edu
- Submit a Request via Web Form: Help.IllinoisState.edu/get-it-help
- Live Chat: Help.IllinoisState.edu/get-it-help
Feedback
To suggest an update to this article, ISU students, faculty, and staff should submit an Update Knowledge/Help Article request and all others should use the Get IT Help form.


