Technology
Using the Achieve Check-In Queue
Last modified 4/30/2026
Achieve has a check-in queue feature that can be set up for your department. After it's set up, the queue can be displayed on a kiosk or at a front desk so that those who walk into your office can use the kiosk to sign up for an appointment or have the person at the front desk to sign them up for an appointment.
The kiosk can be set up so that students are either randomly assigned to an advisor or students are able to pick the advisor they would like to meet.
Requesting Access
To set up the check-in queue, submit a request at Get IT Help with the name of the department, program, and advisors that will be included in the queue.
Using the Check-In Queue (Advisors)
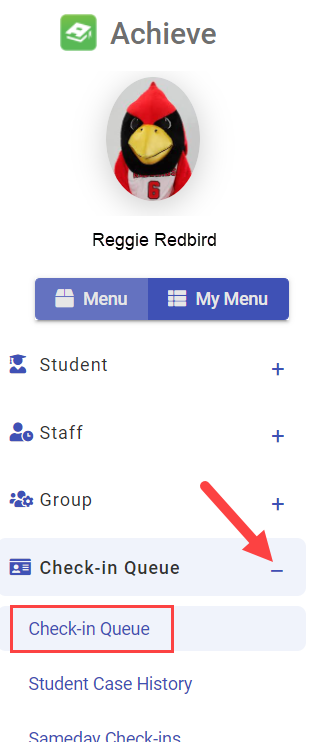
As an advisor, the check-in queue can be accessed by navigating to the Achieve website.
Once there, expand the Check-In Queue menu on the left side of the screen.
Click Check-In Queue.
The Check-In Queue will be displayed on the right side of the screen.
Check-In Queue Homepage
When the Check-In Queue is first opened, the homepage will be displayed.
The buttons at the top of the homepage will help you use the Check-In Queue.

- Today's Appointments - Click the Today's Appointments button to open the Today's Reservation Lookup window. This window will display your appointment(s) for today and to check-in students. Use the radio buttons to filter the appointments listed in this window. Use the Check-in Selected Students button to check in students who have signed into the queue.

- New Check-in - Click the New Check-in button to manually check someone into the queue and meet directly with the student, bypassing the front desk/kiosk. This will open the New Check-In window. Follow the steps in the New Check-in window to check in students.

- Check-In Appointments View - Use the three icons to change the view of the check-in appointments on this page. From left to right: Full View, Intermediate View, Minimal View

- In Session - The In Session field will show the number of students who have checked into the queue and are now meeting with their advisor.
- In Queue - The In Queue field will show the number of students who are currently checked into the queue and therefore, are waiting for an appointment.
- On Hold - The On Hold action can be completed by the Actions menu when a session is started. Once the Actions dropdown menu is selected, click Put on Hold/Release Hold.

After this choice is selected, a popup will display asking for how long to put the person on hold. The length of time is calculated by increments of five minutes, and up to sixty minutes.
This will increase the number in the On Hold field, indicating that a meeting is on hold for an advisor who is part of the queue. This option is used during a session. An example of using On Hold is if you or the student need to stretch your legs or step away from the meeting for a brief amount of time, and plan on continuing once you and the student are able to resume the meeting. - My Preference - Use the dropdown menu that appears when the My Preference button is selected to change the preference of different aspects of the Check-In page.
- Signed In - Click the slider bar in the Signed In field to be signed into the queue. Your name will show up in the queue/kiosk as someone that students can select for an appointment (if your queue is set up to allow students to select a specific advisor).
- Available - Click the slider bar in the Available field to signify that you are available at the beginning of your shift. Click the slider bar off when you are temporarily unavailable, such as if you are on break. Click the slider bar on when you are back and available in the queue.
Once a student has signed in, their name will appear on this page. Click their name when you are meeting with the student.
Student Check-In Process
Once a student has checked in at the kiosk, you will see the number in the In Queue field increase. Alternatively, you can also manually check in students using the New Check-In button.
Manual Check-in
Students can be manually checked into Achieve, bypassing the queue/kiosk.
- Click the New Check-in button. This will open the Center & Modality page of the New Check-In window.

Use the radio buttons in the Select Meeting Modality field to indicate the type of meeting you are having with the student.
Use the Select Center dropdown menu to select your check-in queue. Then, click the Start Check-In button. - In the Select Student page, select the radio button under Search Options to indicate how you will be searching for the student.

Then, start typing the student's name or ULID in the Search Student dropdown menu. Their name will be populated in the search results below this menu.
If you have searched for the student in the past, use the dropdown menu to find the student's name.
Click the student's name. Then, click the Next button. - In the Complete page, choose the name of the advisor that the student is meeting in the Select Staff dropdown menu.

- Click the Finish check-in & notify staff button. This will close the window and the student will appear as a tile on your homepage.
Using the Check-In Queue (Students)
Here is an example of a kiosk check-in page:
Notice how the second staff member has a number in the In-Queue column. Reggie Redbird is currently meeting with someone and started the meeting at 12:15PM.
Click the Check-In Options - Single-Sign-On or Future/Transfer Students button to continue the sign-in process.

If a student is enrolled at the university, the student will enter their ULID and password on the next screen that displays. Then, click the Login button.
If the student is not enrolled at the university and therefore, does not have a ULID, fill out the fields at the bottom of this screen and click the Register Me button.
After either the Login or Register Me button is selected, the next screen will complete the sign-up process. For this kiosk, students can select an advisor to meet or any available advisor. The kiosk can also be set up to randomly assign an advisor to a student, if preferred. If you have a mandatory questionnaire, the questions will appear after the Finish Sign-In button is clicked for the students to fill out. If there is no questionnaire, the sign-in process is complete.
Advisors will see the In-queue field increase by one.
Click the Discard & Go Back button to return to the previous screen.
Start Session
Once the student has checked in, a tile will appear on the homepage with the student's information.
- Click the tile to open a window that you can use to start the session and record session notes.
- Click the Start Session button.
- Note that the In Queue field has decreased by one and the In Session field has increased by one.
The Start Session button will change into a Release Session button. The text box will also be activated, allowing you to enter session notes.
- If you end up not needing to meet the student (perhaps they needed to meet someone else instead) or do not need to record notes, click the Release Session button. The number will increase in the In Queue field.
- If you or the student needs to leave, click the Options button, then select Cancel session from the dropdown menu that displays. This will remove the Start session window, the tile on your Check-In homepage, and the numbers in In session field and In Queue field will both increase by one.
- There are other menus in this window.
- Use the Actions menu to view other actions you can take with the session.
- Use the Options menus to view student information in Achieve.
- Use the three more dots to view other Achieve information about the student.
- If the meeting with the student is over and session notes are written, click the Complete button.
- This will display the Complete window. Use the dropdown menu to select the reason for the appointment. Then, click the Complete button.

This will close the window and end the session.
How to Get Help
Technical assistance is available through the Illinois State University Technology Support Center at:
- Phone: (309) 438-4357
- Email: SupportCenter@IllinoisState.edu
- Submit a Request via Web Form: Get IT Help Form
- Live Chat: IT Help Live Chat
Feedback
To suggest an update to this article, ISU students, faculty, and staff should submit an Update Knowledge/Help Article request and all others should use the Get IT Help form.