Technology
Creating Appointment Time Slots in Achieve
Last modified 11/14/2024
Once you have an Achieve account and profile, you must create appointment time slots so individuals can sign up for appointments with you.
Before You Begin
Achieve is a web-based application that allows you to sync appointments with your Outlook calendar.
Access to Achieve is required before you can schedule appointments. The term “appointment time slots” refers to a span of time during which you schedule appointments. You also need to create a profile in Achieve. For more information, see Achieve.
Creating Time Slots in Achieve
- Open a web browser and navigate to https://appointments.illinoisstate.edu/achieveadmin.
- Log in with your ULID and password.
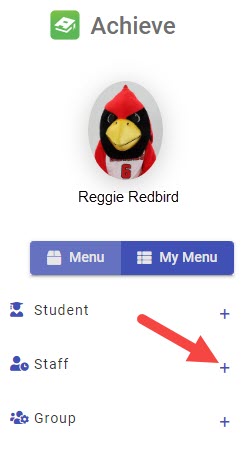
- Expand the Staff menu on the left side of the screen using the plus ( + ) sign.
- In the expanded Staff menu, select Create Time Slots. This will open the Create Time Slots page.
- Click the Create New Time Slots button.
- Use the dropdown menus to select the appropriate Department and Program for your time slots.
- Use the dropdown menu to select your name as the Staff (advisor/tutor/counselor/faculty).
- Enter a title for your appointment time block in the Subject line. This will appear when individuals sign up for an appointment.
- Enter the Location for your appointments.
- Select a Start Time and an End Time for your time slots. You can set multiple appointments within a multiple hour time slot.
- Select a Start Date and an End Date. If you are scheduling office hours for a course, you can schedule time slots for an entire semester.
Note
Time slots appear within a 90 day window. Therefore, if you create a time slot outside of the 90 day window, you will not see this time slot as an option on your page. However, this time slot will appear once it is within the 90 day window.
- Select the Appointment Block Type. Choose between a Single Appointment Block or Multiple Appointment Block.
- If you choose Multiple Appointment Block, you will indicate how long you want each appointment time slot to be. The shortest appointment time is fifteen minutes.
- Select the Appointment Type.
- This indicates how many individuals will attend one appointment. Walk-In appointments are only used for departments that have walk-in kiosks. Walk-In appointments will not be displayed on your profile.
- Indicate your Schedule. If you want the time slots to occur on specific days of the week, click the check box next to those days.
- If needed, enter a note in the Note to show with the appointment. Each individual who signs up for an appointment will see this message in the confirmation email.
- Click Save.
A list of your current time slots will be listed.
How to Get Help
Technical assistance is available through the Illinois State University Technology Support Center at:
- Phone: (309) 438-4357
- Email: SupportCenter@IllinoisState.edu
- Submit a Request via Web Form: Help.IllinoisState.edu/get-it-help
- Live Chat: Help.IllinoisState.edu/get-it-help
Feedback
To suggest an update to this article, ISU students, faculty, and staff should submit an Update Knowledge/Help Article request and all others should use the Get IT Help form.
