Technology
Login Process for ISU Managed MacOS Devices
Jamf Connect Self Service+ is a product installed on managed MacOS devices to keep them updated and secure, in compliance with the university's Patch Management Standard.
MacOS devices managed by Endpoint Support will be enabled for Self Service+ as well as FileVault on April 21st, 2026. Other university IT support units may enable their managed MacOS devices on a different schedule. Once Self Service+ and FileVault have been enabled by your IT support team, you will notice the changes following the next restart (reboot) of your device.
Users will log in to Self Service+ with their normal ISU login credentials and will need to sync the password on the Mac whenever their ISU account password is changed. The below instructions discuss how to log in to your Mac via Self Service+ following a restart of your device, which is required following device updates (every few weeks) or following a ULID password reset. If you are simply logging back in to your Mac device from Sleep mode or from the Lock Screen, there is no change to how you log back into your device, provided your password has been synced between your device and Self Service+ as described in this article.
- MacOS Login Process (Following a Device Restart)
Enable/Unlock FileVault:
FileVault is a built-in, full-disk encryption program in macOS. When enabled, FileVault secures your data by encrypting it, and requiring a password or recovery key to access the information.
Note: You only need to complete this step if your IT support team has enabled the FileVault policy on your Mac device. If your IT support team has not enabled the FileVault policy, you may skip to the section below under the Self Service+ Login heading.
- When logging in to a MacOS device following a restart (reboot), you will be prompted for your password to unlock FileVault.
- If this is the first time you are logging in since administrators have enabled the FileVault policy on your device, you will first be prompted to enable FileVault (Figure 1):
Figure1:
- If this is the first time you are logging in since administrators have enabled the FileVault policy on your device, you will first be prompted to enable FileVault (Figure 1):
- You will be presented with a screen showing all the accounts created on your device. Select your ULID account and type in the password (Figure 2):
Figure 2: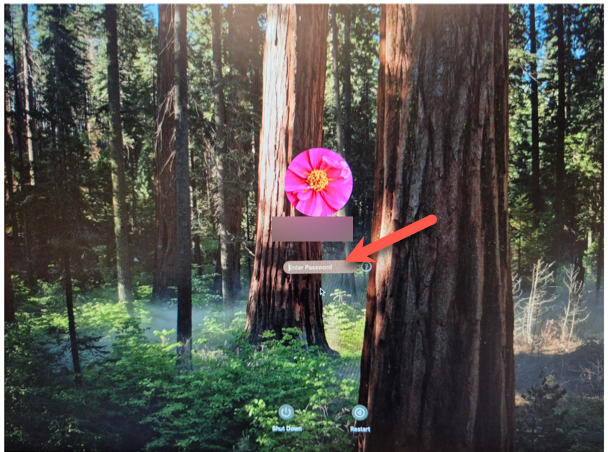
Log in To Your Mac Via Self Service+ Following a Device Restart
- Once FileVault has been unlocked/enabled (only required IF your IT support team has enabled that feature) you may then finish logging into your Mac via Self Service+, which uses Central Login (Figure 3). Type in your email address. Click Next. Type in your password and click Next. You will then be asked to confirm via Multi-Factor Authentication.
- For more information about Central Login at ISU, please refer to: Central Login
Figure 3: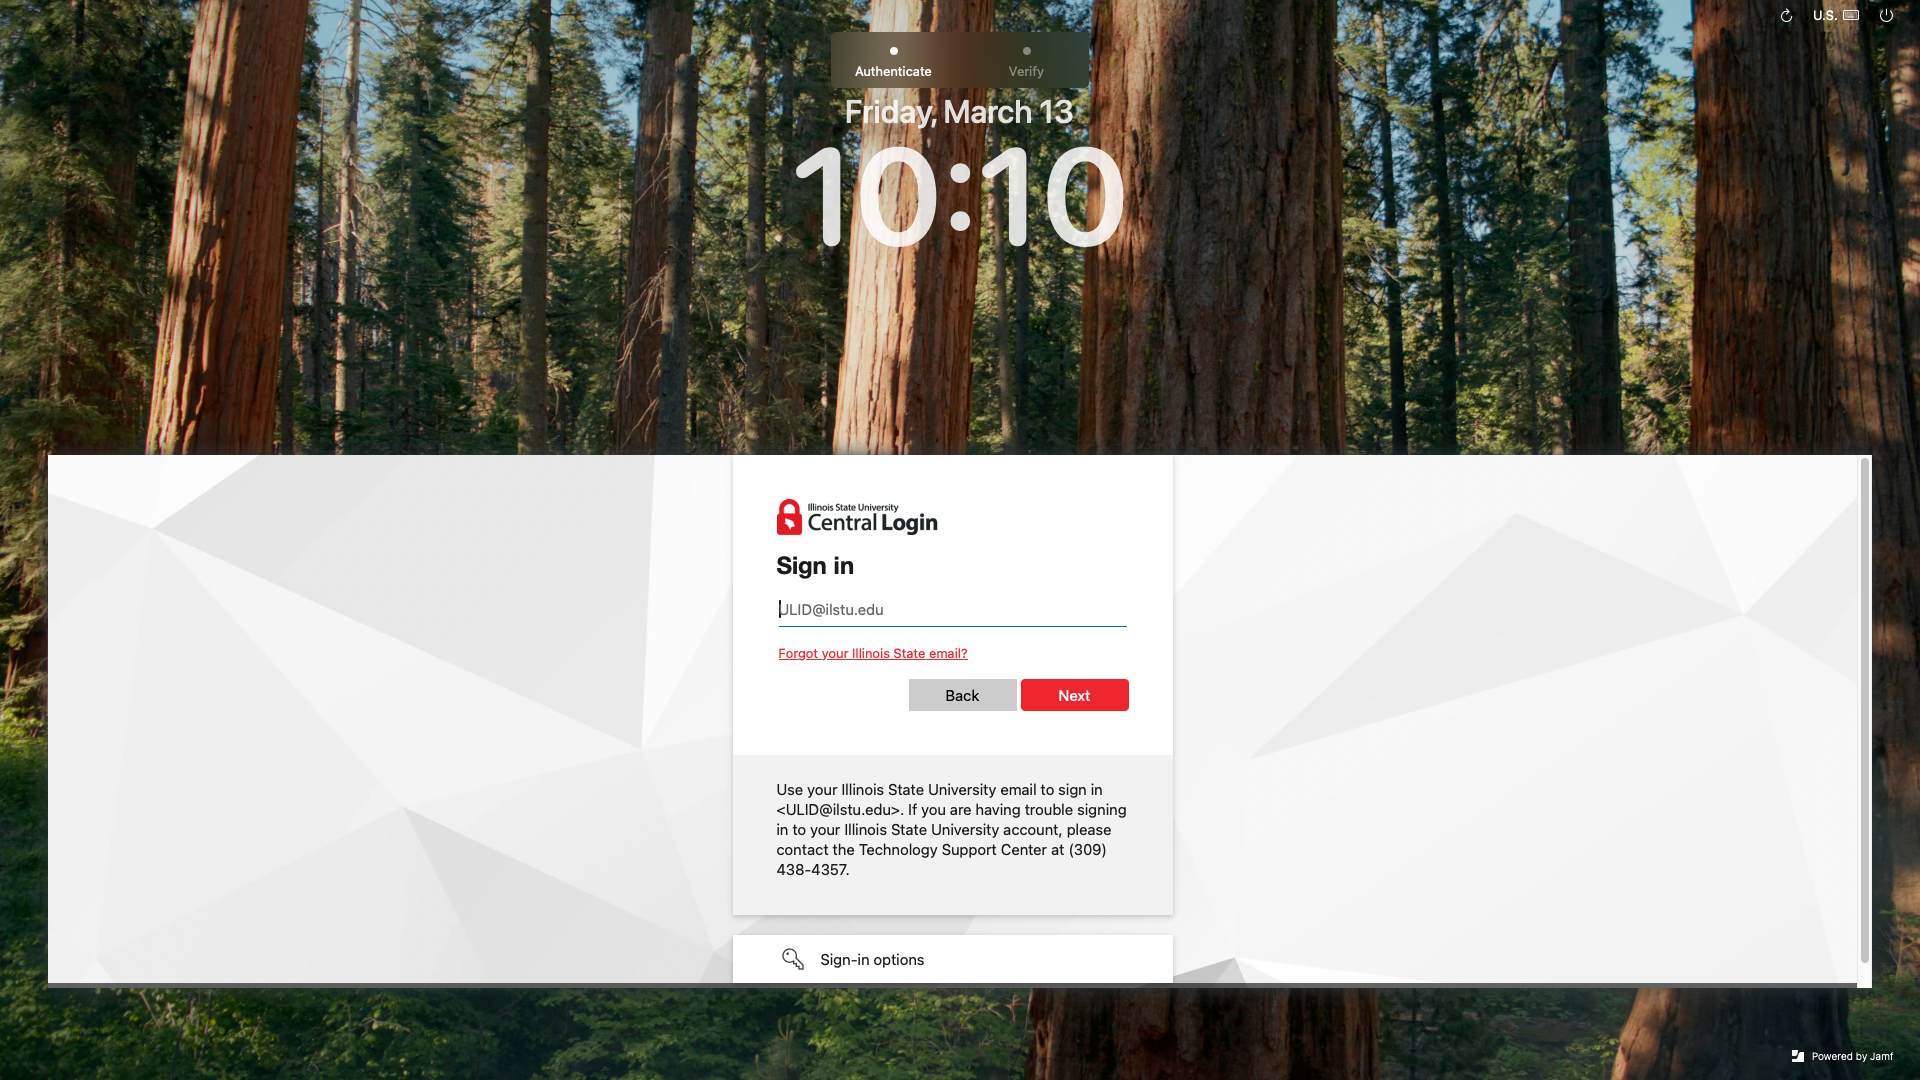
- For more information about Central Login at ISU, please refer to: Central Login
- If this is the first time you are logging in to the device, you will then be asked to set your accessibility settings and theme settings. You can then click Continue on the Welcome to Mac screen to access your desktop.
Note: After connecting to Self Service+ for the first time, you may be prompted to allow Self Service+ to access your Keychain. Selecting "Always allow" will prevent this pop-up from recurring. If the Illinois State Account Sync prompt remains open after clearing the keychain prompt, a device restart will clear that.
- Sync an Account Password Change to a MacOS Device
When an ISU Account password is changed, you will need to do three things:
First sync your local MacOS device password with your ULID passoword:
- MacOS does not automatically update your device password to match your ULID password, so it must be done manually:
Next reset your Mac Keychain:
Next sync the new password between your device and Self Service+:
- This will ensure you do not need to log in via Central Login and MFA except for after a device restart. There are two ways of syncing the new password with Self Service+, as described below:
Sync Password Method 1:
Restart the Mac and sign back into the device with Self Service+ again with your new password (you will need to connect the device via network cable).Restart the Mac and sign back into the device with Self Service+ again with your new password (you will need to connect the device via network cable).
Sync Password Method 2:
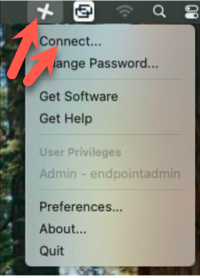
- Use the Connect option in Self Service+ to sync the account while logged in.
- On the top toolbar, click on the Self Service+ icon that looks like a plus icon and click on Connect (Figure 1):
- This will then bring up a sign in box asking for an email address and password. Type in the email address and the new password and then click Sign In. This will then sync the new password with the password on your Mac (Figure 2):
Figure 2: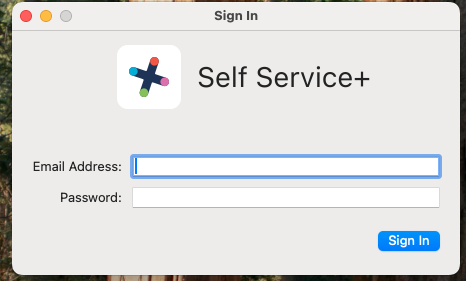
- This will ensure you do not need to log in via Central Login and MFA except for after a device restart. There are two ways of syncing the new password with Self Service+, as described below:
- Log In to your MacOS Device From Sleep Mode or Lock Screen
To log in to your MacOS device from Sleep mode or the Lock screen, just enter your password into the local passoword prompt (Figure 1). You will NOT be required to use Central Login nor MFA is this case.
Figure 1:
How to Get Help
Technical assistance is available through the Illinois State University Technology Support Center at:
- Phone: (309) 438-4357
- Email: SupportCenter@IllinoisState.edu
- Submit a Request via Web Form: Get IT Help Form
- Live Chat: IT Help Live Chat