Technology
Creating an Email Signature in Outlook for Windows
Last modified 10/9/2024
The Outlook email client allows you to create and use a personal signature, which will appear at the end of outgoing email messages. The signature can include text, images, a logo, links to a website, and more. You can choose to have the signature on all outgoing mail automatically, or choose which messages include a signature.
Important!
If you have an Illinois State Office 365 email account, and you use Outlook as your email client, but, you also use the Outlook Web App at Office365.IllinoisState.edu, you will need to create a signature in both locations.
Create an Automatic Email Signature
To create and automatically include a signature on new messages:
- Open Outlook
- Select Settings in the upper right of the screen (Gear icon).
- Under the Accounts section choose Signatures
- A window will pop up with some options to add new and edit current signatures (Figure 1).
- + New signature: Choose this to add a new signature
- Title: The title of your signature
- Below the Title section is a text box where you can add your custom signature
- Select default signature:
- For New Messages: Choose the signature you want to be added for new messages
- For Replies/Forwards: Choose the signature you want to be added for replies to messages and forwarded messages
Figure 1: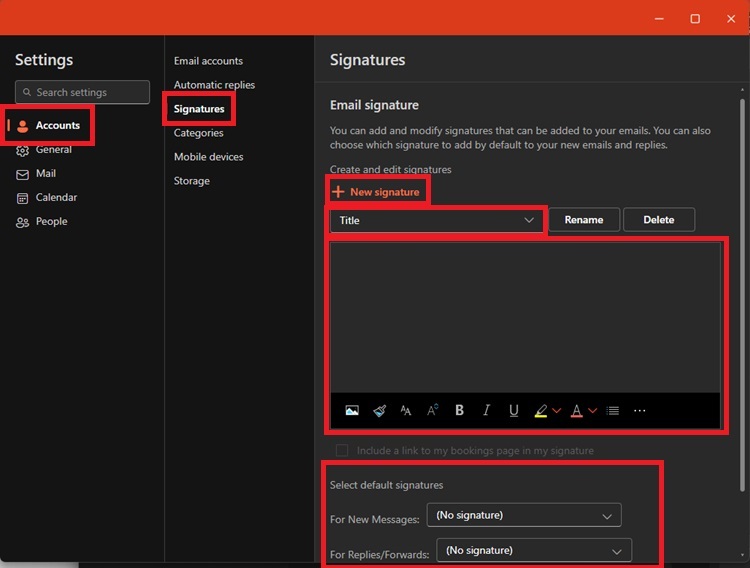
The signature will now automatically appear at the bottom of your chosen messages, when using your Outlook email.
How to Get Help
Technical assistance is available through the Illinois State University Technology Support Center at:
- Phone: (309) 438-4357
- Email: SupportCenter@IllinoisState.edu
- Submit a Request via Web Form: Help.IllinoisState.edu/get-it-help
- Live Chat: Help.IllinoisState.edu/get-it-help
Feedback
To suggest an update to this article, ISU students, faculty, and staff should submit an Update Knowledge/Help Article request and all others should use the Get IT Help form.