Technology
Comevo Basics
Last modified 9/27/2023
Note
Before you can log in to and access Comevo, you will first need to have an account created for you, which you can do by Submitting a Help Ticket. You will also need to have completed Comevo training.
Once you have completed training and had an account created for you, you can log in to Comevo here: Comevo Log In Page.
How to Create an Orientation/Training
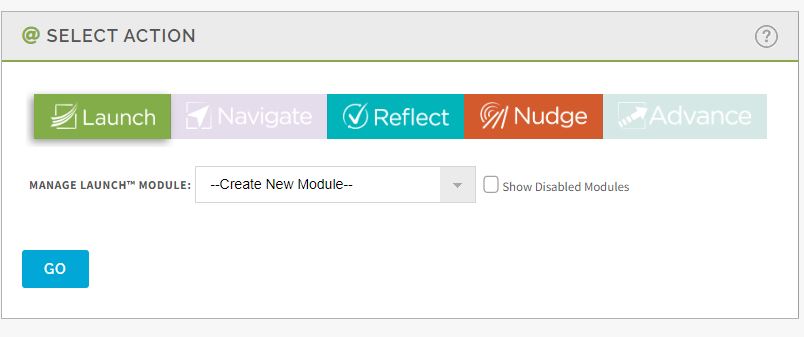
- Under Manage Launch Module in the Home page (Figure 1), select Create New Module.
- Select Go.
- Fill out the Create New Module form.
- Type in the Module name, which should be the name of the training or orientation.
- Under copy content from: choose none (or a previous module made if the new training is similar).
- Under pre-made content to use: choose none or default.
- Select Create.
Figure 1:
How to Edit an Orientation/Training
- Under Manage Launch Module in the Management Console Home page (Figure 1 above) select the title of the module you wish to edit.
- Select Go.
Manage Launch Course
Once you have created or are logged in to edit a Launch Course, you will see a few different options that allow you to edit and create the modules. These options are as follows.
Note
Each section contains a Question Mark ? in the upper right corner that will give you more information about how to use that section.
Status
This box is where you publish your training.
Prior to publishing your training module, you will see two options under Status (Figure 2):
- Preview: Allows you to preview the training.
- Publish and Go Live: Provides you a link for the training that you can share.
Figure 2:
Once published, you will see three options under Status:
- Preview: Allows you to preview the training.
- Add to Website: Creates HTML links and explains how to add the training onto your personal website.
- Create Working Copy: Allows you to make edits to a module behind the scenes while users are viewing your module. Simply republish the module once you are completed with all edits so that users will see the updated module.
Browse and Manage Sections
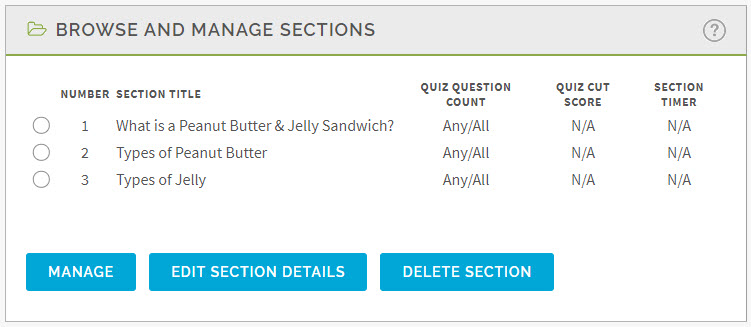
This box will contain your created sections and allow you to manage, edit, and delete these sections. You will see three options (Figure 3):
- Manage: Takes you to the section editor of the section you choose.
- Edit Section Details: Click to change the name or location of a section.
- Delete Section: Removes and erases a section.
Figure 3:
Create New Section
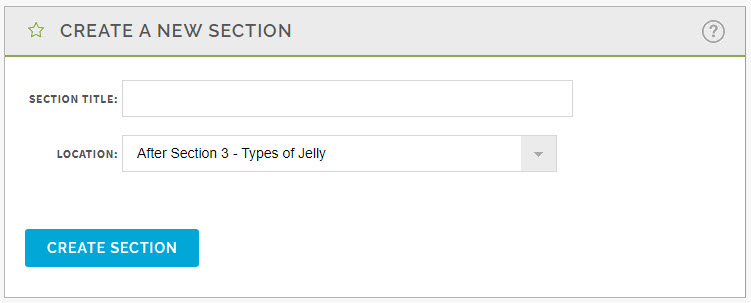
This box allows you to create new sections after naming the section and choosing its location by selecting the Create Section button (Figure 4).
Figure 4:
Reset Options
The Reset Options section is used for resetting quizzes and contains two options (Figure 5):
- Edit options
- Manual reset
Figure 5:
Terms to Know
This section allows you to provide definitions to specific terms every time they appear in your module. This box contains three options (Figure 6):
- Edit Term
- Delete Term
- New Term
Figure 6:
Settings for (Module Title Here)
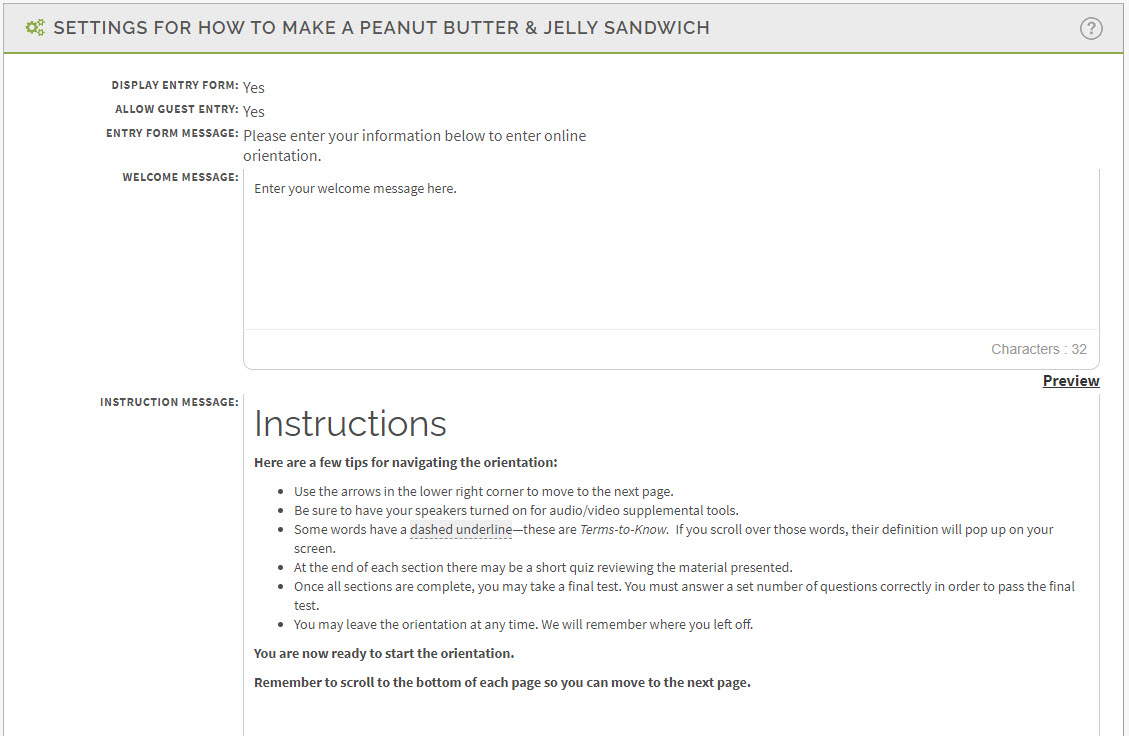
The largest box on the Manage Launch Course section will be the settings for the module. (Image 7) Within this section, you will see an overview of the settings for your course. Here, you will be able to edit the Instruction Message, choose if there will be a quiz or test, edit the pass/fail message, edit the completion message, and edit course details.
Figure 7:
Clicking the Edit Course Details will allow you to edit all of the sections you see in the preview (Figure 8).
Figure 8:
How to Publish Your Training Module.
- Select Publish and Go Live from the Status box (Figure 9).
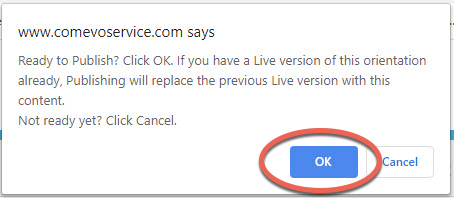
Figure 9: - In the Comevo Service pop up box, select OK if you are ready to publish (Figure 10).
Figure 10:
How to Create Sections
- Go to the Create a New Section box. (Figure 4 above).
- Type in the Section Title.
- Select the location of the section by using the Location drop down.
- Select the Create Section Button.
How to Edit a Section
- Select the section you wish to edit in the Browse and Manage Sections box. (Image 3).
- Select Manage to add more pages or edit the information in the section.
- Select Edit Section Details to change the title of the section or its location.
Section Pages
After going into the Manage part of a section to edit it, you will be able to manage the pages within a section. In this part, you will see four boxes that allow you to add and edit information within the section and each individual page. These boxes are as follows:
Pages for a Section:
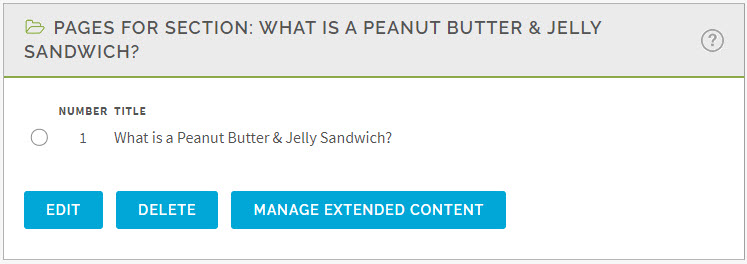
Shows you the current pages you have in this section and will allow you to edit, delete and manage those individual pages by selecting the page you wish to edit and choosing one of the three options listed below (Figure 11):
- Edit
- Delete
- Manage Extended Content
Figure 11:
Decision Pathfork:
This section allows you to create branches within a section in order to tailor your training to a specific user type. There are three options to choose in this box:
- Add Pathfork (Figure 12)
- Edit Pathfork
- Remove Pathfork
Figure 12:
Manage Assessment Questions:
This is the quiz tool and allows you to manage each sections' quiz, if you decide to use quizzes in your training module (Figure 13).
Figure 13:
Create New Page:
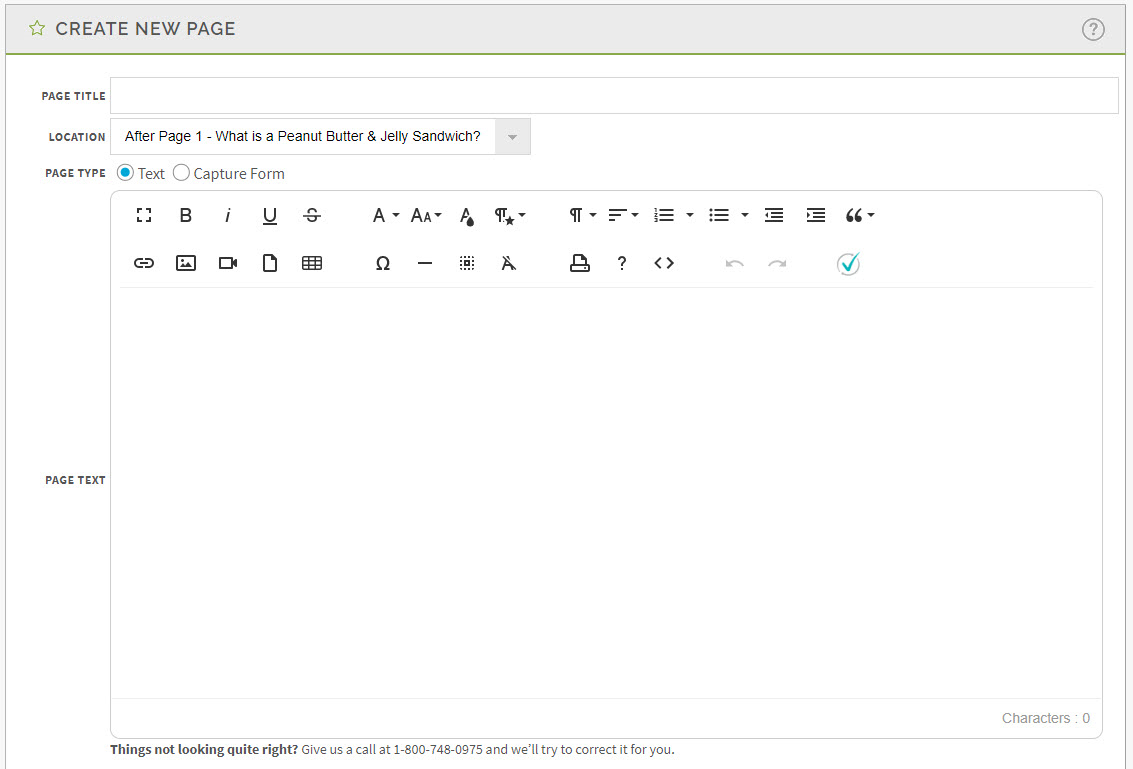
This box allows you to create new pages within your section (Figure 14).
To create a new page:
- Enter the Page Title.
- Select the Location of the page using the drop-down arrow.
- Add in the desired Page Text in the text editor field.
- If you wish to preview to the page before you are done editing, select Preview.
- Select Save Page when you are done.
Figure 14:
Create Section Quiz and Final Test Assessment Questions
Quizzes or final assessments, are created in each section. You can choose to do just section quizzes, a final assessment, or a combination of both. To create a quiz or final assessment questions, go to the Manage part of the section and do the following:
- Select New Question in the Manage Assessment Questions box (Figure 13 above).
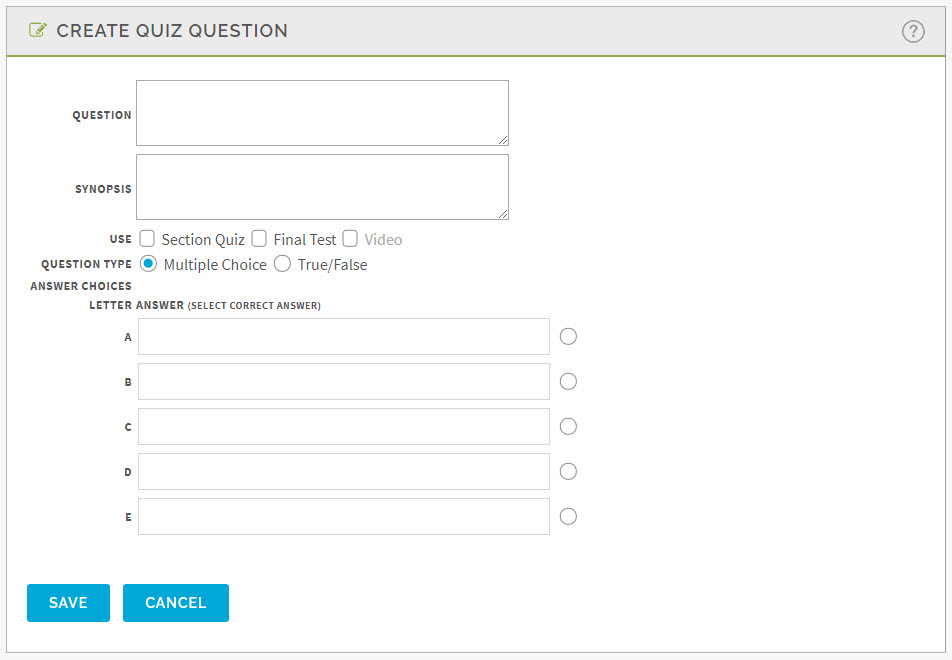
- Fill out the fields displayed in the form contained in the Create Quiz Question box (Figure 15).
- Question: Enter the question.
- Synopsis: Enter a synopsis if desired. This may include additional background information that will reinforce why the correct answer is correct if the test-taker gets it wrong.
- Use: Place a check in the box next to either Section Quiz, or Final Test, or next to both if desired.
- Question Type: Click on the radio button next to either Multiple Choice or True/False as desired.
- Answer Choices: If multiple choice, enter the answer choices you want the user to choose from. You may enter up to five questions in the A, B, C, D, and E fields. Be sure to select the radio button to the right of the correct answer. If the question is True/False, select the radio button next to either True or False.
- Select the Save button.
Figure 15:
How to Run Reports
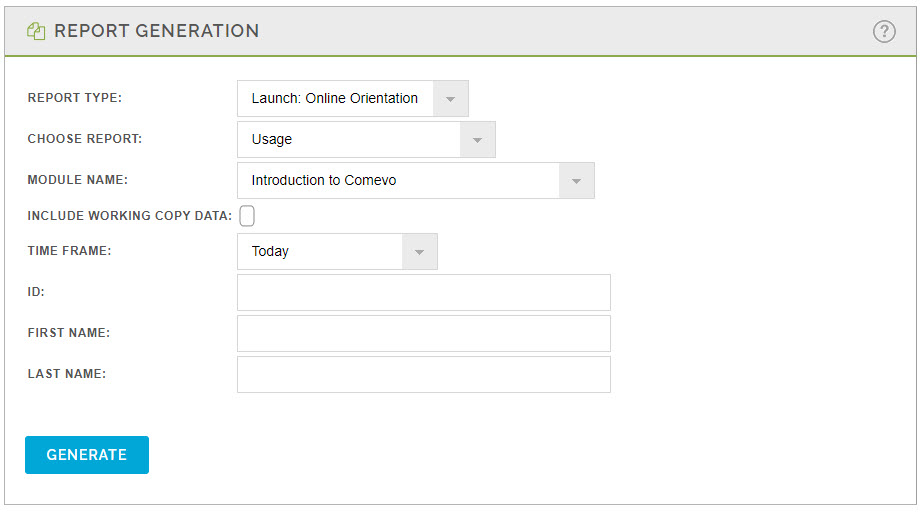
Comevo has the ability to generate a report based on user usage. To access the report, navigate to the Management Console home page and select Reports in the Utilities section.
Once you are in the Reports page, fill out the information in the Report Generation box (Figure 16). This will include selecting from the options in the drop-down menus next to the Report Type, Choose Report, Module Name, and Time Frame fields for the report. Other optional information may be entered as well, such as checking a box next to Include Working Copy Data if desired, or entering information in the ID, First Name, or Last Name fields.
After you have filled out the Report Generation form, click Generate at the bottom of the box. The report will load in the Report Retrieval box where you can view and download the report data.
Figure 16:
How to Upload Documents
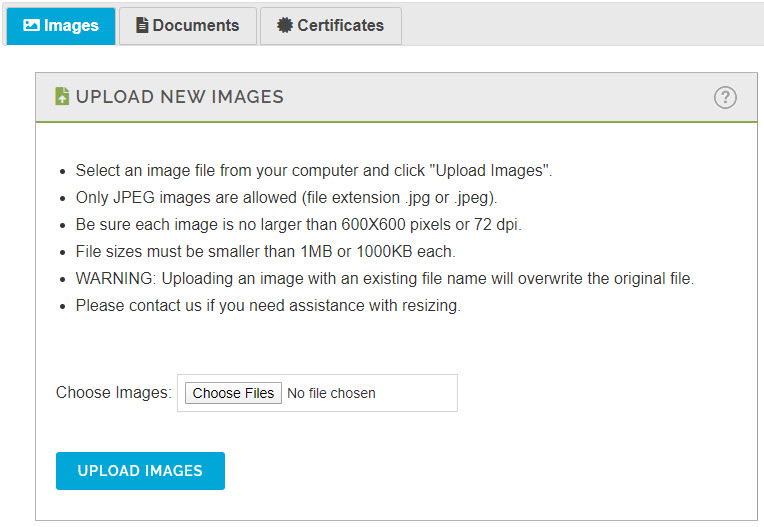
Documents can be uploaded directly into Comevo from your organizational unit home page. Once uploaded, these will be available to use within different modules that are created. To upload a document, do the following:
- Select Uploads from the Utilities in the Management Console home page.
- Choose what type of file you are uploading by clicking the appropriate Images, Documents, or Certificates tab (Figure 17).
- In the Upload New Images box select Choose Files.
- Choose the document you want to upload to Comevo from your device.
- Select Upload Images once your files have loaded.
Figure 17:
Creating Orientation Certificates
Orientation certificates need to be created in Microsoft Word and will have to have the extension .docx to be allowed. The file is not allowed to be any larger than 4MB.
The certificate can be designed however is desired, and can include the user’s name, date completed, student ID, and the module name. If you want any of that information displayed, you need to use the following code on the certificate before uploading it to Comevo:
- {fname} – First Name
- {lname} – Last Name
- {uniqueid} – The ID the student has used to enter the module
- {ModName} – Name of your module
- {compldate} – Date of completion
Note
Be sure to use the curly brackets for this code: { }
Once you have completed your certificate, you can upload it to Comevo using the same instructions described under the How to Upload Documents heading, (above) choosing the certificates tab.
Creating and Editing a Survey
Comevo has a survey feature that can be used to gather feedback about your module. To create your survey, first go to the Management Console home page and follow these instructions:
Create a Survey
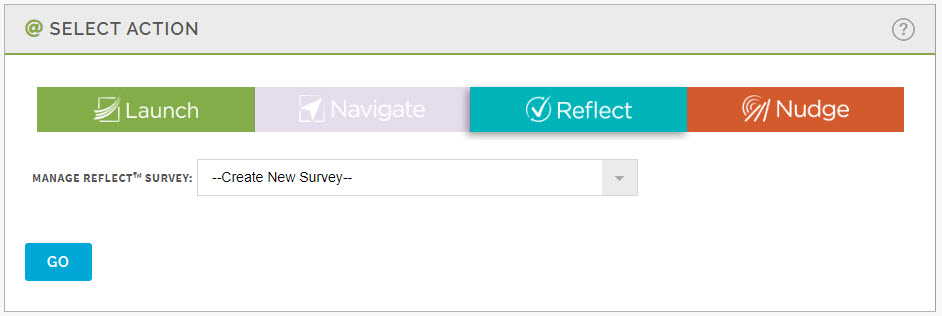
- In the Select Action box (Figure 18), where you select/create modules click Reflect.
- In the Manage Reflect Survey box, choose Create New Survey from the drop-down menu to start a new survey.
- Select Go.
Figure 18:
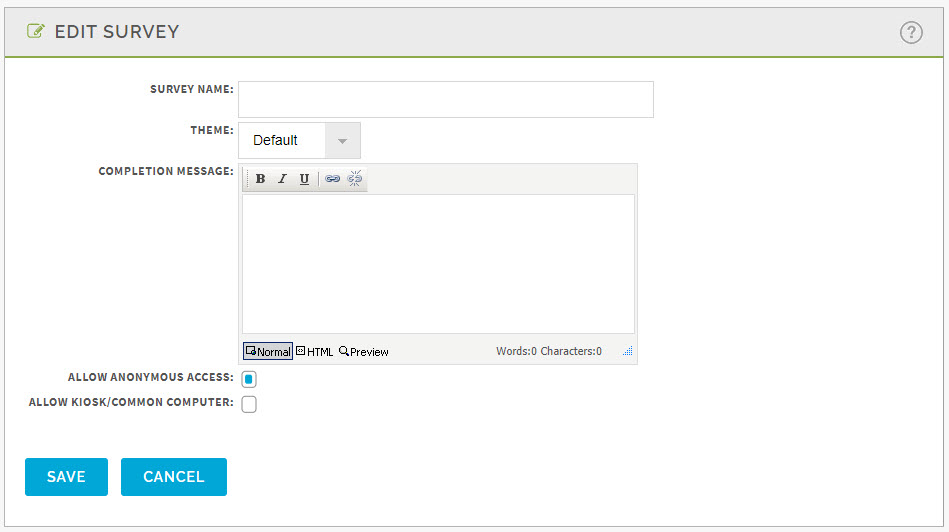
Fill out the Edit Survey form (Figure 19).- Enter the Survey Name in the field provided.
- Click the drop-down menu next to Theme and select a theme.
- Enter Completion Message details in the text editor field provided.
- If desired, click in the box next to Allow Anonymous Access.
- If desired, click in the box next to Allow Kiosk/Common Computer.
- Select Save.
Figure 19:
Edit a Survey
After your survey has been created, you are brought to the Manage Survey page, but you can also get here by choosing the name of your survey from the Reflect Survey box instead of choosing Create New Survey. To edit your survey, do the following:
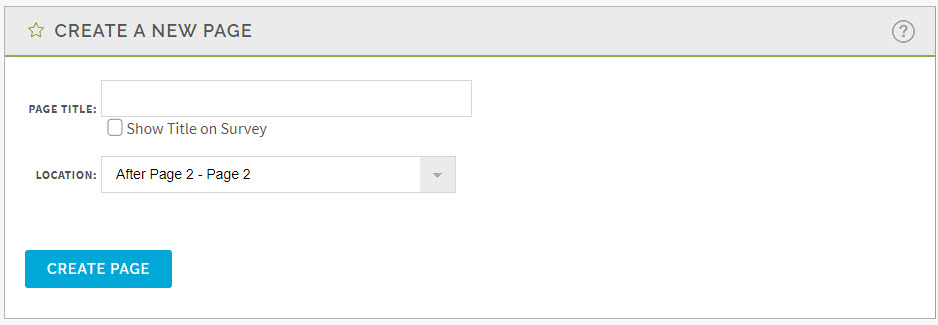
- Create page or pages for your survey questions in the Create a New Page box (Figure 20).
- Enter the Page Title in the field provided.
- Choose to check or uncheck the box next to Show Title on Survey.
- Click on the drop-down menu next to Page Location and select a location from the options provided.
- Select Create Page.
Figure 20: - Under Manage Pages (Figure 21), select the page for which you want to manage questions.
- Select Manage Questions.
Figure 21:
Create and Edit Survey Questions
After creating your survey and adding pages to house your questions, you will need to create the questions for the survey. Once you select Manage Questions (see previous section above), you will be brought to the page that allows you to create and edit survey questions. You may create and edit survey questions by doing the following:
Create a Question
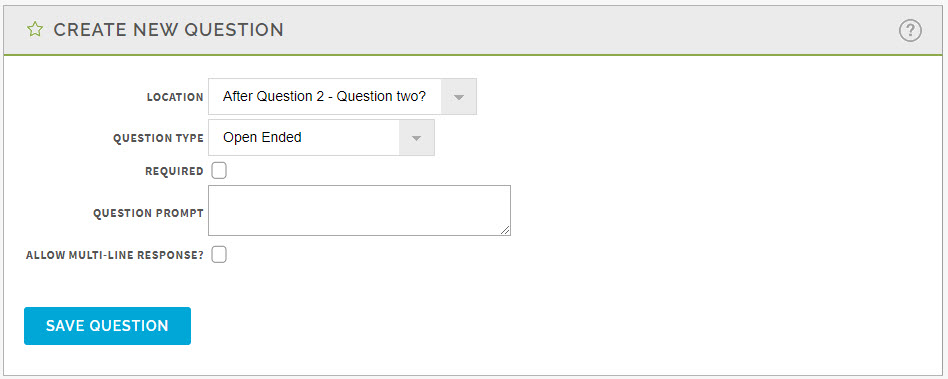
- Fill out the Create New Question form (Figure 22).
- Click the arrow next to the Location field to select a location from the drop-down menu.
- Click the arrow next to the Question Type field to select a question type from the drop-down menu.
- If desired, click in the box next to Required.
- In the text box next to Question Prompt, enter a question prompt.
- If desired, click the box next to ALLOW MULTI-LINE RESPONSE?.
- Select Save Question.
Figure 22:
Edit a Question
- Select the question you need to edit under the Question For Page: box.
- Select Edit.
- Edit the question as needed.
- Select Save Question.
Adding the Survey to your Module
Once your survey has been created, you can add it to your module by going back to the Management Console home page and following these instructions:
- Under the Select Action box choose the module you wish to add the survey to.
- Select Go.
- Under the Settings For (Module Name) box, select Edit Course Details.
- Scroll to the Exit Redirect section at the bottom of the box.
- Choose Survey selection for Exit Redirect.
- Beneath that, choose the survey you created for this module in the Survey Selection drop-down menu.
- Select Save.
How to Get Help
- Technical assistance is available through the Technology Support Center at (309) 438-4357, by email at SupportCenter@IllinoisState.edu, or by Live Chat at Help.IllinoisState.edu.
- All Comevo users have access to the Comevo support guides and the ability to contact Comevo support via their email address listed in the management console. When contacting Comevo support, it is recommended to CC KnowledgeandTraining@ilstu.edu for awareness. This recommendation is to allow us to know what questions there are and how they are resolved so the Illinois State University Office of Technology Solutions Knowledge and Training Team are able to document these scenarios on the IT Help website.
- User may also contact the Office of Technology Solutions Knowledge and Training team at KnowledgeandTraining@ilstu.edu if they need assistance with Comevo.
