Technology
Avoiding Compatibility Issues with Adobe Creative Cloud Files
Last modified 10/16/2024
The following article contains steps necessary to determine which version of Creative Cloud app was used to create your files in order to avoid compatibility issues in the Illinois State uLabs and departmental computer labs. The article will also show the steps necessary to upgrade and downgrade your version of Creative Cloud apps.
What version should I use?
If you want to be able to edit the work you create in Creative Cloud apps, both in the computer lab at ISU and on your own machine, it is important to use the same version of the software. Different versions could cause compatibility issues between your files.
How to Check the Application Version
Use the process below to check the version in the lab or on your own computer. The example shown below is for Photoshop, but all Adobe applications work the same way.
- Launch Adobe PhotoShop.
- MAC:
- Choose Photoshop from the PhotoShop menu next to the Apple Logo (Figure 1)
- Click About Photoshop to see the version.
Figure 1:
- WINDOWS:
- Choose Help → About Photoshop → About PhotoShop.
- The pop-up window will show the current version number near the upper left-hand corner, below the product name (Figure 2)
Figure 2:
Install Older Versions of Creative Cloud Apps
The Illinois State University uLabs and departmental labs may have an older version of apps than you do. Review the steps below on how to install a compatible version.
- Click the Creative Cloud icon, located in the Apple Menu Bar (MacOS) or the Windows Task bar (Windows OS) to open the Adobe Creative Cloud Desktop App (Figure 3)
Figure 3:
- Click the Apps option if it is not already open (Figure 4)
Figure 4:
- Click the drop-down menu next to the application you wish to install (Figure 5)
Figure 5: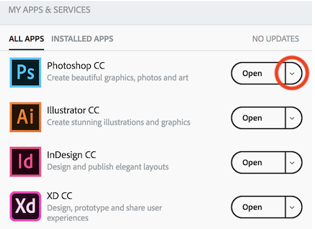
- Choose Other Versions from the drop-down Menu (Figure 6)
Figure 6:
- Click Install next to the application version that you need (Figure 7)
Figure 7:
Important!
By default, when you install a new version of an application using the Creative Cloud app, previous versions of that application are uninstalled, leaving only the most recent version. To retain previous versions, deselect Remove Old Versions in the Advanced Options section of the updater interface. To see an example of this, view Figure 6 below.
Figure 6:
How to Get Help
Technical assistance is available through the Illinois State University Technology Support Center at:
- Phone: (309) 438-4357
- Email: SupportCenter@IllinoisState.edu
- Submit a Request via Web Form: Help.IllinoisState.edu/get-it-help
- Live Chat: Help.IllinoisState.edu/get-it-help