Technology
Microsoft Whiteboard
Microsoft Whiteboard is a free digital canvas. This application allows users to sketch, plan, and collaborate with their content and ideas. Whiteboard is automatically enabled for existing Office 365 tenants.
To learn more, visit Microsoft's Whiteboard Page
- Using Whiteboard on Your PC
Install the Microsoft Whiteboard app for Windows from the Microsoft Store.
After installing, sign in to Whiteboard with your ISU Office 365 account using your ILSTU email and password.
- Using Whiteboard on your iOs Device
Download Microsoft Whiteboard to your iOS device from the App Store (requires Apple iOS 9 or later, iPhone 5s or later, iPad Mini 3 or later, iPad Air, or iPad Pro).
After installing, sign in to Whiteboard using your Illinois State University email address and password.
- Using Whiteboard for the Web
To access Whiteboard for the web, navigate to Microsoft Whiteboard Portal
Whiteboard for the web currently allows users to create and join boards, create and erase ink, and view sticky notes and images that others have added. It is supported on devices running an up-to-date version of most browsers, including Edge, Chrome, Firefox, and Safari.
Note: To zoom the canvas on Edge using a touch screen, touch events must be enabled. To do this, type about:flags in the address bar and press the Enter key. Scroll to Enable touch events and select Always on in the dropdown.
Note: Whiteboard for the Web is currently incompatible with Internet Explorer, Windows Phone 8.1, the Silk browser on Amazon Kindle, and extremely small form factor devices, such as smart watches.
- Using Templates (Preview) in Whiteboard
Templates are a new feature, currently in Preview, and available in the PC, Surface Hub, and iOS apps. Templates lets you and others brainstorm and work together more easily in Whiteboard.
Templates can be accessed by tapping or clicking the Insert menu button > Templates (Preview). This will bring up the template gallery, where you can scroll to browse and choose a template (See Figure 1).
Figure 1: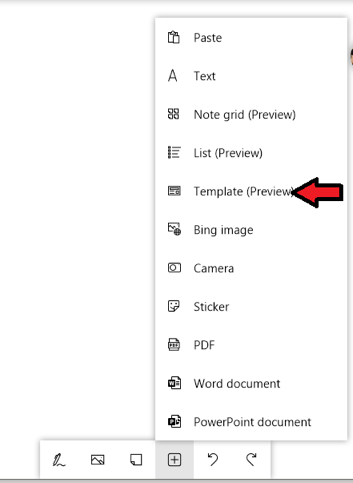
Note: Templates are not yet supported in Whiteboard for the Web, but will be available in the future.
- How do I use Ink, and what is Finger Painting?
If you are using a device with an active pen, you can use pen and touch for different things. Drawing on the screen with the pen will cause ink to appear, while dragging with your fingers will cause the canvas to pan.
If your device is passive – meaning that the pen is hollow or your device did not come with any pens – you will need to toggle Finger Painting mode on and off to change how you interact with the screen. When finger painting mode is on, touching the screen will draw ink on the canvas. When finger painting mode is off, touching the screen will pan or zoom the canvas.
You can switch among different color pens, highlighters, and erasers by selecting the applicable tool at the bottom of the app.
- How do I use a mouse and keyboard in Whiteboard?
To use a keyboard or mouse in Whiteboard, use the following steps:
- To pan the board canvas, click and then drag the canvas with the mouse, or hold down the Ctrl key on your keyboard while using the arrow keys.
- To quickly zoom the board canvas, scroll the mouse wheel up or down (if available).
- To select an object, click it with the mouse, or press the Tab key repeatedly until the object you want is selected.
- To insert an object, such as an image or text, click the [ + ] icon in the toolbar, and then click the object that you want to add. You can also use the context menu by clicking Shift and F10 keys at the same time, using the arrow keys to select the object that you want to add, and then pressing the Enter key.
- To draw or erase ink, click the Pen icon on the toolbar, select a pen or an eraser, and then use your mouse to draw on the canvas or to erase ink strokes. To use the keyboard for tool selection, press the Tab key repeatedly until the Pen icon is selected on the toolbar.
- To move the ruler while it is visible, click and then drag the ruler with the mouse
- To change the ruler’s angle, click to select the ruler with your mouse, and then use the arrow keys on your keyboard to change the angle.
- How do I use the Ruler?
The on-screen ruler in Whiteboard can help you draw precise, straight lines or align a set of objects on your whiteboard. To use the Ruler, use the following steps:
- Tap the [Ruler] icon to make the ruler appear on the canvas.
- Position the ruler at the angle you want:
- Use one finger or the mouse to move the ruler up/down or left/right.
- Use two fingers to rotate the ruler to the angle you want. If you don’t have a touch screen, use the mouse to select the ruler and the arrow keys to change the angle.
- To draw a straight line, tap to select a pen or highlighter, then begin drawing along the edge of a the ruler.
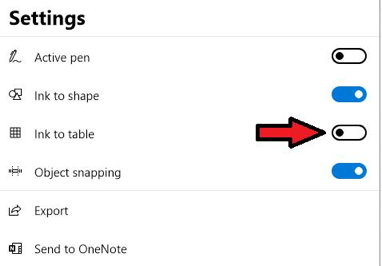
Note: The Ruler icon will not appear until you’ve enabled Active Pen (See Figure 2).
Figure 2:

- How do I use Ink to Shape?
If you want your hand-drawn shapes to change to precise shapes, you can use the optional Ink to Shape feature by enabling it in Settings. When Ink to Shape is active, drawing a shape — such as a circle or square — will automatically change the hand-drawn ink strokes to a precise shape on your whiteboard. Whiteboard’s shape conversion currently works for squares, rectangles, triangles, circles, hexagons, pentagons, and parallelograms.
Tip: You can use the Undo command if you want to revert to your original ink strokes for the last shape you drew. Shapes cannot be erased, but can be deleted by tapping on the shape and selecting the Trash Can icon from the context menu or using the Delete key. To stop automatically converting shapes from ink, turn off the Ink to Shape feature in Settings.
- How do I use Ink to Table?
Whiteboard allows you to create organized and clean tables on the fly with just a few ink strokes. You can highlight cells and add or remove columns or rows. To begin a table, first draw a square on the canvas. Once it is recognized by Whiteboard, bisect the shape with a vertical or horizontal line to create columns and rows, respectively.
You can add or remove columns and rows using the + and – symbols. Using the highlighter on specific cells also lets you highlight them for easier reference.
Erasing over a table erases the content in the table before it erases the table itself so you won’t accidentally erase the table itself (See Figure 3).
Figure 3:
- How do I use Object Snapping?
Object snapping helps you align your content by providing a visual cue. A line appears when you move an object (such as a sticky note or an image) close to another object. You can enable object snapping in Settings with the On/Off toggle switch.
- How do I select, move, resize, and copy content?
- To move objects when finger painting mode is disabled, you can select with your finger to easily move around the canvas.
- To select content, you can use your finger, pen, or the Lasso Select tool in the toolbar to select several objects at once. With Lasso Select activated, use your pen to circle the content you want to select. When finger painting mode is enabled for passive/non-pen based devices, you can also turn on Lasso Select to use your finger to circle-select content.
- To select: If your active pen has a barrel button, hold this button to temporarily switch into Lasso Select mode and circle content to select it.
- To move: When content has been selected, move it using your finger or pen.
- To resize: Use two fingers to stretch or minimize the content.
- To copy: Press and hold the selected content. Then, press the Copy button.
Next, press and hold in the location where you want to paste, then press the Paste button.
- How do I add pictures to Whiteboard from my device?
To insert pictures from your device, press and hold (on touch devices) or right-click to open the context menu, and then select the ?Image button. The File Explorer will appear. Use the File Explorer to select pictures from your device.
- How do I add sticky notes and annotate them?
Tap the [Insert] button in the toolbar, then tap Text note. You can also choose a specific area of the canvas, press and hold (on touch devices) or right-click to open the context menu, and then click the Note button to insert a sticky note.
To annotate a sticky note with ink, write on top of the sticky note; the ink will be grouped with the sticky note. To annotate a sticky note with text, click the sticky note. When the cursor appears, type on your keyboard.
- How do I lock an image to the background?
- On touch devices, press and hold the context menu (or right-click it) to open it, then tap or click the Image button.
- In the Open Dialog Box that appears, select a picture from your device, then click Open.
- If necessary, resize the image you inserted by clicking or tapping the image to select it, then dragging the sizing handle in the bottom right corner of the image up or down.
- When you are finished resizing the image, right-click it, click the ". . ." button on the context menu, then click Lock to Background
- Tip: To unlock an image from the background, right-click the image, click the ". . ." button on the context menu, then click Unlock from Background
- How do I look at a bird’s eye view of my Whiteboard?
Double tap or click to zoom out so you can view the entire whiteboard. You can double tap or click to toggle between a bird’s eye view (zoomed out) and a zoomed in to 100% view. Alternatively, continuously zooming out the canvas will eventually switch you to bird’s eye view.
- Where can I find all of my Whiteboards and how to I switch to them?
When you have a whiteboard open, click the Back arrow to get to your other existing whiteboards.
Note: The back button is not visible on Surface Hub until you sign in.
- How do I title a Whiteboard?
You can title a whiteboard by going to the board gallery and tapping the ". . ." button for the whiteboard you want to rename.
- Titles can contain between 1 and 254 characters.
- Titles cannot contain the characters “ * : < > ? / \ |
- Titles cannot start with the ~ (tilde) character.
- How do I collaborate with someone else in Whiteboard?
While signed in, you can start a collaborative session by tapping the [Invite] button next to your name, then writing or typing the name of the person with whom you want to collaborate. This will send that person an email and they will see your board automatically appear in their list of available boards.
You can also select More options to generate a sharing link that you can copy and paste into an email message.
Note: Users can currently collaborate only with other people within their organization. Microsoft will be adding the option to collaborate on whiteboards with guests outside of your organization in the future.
- How can I export a Whiteboard, or save it as a screenshot or a file?
To export your whiteboard, tap the Settings button, then select Export Image (png).
- How can I export, or delete personal data from my Whiteboards?
To Export:
Tap the ". . ." button for the whiteboard you want to export, then select Export image (png).
This will open a File Explorer window in which you can choose where to save the image.
To Delete:
Tap the ". . ." button for the whiteboard you want to delete, then select Delete.
Warning: This will permanently delete the whiteboard.
- What is Whiteboard in Microsoft Teams meetings?
Whiteboard integration in Microsoft Teams meetings is powered by Whiteboard for the web, which lets participants of Teams meetings draw, sketch, and write together on a shared digital canvas.
For details about Whiteboard integration with Teams, see Use Whiteboard with Teams
How to Get Help
Technical assistance is available through the Illinois State University Technology Support Center at:
- Phone: (309) 438-4357
- Email: SupportCenter@IllinoisState.edu
- Submit a Request via Web Form: Get IT Help Form
- Live Chat: IT Help Live Chat