Technology
Adding OneDrive Content in Canvas
Instructors can add documents to their Canvas course(s) from Microsoft OneDrive using the Microsoft OneDrive Learning Tool Integration (LTI) build into each Canvas course. Content may be added from the OneDrive LTI via several methods within Canvas, including:
- Link from the Canvas Rich Content Editor (RCE)
- Link within a Module
Important
Files shared via the Microsoft OneDrive LTI via one of the below methods should result in all members of your course having access to the shared content. It is also possible to log in to Microsoft OneDrive directly and copy/paste links for files into your Canvas course; however, you may need to manually configure sharing permissions for each file individually within OneDrive in that case. It is strongly recommended that OneDrive content be shared within Canvas courses using the methods described below. Be aware that adding OneDrive content via the methods described below will result in a new copy of the content being created within Canvas, and subsequent changes to the shared content will not sync between your Canvas course and your OneDrive account. If changes need to be made to content previously shared via one of the below methods, you will either need to open the shared links in your Canvas course(s) and update the file, or you may update the file in OneDrive and re-add new links to your Canvas course via the methods below.
- Enable the Microsoft OneDrive LTI Link in Course Navigation
Instructors may choose to enable Microsoft OneDrive in the Course navigation. This will allow both the instructor and students to access, open, and edit content from their ISU OneDrive accounts. To do so:
- Navigate to the Canvas course in which you would like to use your OneDrive content.
- If OneDrive does not currently appear in your Course navigation, enable it.
- For more information regarding enabling items in Course navigation, please see: Manage the Course Navigation Menu in Canvas
- Select OneDrive in your course navigation.
- If prompted, select Work or school account.
- Log in to OneDrive via Central Login.
- For more information about Central Login at ISU, please refer to: Central Login
You have now logged in to the OneDrive LTI within your Canvas course. Your students will also be able to log in to their OneDrive accounts within your course in order to share their content within the course where appropriate.
- Add OneDrive Content via the Canvas Rich Content Editor
The Canvas Rich Content Editor is available within multiple Canvas resources, including:
- Announcements
- Assignments
- Discussions
- Pages
- Quizzes
- Syllabus
You may link to your OneDrive content using either the OneDrive icon, or the Plug In icon, in the Canvas Rich Content Editor as described below:
- Select one of the options below:
- OneDrive icon: In the Rich Content Editor, click on the Blue Cloud (OneDrive) icon (Figure 1)
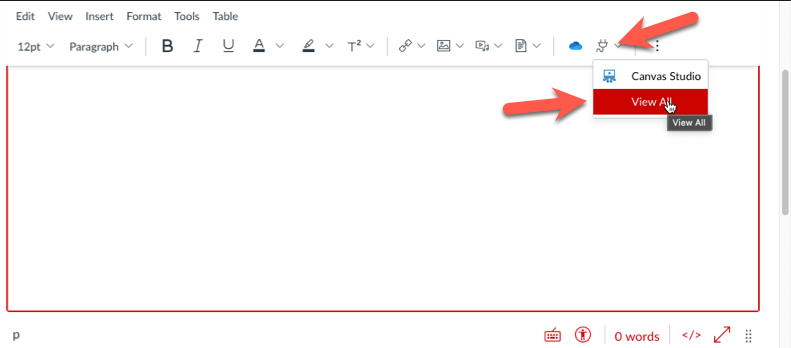
Figure 1: - Plug In icon: In the Rich Content Editor, click on the Plug-In icon in the menu and select View All (Figure 2):
- If Microsoft OneDrive already appears as an option you may skip this step and move to the next step.
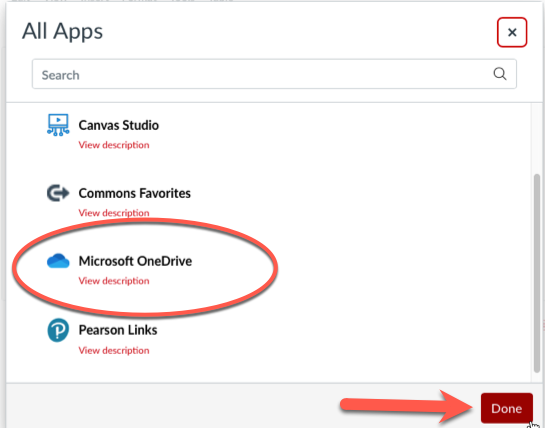
Figure 2: - Select Microsoft OneDrive > Done (Figure 3):
Figure 3:
- If Microsoft OneDrive already appears as an option you may skip this step and move to the next step.
- OneDrive icon: In the Rich Content Editor, click on the Blue Cloud (OneDrive) icon (Figure 1)
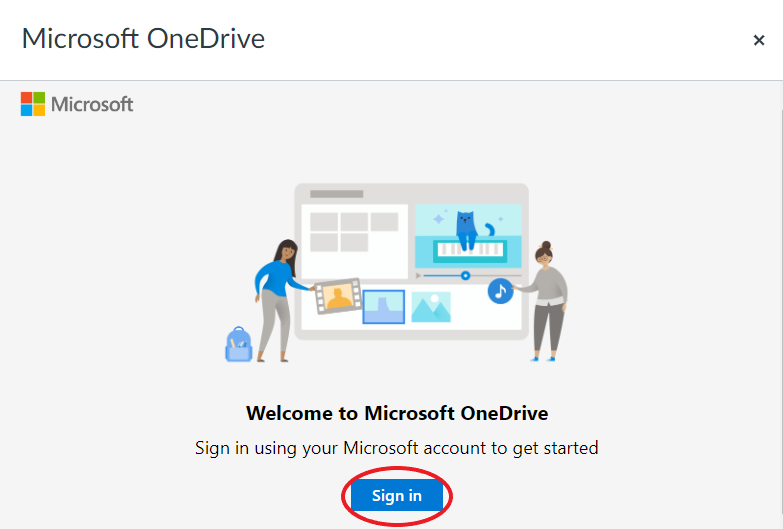
- In the Microsoft OneDrive pane, select Sign in (Figure 4):
- If prompted, select Work or school account.
Figure 4:
- If prompted, select Work or school account.
- Log in to OneDrive via Central Login.
- For more information about Central Login at ISU, please refer to: Central Login
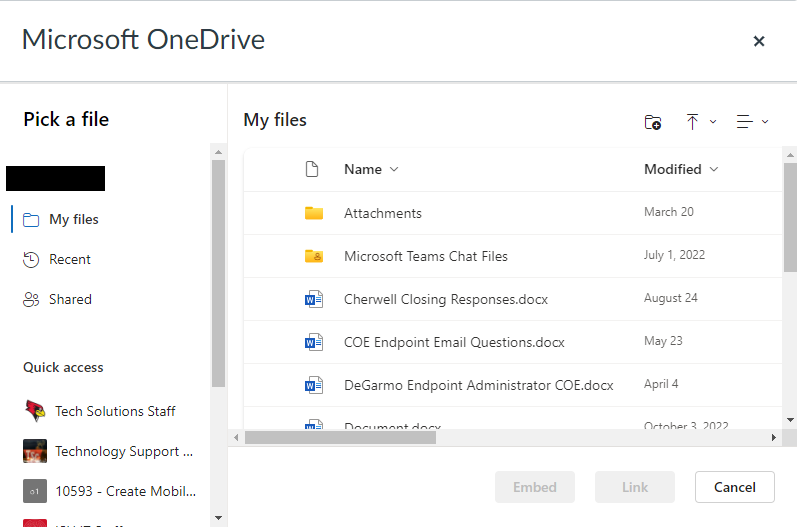
- Once you have signed in, you will see your Microsoft OneDrive files and documents (Figure 5):
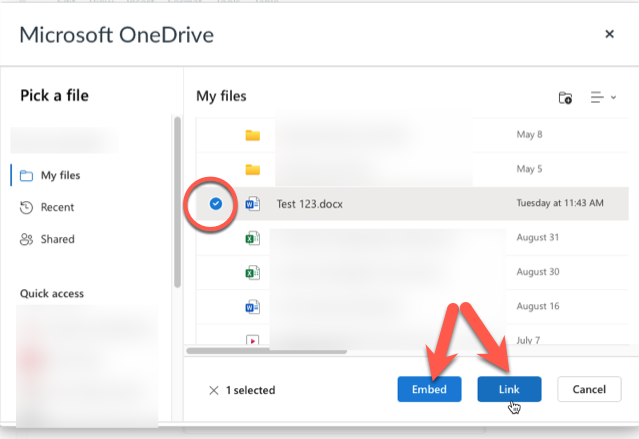
Figure 5: - Select next a resource you would like to add to your Canvas course, and select either Embed to display the content with the Rich Content Editor or Link to simply insert a link to the content (Figure 6):
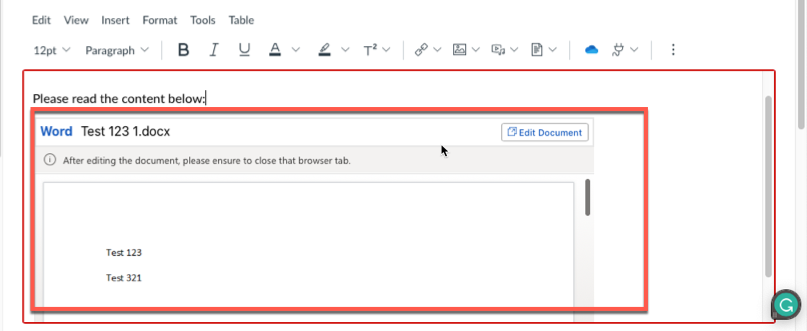
- Examples of how the Embed and Link options will appear in your in your course can be seen in Figures 7 and 8 below:
Figure 6:
Figure 7 (Embedded Content):
Figure 8 (Linked Content):
- Examples of how the Embed and Link options will appear in your in your course can be seen in Figures 7 and 8 below:
You have now added the OneDrive content to your Canvas course via the Canvas Rich Content Editor.
- Link OneDrive Content Within a Canvas Module
To do so follow the steps below.
- Navigate to the Canvas course in which you are wanting to add OneDrive content to a module.
- Click on Modules (Figure 1):
Figure 1: - At this point, you will then click on the " + " sign on the module you are wanting to add a document (Figure 2):
Figure 2: - You will see a pane with a field labeled Add. Click the arrow next to that to access the dropdown menu. Select External Tool (Figure 3):
Figure 3: - Scroll down and select Microsoft OneDrive (Figure 4):
Figure 4: - You will be prompted to login to your Microsoft 365 account if you are not already logged in.
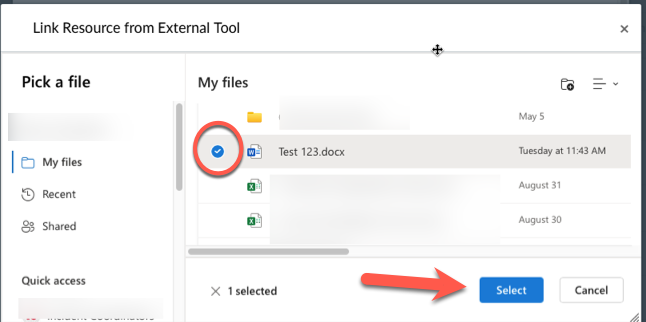
- Once you have authenticated, you will now see your files on OneDrive. Select the file you want to add to your Module and then click on Select (Figure 5):
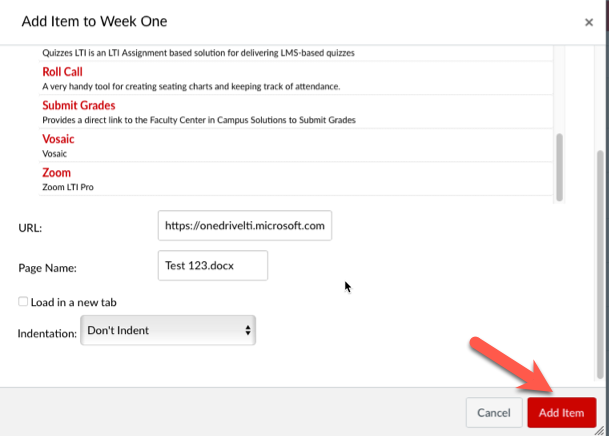
Figure 5: - That file will will then start to download and bring you back to the previous window. Scroll down to view the download and for the options to Load in a new tab or Indent the item. Once you have made your selections, click Add Item (Figure 6):
Figure 6:
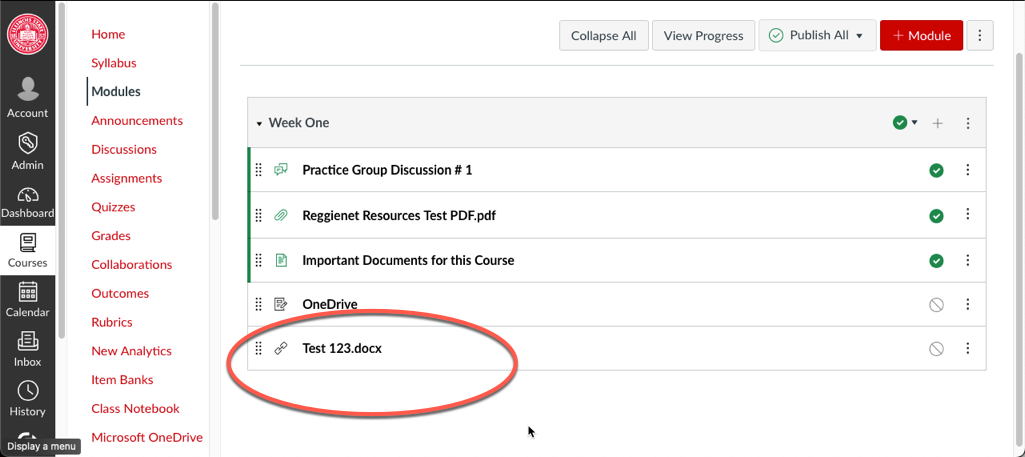
The window will close and you will see the document that you added to your Module (Figure 7):
Figure 7:
Note
The document will not be published until you click on the gray cancel icon and change it to a green check mark
How to Get Help
Technical assistance is available through the Illinois State University Technology Support Center at:
- Phone: (309) 438-4357
- Email: SupportCenter@IllinoisState.edu
- Submit a Request via Web Form: Help.IllinoisState.edu/get-it-help
- Live Chat: Help.IllinoisState.edu/get-it-help
