Accessibility
Tagging Table of Contents in Adobe Acrobat Pro
Last modified 10/28/2024
Tagging the Table of Contents (TOC) in a PDF is crucial for ensuring the document’s accessibility, especially for users relying on screen readers or other assistive technologies. Properly tagged TOCs allow these users to easily navigate through the document by providing a structured, clickable list of sections and headings. Without proper tagging, screen readers may either skip the TOC or read it in a confusing, unorganized manner, making it difficult for users to find relevant information. Follow these steps to make your Table of Contents accessible.
This guide outlines the steps for tagging a Table of Contents from scratch in Adobe Acrobat. While documents created in Microsoft Office typically have their tags imported automatically, this guide can also be used to review and adjust an already tagged Table of Contents to enhance its accessibility. Follow these steps to make your Table of Contents accessible.
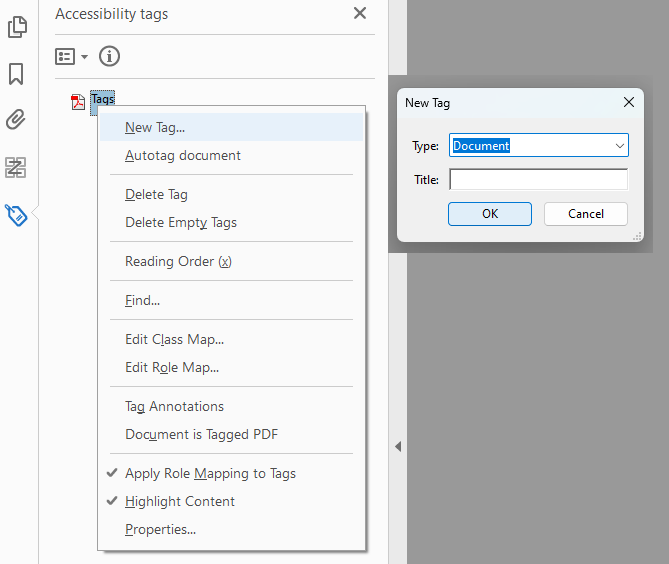
Step 1: Open Tags Panel and Create Tags Root
Do you need help locating the Tags panel? Learn more in this guide: Understanding the Tags Tree and Tags Panel in Adobe Acrobat Pro.
Step 2: Add a Document Tag
Add a Document tag as the parent tag by right-clicking and selecting "New Tag", then choosing "Document
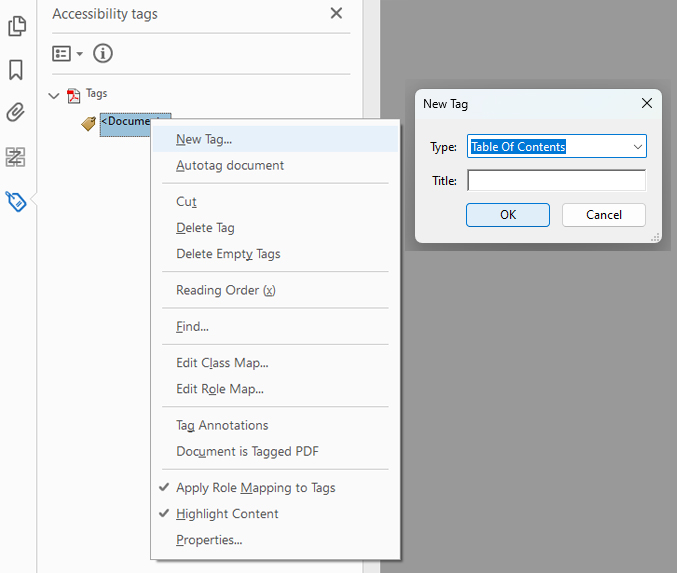
Step 3: Create a Table of Contents Tag
- Right-click on the Document tag
- Select "New Tag"
- Choose "TOC" (Table of Contents)
- Make sure it is nested inside the Documents Tag
Step 4: Create Table of Contents Item (TOCI) Tags
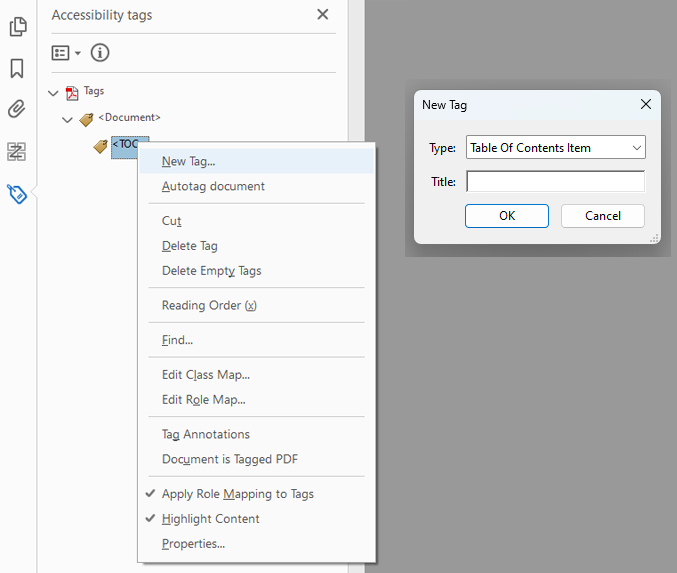
Inside the TOC tag, create Table of Contents Item (TOCI) tags for each entry:
- Right-click on the TOC tag
- Select "New Tag"
- Choose "TOCI"
- Make sure it is nested inside the TOC Tag
Step 5: Add Contents to the TOCI Tags
To add content to the TOCI tags:
- Select the TOCI tag
- Go ahead to highlight the text in the document
- Right-click on the empty TOCI tag
- Choose "Create Tag from Selection"
- Repeat steps 5 for each TOCI entry.
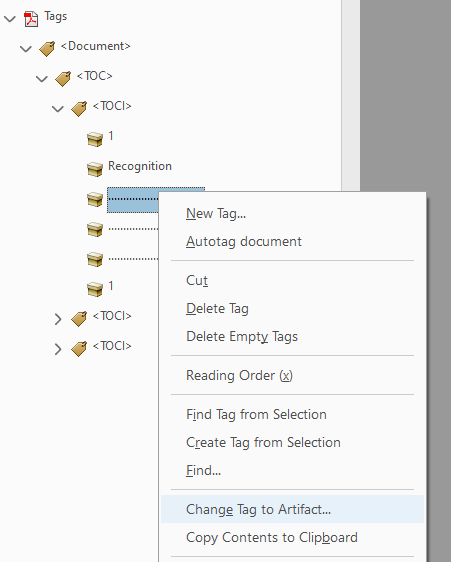
Step 6: Tag Leader Dots
For leader dots:
- After the TOCI items have been tagged,
- Right click on each leader dots tag in the Tags panel.
- Choose "Create Artifact" to remove them from the tag structure.
Adding links to the TOC entries
Adding links to Table of Contents (TOC) entries is important because it benefits everyone, not just individuals with disabilities. Linked TOC entries allow all users to navigate a document more easily, offering quick access to specific sections with a single click. This improves the overall user experience, making lengthy or complex documents more accessible and user-friendly. By incorporating linked TOCs, you're ensuring a smoother reading and navigation experience for all users, while also meeting accessibility guidelines.
Steps to Add Links to TOC Entries in Acrobat
Step 1: Highlight the text
Start by highlighting the text in the Table of Contents that you want to link to its respective page.
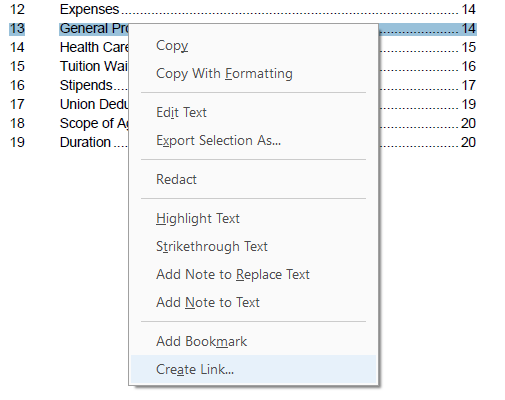
Step 2: Create Link
Once the TOC entry is highlighted, right-click to bring up the options menu and select "Create Link" from the list.
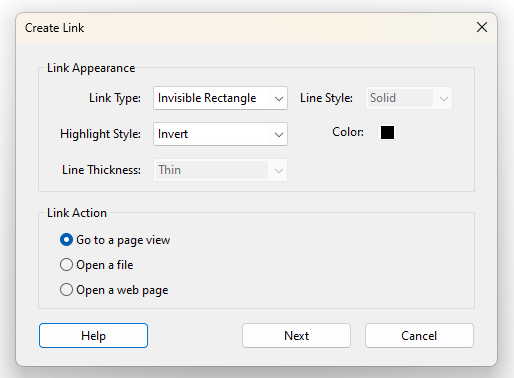
Step 3: Set Link Action
A pop-up window will appear with different link actions. Choose "Go to a Page View" and click Next to proceed.
Step 4: Set Link Destination
Use the scrollbars to navigate to the section of the document that corresponds with the selected Table of Contents Item. When you've reached the right page, click Set Link to confirm the action.
Step 5: Link all TOC Items to Pages
5. Continue linking each TOC item to its appropriate page.
Review the Tags
After linking all Table of Contents items, review the document's structure to ensure that all TOC items are properly nested under the TOC tag. It’s essential to verify that all links direct to the correct pages and ensure that all content, including TOC entries, is correctly tagged or, if unnecessary, marked as an artifact to avoid confusing screen readers.
By following these steps, you improve both the functionality and accessibility of your document, ensuring that it’s navigable for everyone and compliant with accessibility standards.
