Information Security
Guidance for Securely Receiving Highly Sensitive Information
Last modified 2/28/2023
This guidance provides individuals with instructions on how to securely receive highly sensitive information from others whether they are internal or external to the University.
- Step 1: Confirm the Sensitivity of the Information
The first step in securely receiving highly sensitive information is to determine that it is indeed highly sensitive. Sometimes we may feel something is highly sensitive but in reality it is not formally classified as such or otherwise regulated.
Consider the following factors to confirm sensitivity:
- Is the type of information classified as Highly Restricted in the 9.8.1 Data Classification Procedure of the University?
- Is the type of information generally recognized as confidential and nonpublic? (e.g. Social Security number)
- Is the type of information specifically controlled by regulation and defined as sensitive? (e.g. FERPA and privacy of education records, HIPAA and protected health records)
If you cannot make a determination yourself, consult with the Information Security Office.
- Step 2: Determine Frequency and Volume
Consider how often you will receive such information. In many cases, there is a one-time or infrequent need to receive such information. In other cases, departments will have a defined process that requires repeated submissions from a various sources of the information. Depending on your circumstance, you have different options we would recommend.
- Step 3: Consider Options for Use Case
Consider which of the following use case examples fits your situation best.
Scenario 1
I need to receive a data file about several people with highly sensitive information about them. This is not something I usually receive, but my current situation/assignment/project requires it.
Recommendation: Step 3a.
Scenario 2
I need to receive a form that many different individuals will send. Submissions will happen occasionally throughout the year, but specifically in bulk around the start of the semester.
Recommendation: Step 3b.
Scenario 3
I need to receive a form and an image of a government ID from an unknown number of people. Submissions occur based on circumstances and need, but when the situation requires, the submission is handled the same.
Recommendation: Step 3b.
- Step 3a: Infrequent or Single Time
If you need to receive highly sensitive information once or very infrequently, we recommend that you use the SendTo system.
About SendTo
SendTo is a file sharing service operated by Illinois State University to specifically handle the transfer of sensitive files and information. Files can be sent to or from internal or external individuals of the University.
Important: If you are on the campus network or VPN, visiting https://sendto.illinoisstate.edu will automatically take you to the Central Login screen. If you are not on the campus network or VPN, you will see the homepage of SendTo which gives an option to use SSO or register a local account. External individuals must register a local account within SendTo.
- Step 3b: Standardized and Repeated Submissions
If you need to receive highly sensitive information as part of a standard process, we recommend that you request a SendTo System Filedrop.
About SendTo
SendTo is a file sharing service operated by Illinois State University to specifically handle the transfer of sensitive files and information. Files can be sent to or from internal or external individuals of the University.
Important: System Filedrops are web forms that anyone can visit and submit without signing in. The submissions are only delivered to the recipients set when the filedrop is created.
Request a SendTo System Filedrop
To request a SendTo System Filedrop, submit the following information in email to informationsecurity@ilstu.edu:
- Short name of system file drop - All one word (e.g. reggiefeedback). Alphanumeric. Used for the web address (e.g sendto.illinoisstate.edu/filedrop/reggiefeedback).
- Display title - Displayed at the top of the form.
- Description - A few sentences explaining the purpose of the form. This can be customized as a list if there are steps to complete before submission.
- Recipient - The email address of the primary individual to receive notifications and access the submissions. Cannot be an alias or group email address.
- Carbon copy recipients - Additional email addresses of individuals to receive notifications and gain access. This can include an alias or group email, but only for notifications not access.
- Download receipts - True or false. Sends an email notification to all recipients and/or the submitter when the submission is accessed.
- Custom fields - By default, a system filedrop will have email, subject, and message along with the file attachment. Additional fields can be added such as phone number, ID number, etc.
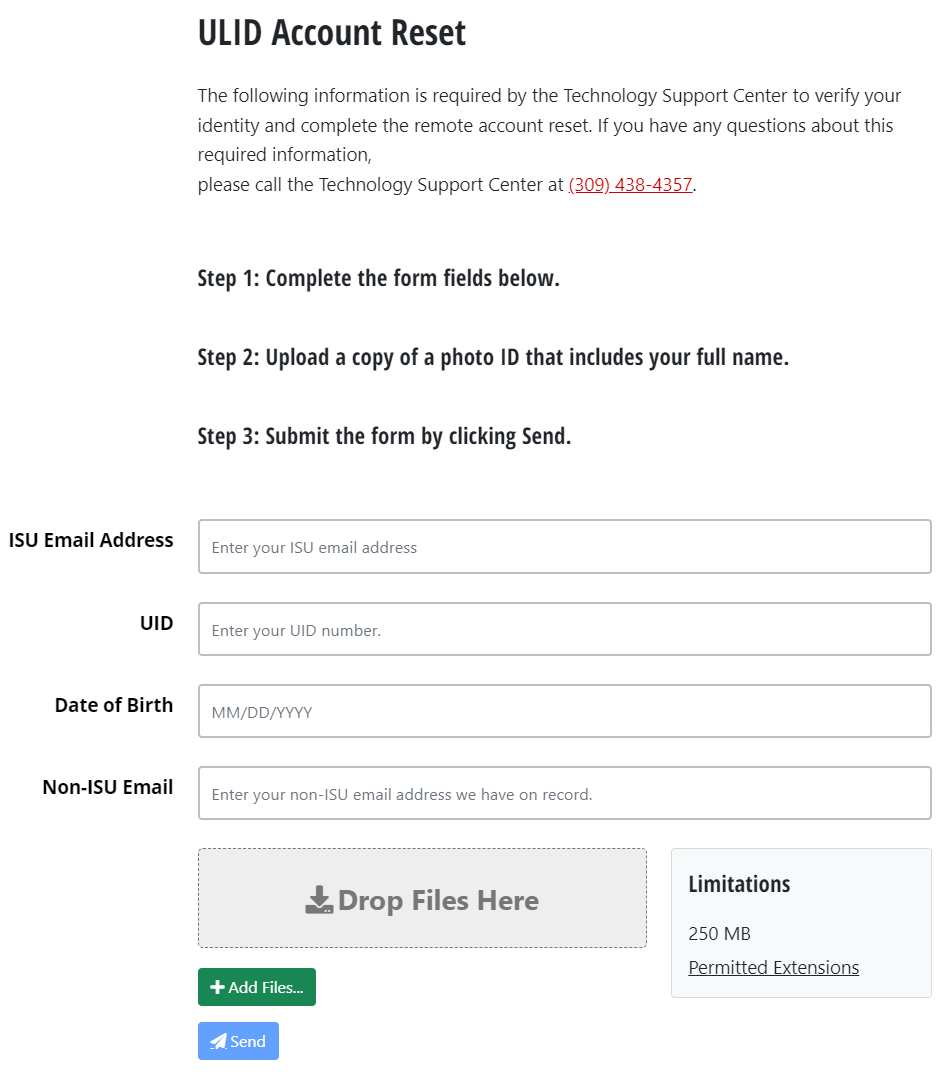
Example: The following image provides an example of a SendTo System Filedrop used by the Technology Support Center.
If you still have questions or are unsure of which option is best for your use case, email informationsecurity@ilstu.edu for assistance.
Feedback
To suggest an update to this article, ISU students, faculty, and staff should submit an Update Knowledge/Help Article request and all others should use the Get IT Help form.
