E-Commerce
Mobile Terminal Guide
Last modified 3/28/2024
This guide outlines the payment processing options for A920 mobile terminals.
- Run a Transaction
- Open the payment processing app from the terminal's home screen
- Navigate to the 'Credit' tab
- Click the 'Sale' button
- Enter the transaction amount and press 'Confirm'
- Follow on-screen instructions for customer payment on the terminal
- Prompt the customer to swipe, tap, or insert their card
- The merchant receipt will print first
- Confirm the customer receipt prints when prompted
- Re-Print a Receipt
Re-Print Last Receipt
- Open the payment processing app from the terminal's home screen
- Navigate to the 'Func' tab
- Select 'Re-Print'
- Choose 'Print Last' to print the most recent receipt
Re-Print Any Receipt
- Open the payment processing app from the terminal's home screen
- Navigate to the 'Func' tab
- Select 'Re-Print'
- Choose 'Print Any'
- Enter the transaction number for the receipt that needs to be reprinted
- Void a Transaction
- Open the payment processing app from the terminal's home screen
- Verify you are in the 'Credit' tab
- Select 'V/Sale'
- Enter the transaction number you wish to void
- Select the 'Confirm' button
- Confirm the Void Sale receipt prints when prompted
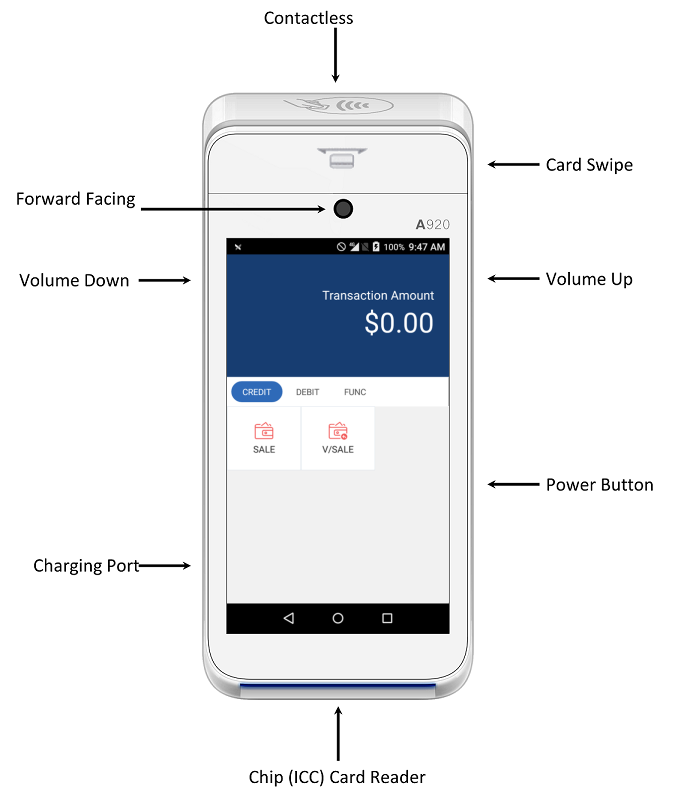
- Setting Up the Terminal
Initial Setup
- Plug the terminal in with a micro USB charging cable
- After plugging in the terminal, tap the power button to display the charge of the battery
- Hold down the power button for three seconds to turn on the terminal
- Refer to the graphic for questions regarding the available features on the terminal
- Closing a Batch
Note: Merchants are required to close a batch at the end of the day to submit all transactions for processing. Terminals will batch automatically if they remain plugged in overnight.
- Open the payment processing app from the terminal's home screen
- Go to the 'Func' tab
- Select 'Batch'
- Choose 'Batch Close'
Confirm the Batch receipt prints when prompted
- Processing a Refund
- Log into https://magic.collectorsolutions.com/magic-ui/Login/illinois-state-university with a Merchant Refund Account authorized to perform refunds
- Obtain the transaction date and identifying information from a receipt or a printed report
- Click the 'Payment Search' option at the top of the webpage
- Enter one of the following into the 'Search Text' box:
- Reference Number
- Confirmation Number
- Authorization Code
- The last four digits on the credit card
- Transaction Amount
- Advanced Search Options (if no Reference Number):
- Click 'Show Advanced Search Options'
- Change 'Type of Criteria' based on entered data
- Set 'Date From' and 'Date To' to the day of the transaction
- Complete the search by clicking the 'Search' button
- If the correct transaction is not found, consider the following:
- The transaction may not be in the system yet (8 AM the day following batch close)
- The transaction may belong to another merchant account
- There may be an error in your search criteria
- Once the correct transaction is found, select the 3-dot button in the 'options' column on the transaction
- Click the 'Process Credit' button
- Type the refund amount (up to the original transaction amount) in the “Amount To Credit” column
- Add notes in the “Notes” field to document the reason for the refund (e.g., “Charged 100.00 instead of 10.00”)
- Click the “Process Credit” button
- Use the 'Print Receipt' or 'Email To' buttons at the bottom of the page to send the customer the receipt or keep a copy for your records
Feedback
To suggest an update to this article, ISU students, faculty, and staff should submit an Update Knowledge/Help Article request and all others should use the Get IT Help form.