Technology
Upload and Manage Files in Canvas Files
Instructors may upload files into their Canvas course, from which they may share the content within their course.
Note: Each Canvas course has a file storage limit of 2 GB. If you are approaching this limit in one of your Canvas courses, you may need to consider alternative file storage/sharing options. For more information, please see:
Upload Files and Manage Permissions
Select the appropriate tab below for information about Uploading Files and Managing Permissions in Canvas
To upload a file into a Canvas course, please follow the instructions below:
- Navigate to Canvas and login at canvas.illinoisstate.edu/.
- Select the course to which you would like to upload a file(s).
- Once in the course, select Files from the course navigation bar on the left.
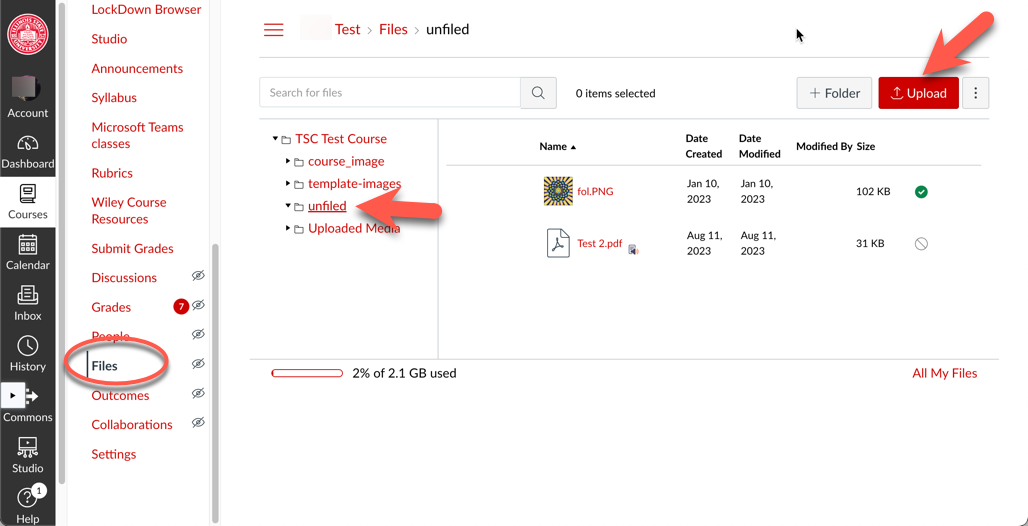
- In Canvas Files, navigate to the folder in which you would like to upload the file, or click + Folder to create a new folder in Files. Once in the desired folder, you may drag and drop the file into the file list, or you may click Upload to navigate to the location of the file and select to upload it (Figure 1):
Figure 1:
Once you have uploaded to desired file(s) into Canvas, you must ensure the appropriate permissions have been set on the items in Files. Visibility permissions may be set on the Files section itself, as well as on individual folders, and then on individual files. Note that files inherit their permissions from the folder in which they reside. This means:
- A file cannot allow greater visibility than the folder in which it resides
- A file can allow for restricted visibility beyond that allowed by the folder in which it resides.
Who Can See Restricted/Hidden Resources?
Users will the following roles will be able to see hidden resources:
- Teacher
- Co-Teacher (Unofficial)
- TA
- TA-Grades Only
- Designer
Users will the following roles will be unable to see hidden resources:
- Student
- Student (Unofficial/Auditor)
- Observer
- Files Section Visibility
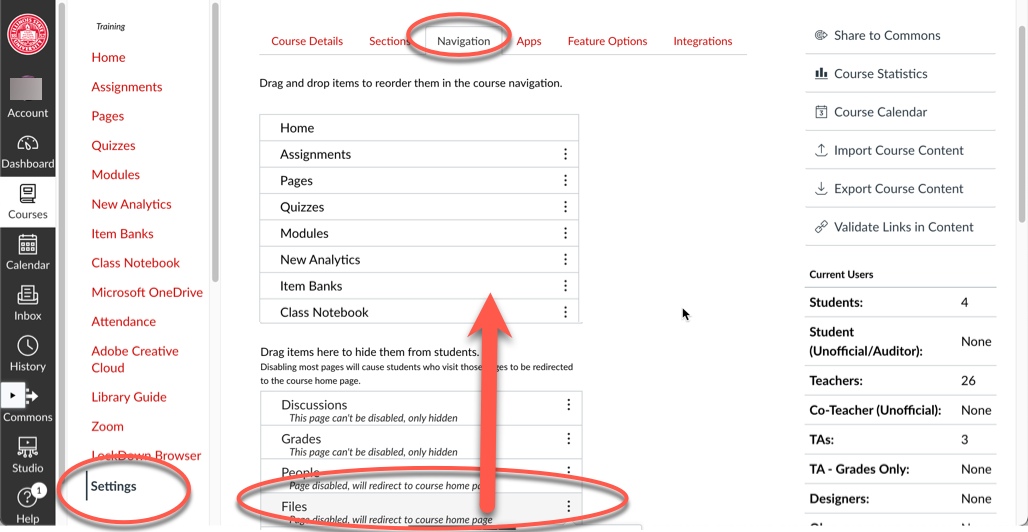
The Files section itself may be either hidden, or visible to students. If an instructor wishes to hide the Files section, users with the Student/Observer roles will not see the Files section in their course navigation bar, while those with the Teacher/TA/Designer roles will observe an eye with a line through it next to the item in course navigation. Even if the Files section is hidden from students, instructors can still elect to share content stored within Files with students.
To Hide Files:
Navigate to course Settings > Navigation and drag Files from the hidden section into the unhidden section (Figure 1):
Figure 1:
- Set Folder Permissions
Set folder permissions as follows:
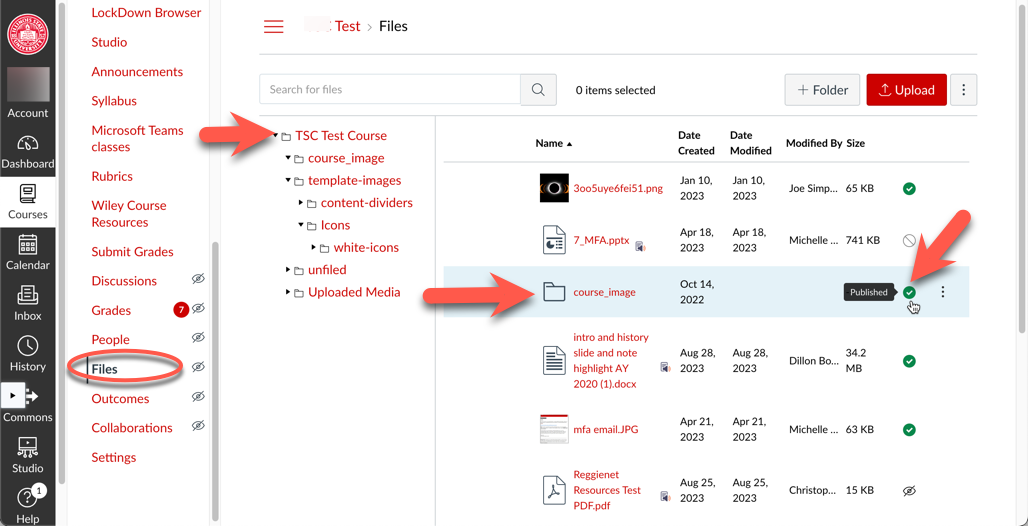
- In the Files section, instructors may assign folder permissions by locating the selecting the top-level of the file structure in Files (or if the folder is nested within another folder, select the folder in which the target folder resides. Then select the permissions icon next to the target folder in the folder/files list in the right side of the screen to open the Permissions Editor.
- In the example below we selected the top-level of the file structure (TSC Test Course) since the target folder (course image) resides in that folder. We then see the contents of the TSC Test Course on the right side of the screen (Figure 1):
Figure 1:
- In the example below we selected the top-level of the file structure (TSC Test Course) since the target folder (course image) resides in that folder. We then see the contents of the TSC Test Course on the right side of the screen (Figure 1):
- In the Permissions Editor, select the desired setting for the folder (Figure 2):
- Publish: This setting will allow anyone to see the contents of the folder.
- Unpublish: This setting will hide the contents of the folder from everyone except the instructor, co-instructors, and administrators.
- Only available with link: This setting will allow anyone with whom the instructor has shared a link to view the contents of this folder. This includes links shared within the Canvas course (i.e. in Assignments, Discussions, Quizzes etc.) that students may click on to access.
- Schedule availability: This setting will allow an instructor to select a start and end date between which the contents of the folder will be visible to students. Outside of the specified timeframe, the contents of the folder will remain hidden from students.
The contents of the folder will now inherit the permissions you set for the folder. Individual files, or folders, contained in this folder may still be hidden from view however, as described in the next section.
- Set File Permissions
Set file permissions as follows:
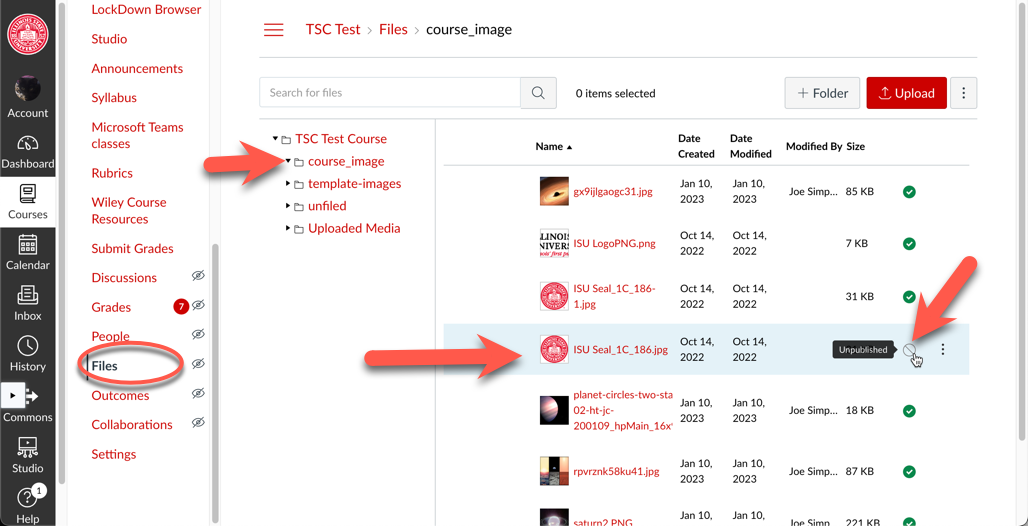
- In the Files section, instructors may assign file permissions by locating and selecting the folder in which the target file resides. Then select the permissions icon next to the target file in the files list in the right side of the screen to open the Permissions Editor.
- In the example below we selected the folder (course image) on the left side of the page, then we selected permissions next to the target file (ISU Seal_1C_186-1.jpg) from the list of the folder contents on the right side of the screen (Figure 1):
Figure 1:
- In the example below we selected the folder (course image) on the left side of the page, then we selected permissions next to the target file (ISU Seal_1C_186-1.jpg) from the list of the folder contents on the right side of the screen (Figure 1):
- In the Permissions Editor, select the desired setting for the file (Figure 2):
- Publish: This setting will allow anyone to see the contents of the folder.
- Unpublish: This setting will hide the contents of the folder from everyone except the instructor, co-instructors, and administrators.
- Only available with link: This setting will allow anyone with whom the instructor has shared a link to view the contents of this folder. This includes links shared within the Canvas course (i.e. in Assignments, Discussions, Quizzes etc.) that students may click on to access.
- Schedule availability: This setting will allow an instructor to select a start and end date between which the contents of the folder will be visible to students. Outside of the specified timeframe, the contents of the folder will remain hidden from students.
The contents of the file will now be hidden or visible to students based on your selection above. Reminder that you may not allow for greater visibility than the parent folder allows, but you can allow for less visibility than allowed by the parent folder.
How to Get Help
Technical assistance is available through the Illinois State University Technology Support Center at:
- Phone: (309) 438-4357
- Email: SupportCenter@IllinoisState.edu
- Submit a Request viaWeb Form: Help.IllinoisState.edu/get-it-help
- Live Chat: Help.IllinoisState.edu/get-it-help


