Accessibility
Creating Fillable Forms in Microsoft Word 2016 and previous
Last modified 4/14/2023
For older versions of Microsoft Word, follow the steps below to add accessible fillable form fields using the Legacy Tools.
Add Title to Form Document
All documents should have a title that represents the content of the document.
Step 1. Select File.
Open your Word document and select File from the Main Tabs.
Step 2. Type in Title.
In the Info screen, type your descriptive title into the text field marked Title.

Open Developer Tab in the Word Ribbon.
If the Developer Tab is not available as a Main Tab choice, follow these steps to add the Developer Tab.
Step 1. Open the Word Options Menu
Select the File Tab then choose Options from the list of choices. From the Word Options menu, select Customize Ribbon.
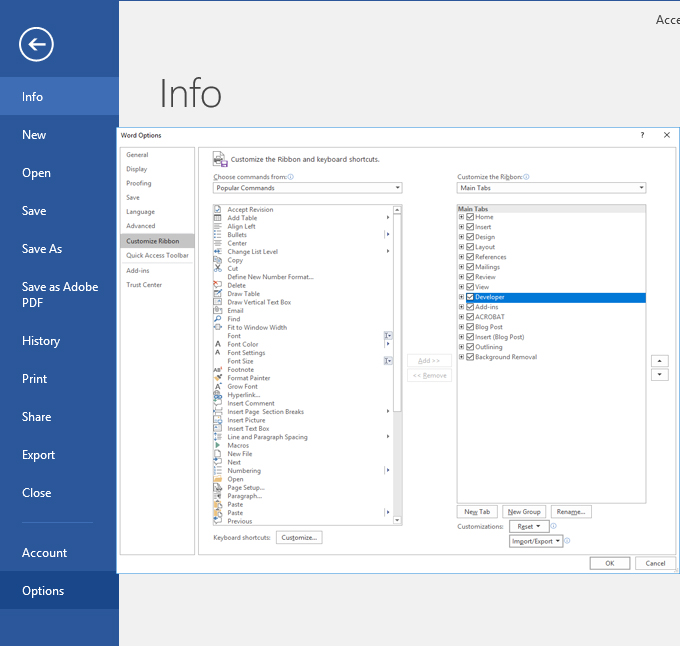
Step 2. Customize the Ribbon
Under the Customize the Ribbon, select "Main Tabs" from the option box then check "Developer" checkbox from the list of choices. Select OK to close the Word Options Menu. The Developer Tab will appear in the Tab options along with File, Home, Insert, etc.

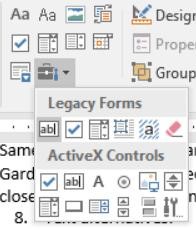
Step 3. Open Legacy Tool Options.
The Legacy Tools, unlike the Content Control tools, have the ability to add Help Text to each field. Adding Help Text communicates a form field's label and other important information to assistive technology. Select the Developer Tab then choose the icon with the Tool box to open the Legacy Tools.

Edit Boxes
An edit box is a text form field used to respond to a question by entering text. The place to type text is typically indicated visually by a highlighted area and a flashing cursor.
Step 1. Place cursor for Text Field.
Place cursor at the beginning of the space where you want to add an edit box. Remember to keep the visual label of your field close to the edit box, typically directly to the left.
Step 2. Select the Text Form Field option.
In the Legacy Tools and under the Legacy Forms heading, choose the icon with an "ab|" to select the Text Form Field option.
Step 3. Open Text Form Field Properties.
Right click on the shaded edit box then choose Properties from the drop-down menu to open the Text Form Field Options dialogue box.
Step 4. Change Bookmark edit box.
In the Bookmark edit box, rename the field to match the field name from the form label. Spaces are not allowed in this field, instead use mixed case/CamelCase for more than one word.
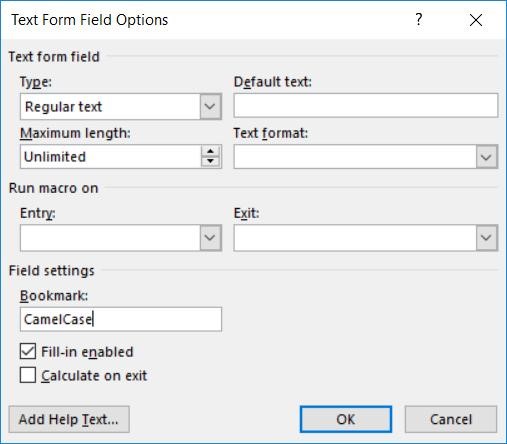
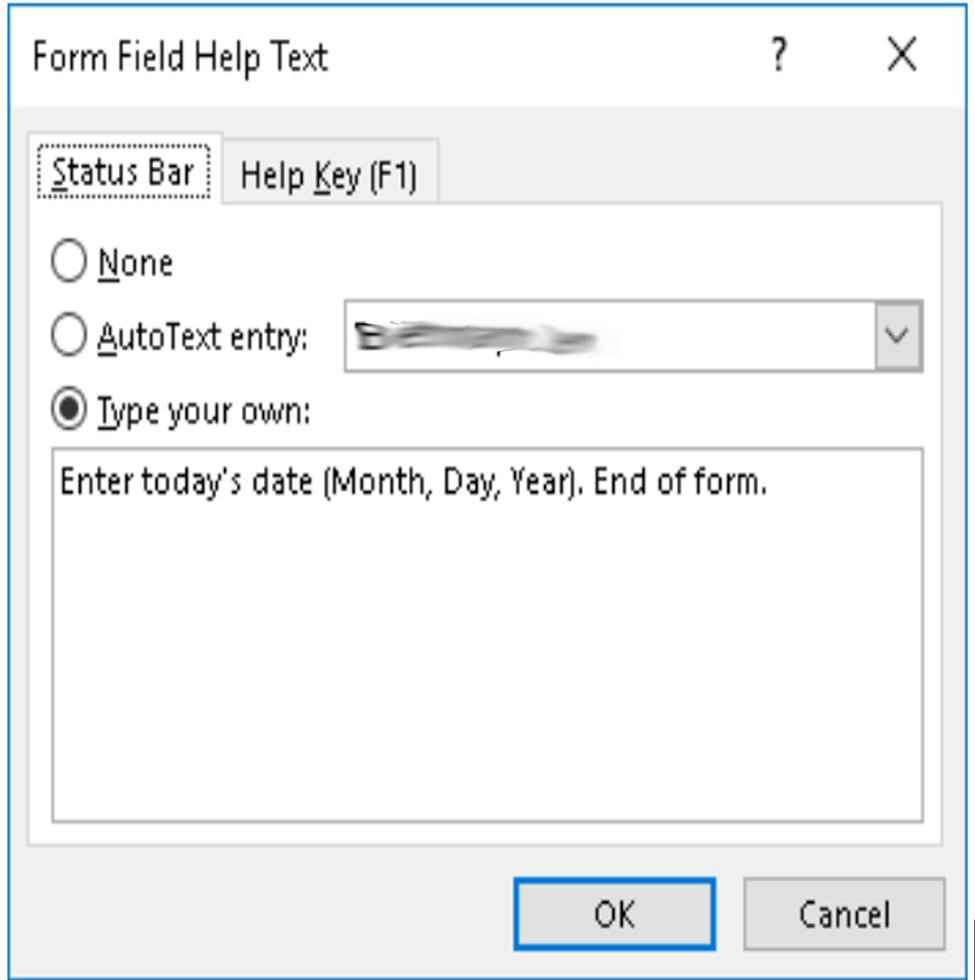
Step 5. Add Help Text.
Choose the Add Help Text button. Select the Type Your Own radio button then type helpful instructions (include the form field's label) or a meaningful prompt message for assistive technology users. The field size is limited to 138 characters.
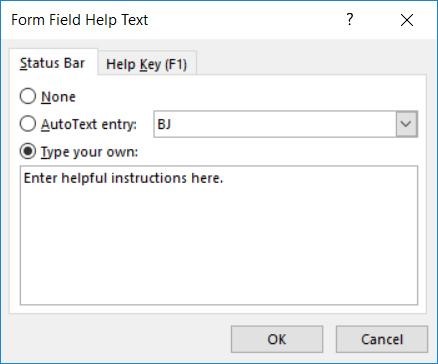
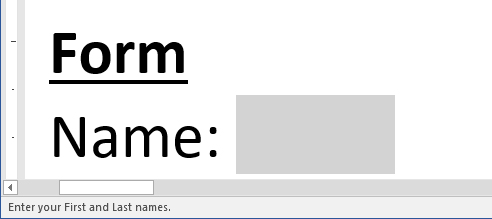
Select OK on all menus and dialogue boxes. Once the form is complete, the help text message will appear on the word status bar at the bottom left corner of the screen when the form field is selected.
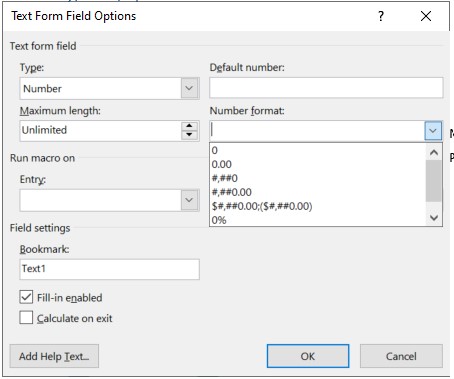
Optional. Enforce text formatting
To enforce text formatting you must be in the Legacy Tools Text field. Navigate to the text field properties to open the Text Form Field Options dialog box. From the dialog box, select a format option from the dropdown for Type. From the format dropdown type or or choose a format option.
Check Boxes
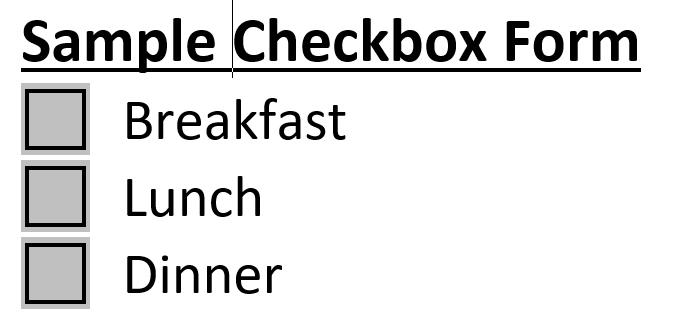
A check box is a small box to the left or right of an item a user can choose. When the check box is selected an X or a check mark appears in the box. When the item is not selected the box is blank.
Step 1. Place cursor for checkbox.
Place cursor in the space where you want to add a check box. Remember to keep the visual label of your check box close, typically directly to the left or right.
Step 2. Select the Check Box Form Field option.
From the Legacy Tools, choose the icon with the box and check mark to select the Check box Form Field option.
Step 3. Open Check Box Form Field Properties.
Right click on the shaded Check Box then choose Properties from the drop-down menu to open the Check Box Form Field Options dialogue box.
Step 4. Change Check Box Bookmark.
In the Check Box Form Field Options dialogue box, choose your check box size, and default value (unchecked or checked). In the Bookmark edit box, rename the field to match the field name from the check box label. Spaces are not allowed in this field, instead use mixed case/CamelCase for more than one word.
Step 5. Add Help Text.
Choose the Add Help Text button. Select the Type Your Own radio button then type helpful instructions (include the check box's label) or a meaningful prompt message for assistive technology users. The field size is limited to 138 characters.
Select OK on all menus and dialogue boxes. Once the form is complete, the help text message will appear on the word status bar at the bottom left corner of the screen when the form field is selected.
End of Form
Some people use assistive technology to navigate form fields and may not be able to see or know when the form is done. To help these people know where the form ends, enter the following sentence into the help text message of the last form field: "End of Form."
Protecting the Form
In order for the form fields to be fillable and navigable with the tab key you must lock the document and restrict unintentional editing.
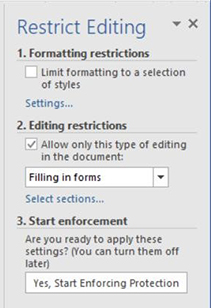
Step 1. Restrict Editing
From the Developer Tab select Restrict Editing Button from the Protect Group.

Step 2. Select Filling in Forms.
In the Restrict Editing Panel, select the check box next to Allow only this type of editing in the document then choose "Filling in forms" from the drop-down list box.
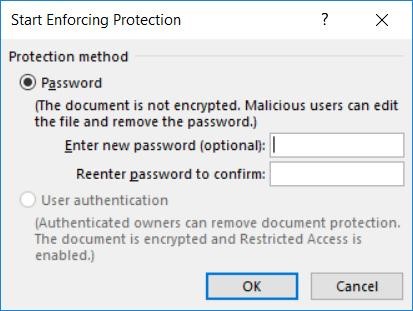
Step 3. Start Protecting
Choose the "Yes, Start Enforcing Protection" button. If the Start Enforcing Protection button is not selectable and grayed out, check to see if Design Mode has been turned off in the Developer Tab.
Step 4. Adding a Password (optional).
Adding a password is optional. To protect without a password, leave the password fields blank and choose the OK button. Please note, if you choose to add a password, it is not retrievable if you forget it later. Forms with forgotten passwords will need to be re-created to make changes.
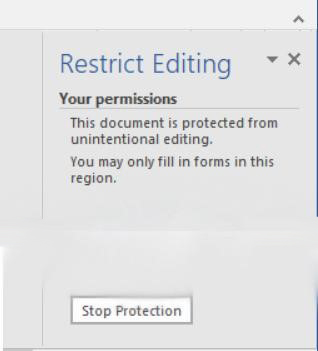
Step 5. Stop Protecting.
If you need to make changes to the form you may stop protecting the form by opening the Restrict Editing Panel (as mentioned above in Step 1). Choose the "Stop Protection" button at the bottom of the panel. Remember to restrict editing again once you have finished your changes.
Resources
For more information on formatting fields and other general form support: